Nikon D300 Review
来源:百度文库 编辑:神马文学网 时间:2024/04/26 11:32:20
Nikon D300 In-depth Review, Phil Askey, March 2008

Review based on a production Nikon D300
Just under two years since the D200 Nikon reveals the D300, the range of changes is so significant that it wouldn't be inappropriate to call it a 'compact D3' (less the full-frame sensor of course). From the top there's a new CMOS sensor with twelve megapixels, a new auto-focus sensor with 51-points (15 of which are cross-type sensitive), there's focus tracking by color, scene recognition, Picture Control presets, six frames per second continuous shooting (or eight frames per second with a battery pack), Compact Flash UDMA support, Live View (with contrast detect AF) and the mighty impressive 3.0" 922,000 pixel LCD monitor (oh and HDMI video output). It's an impressive list, the D200 was a fair step up from the D100, the D300 can be seen as just as big a step, certainly more than enough to make the competition sweat.
Model line history
Model
Announced
Effective pixels
Auto focus
Continuous highest (JPEG)
LCD monitor
D100
Feb 2002
6.0 mp
5 point
3.0 fps, 6 frames
1.8", 120K pixels
D200
Nov 2005
10.2 mp
11 point
5.0 fps, 37 frames
2.5" 230K pixels
D300
Aug 2007
12.3 mp
51 point
6.0/8.0 fps, 100 frames
3.0" 922K pixels + Live View
Nikon D300 Key Features
12.3 megapixel DX format CMOS sensor
Self-cleaning sensor unit (low-pass filter vibration)
ISO 200 - 3200 (6400 with boost)
14-bit A/D conversion
Nikon EXPEED image processor (Capture NX processing and NR algorithms, lower power)
Super fast operation (power-up 13 ms, shutter lag 45 ms, black-out 100 ms)
Shutter life 150,000 exposures
New Multi-CAM3500DX Auto Focus sensor (51-point, 15 cross-type, more vertical coverage)
Auto-focus tracking by color (using information from 1005-pixel AE sensor)
Auto-focus calibration (fine-tuning) now available (fixed body or up to 20 separate lens settings)
Scene Recognition System (uses AE sensor, AF sensor)
Picture Control image parameter presets (replace Color Modes I, II and III)
Custom image parameters now support brightness as well as contrast
Six frames per second continuous shooting (eight frames per second with battery pack)
Compact Flash UDMA support
3.0" 922,000 pixel LCD monitor
Live View with either phase detect (mirror up/down) or contrast detect Auto Focus
HDMI HD video output
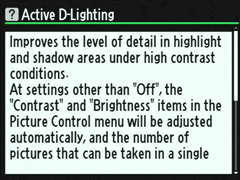
'Active D-Lighting' (adjusts metering as well as applying D-Lighting curve)
Detailed 'Control Panel' type display on LCD monitor, changes color in darkness
New MB-D10 vertical grip fully integrates into body, multi battery type compatible
Buttons sealed against moisture
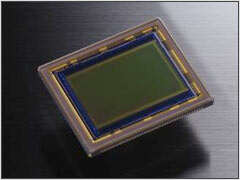
12.3 megapixel DX format CMOS sensor
Viewfinder pentaprism


Main board with EXPEED processor
EXPEED processor


51-point Multi-CAM 3500DX AF sensor module
51 AF point locations in frame (approx.)


1005-pixel metering sensor
Shutter
Nikon D300 vs. D200 feature and specification differences

Nikon D300

Nikon D200
Sensor
• 12.3 million effective pixel CMOS
• DX format
• 10.2 million effective pixel CCD
• DX format
A/D converter
14-bit
12-bit
Image processor
Nikon EXPEED
Unspecified
Image sizes
• 4288 x 2848
• 3216 x 2136
• 2144 x 1424
• 3872 x 2592
• 2896 x 1944
• 1936 x 1296
RAW files
NEF / Compressed NEF 14-bit
NEF 12-bit
TIFF files
Yes
No
Dust reduction
Self-cleaning sensor unit
No
Auto focus
• 51-point Multi-CAM 3500DX
• 15 cross-type sensors
• Contrast detect in Live View mode
• 11-point Multi-CAM 1000
Focus tracking by color
Yes
No
AF area mode
• Single point AF
• Dynamic Area AF [9 points, 21 points, 51 points, 51 points (3D-tracking)]
• Automatic-area AF
• Single Area AF
• Dynamic AF with Focus Tracking and Lock-on
• Group Dynamic AF
• Closest Subject Priority Dynamic AF
Sensitivity
• Default: ISO 200 - 3200
• Boost: ISO 100 - 6400
• 1/3, 1/2 or 1.0 EV steps
• Default: ISO 100 - 1600
• Boost: Up to ISO 3200
• 1/3, 1/2 or 1.0 EV steps
Continuous shooting
• With built-in battery: up to 6 fps
• With AC adapter or MB-D10 pack and batteries other than EN-EL3e: up to 8 fps
5 fps
Image Parameters
• Picture Control (4 presets)
• Sharpening
• Contrast
• Brightness
• Saturation
• Hue
• Presets (6 presets)
• Sharpening
• Tone
• Color mode
• Saturation
• Hue
Active D-Lighting
Yes (also adjusts exposure)
No
Viewfinder
100% frame coverage
95% frame coverage
LCD monitor
• 3.0 " TFT LCD
• 922,000 pixels
• 2.5 " TFT LCD
• 230,000 pixels
LCD Live View
• Handheld mode (phase detect AF)
• Tripod mode (contrast detect AF)
No
Compact Flash
Type I / II (UDMA support)
Type I / II
Vertical grip
MB-D10
MB-D200
Video output
HDMI (HD)
Composite (SD)
Menu languages
14
13
Dimensions
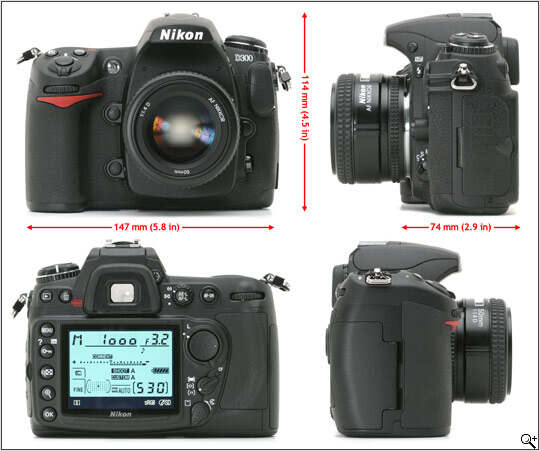
147 x 114 x 74 mm (5.8 x 4.5 x 2.9 in)
147 x 113 x 74 mm (5.8 x 4.4 x 2.9 in)
Weight (no batt)
825 g (1.82 lb)
830 g (1.8 lb)
Foreword / notes
If you're new to digital photography you may wish to read some of ourDigital Photography Glossary before diving into this article (it may help you understand some of the terms used).
Conclusion / recommendation / ratings are based on the opinion of the author, we recommend that you read the entire review before making any decision. Images which can be viewed at a larger size have a small magnifying glass icon in the bottom right corner of them, click to display a larger image in a new window.
To navigate this article simply use the next / previous page buttons or jump to a specific page by using the drop-down list in the navigation bar at the top of the page. You can support this site by ordering through the affiliate links shown at the bottom of each page (where available).
This article is protected byCopyright and may not be reproduced in part or as a whole in any electronic or printed medium without prior permission from the author.
Dpreview use calibrated monitors at the PC normal gamma 2.2, this means that on our monitors we can make out the difference between all of the grayscale blocks below. We recommend to make the most of this review you should be able to see the difference (at least) between X,Y and Z and ideally also A, B and C.

Nikon D300 specifications

Price (body only)
[check]
• US: $ 1799
• UK: £ 1299
• EU: € 1980
Body material
Magnesium alloy
Sensor *
• 23.6 x 15.8 mm CMOS sensor
• DX format
• RGB Color Filter Array
• Built-in fixed low-pass filter (with self-cleaning unit)
• 13.1 million total pixels
• 12.3 million effective pixels
• 3:2 aspect ratio
Image processor *
Nikon EXPEED
A/D conversion *
14 bit
Image sizes *
• 4288 x 2848 [L; 12.2 MP]
• 3216 x 2136 [M; 6.9 MP]
• 2144 x 1424 [S; 3.1 MP]
File formats
• NEF (12-bit or 14-bit *, compressed or lossless compressed RAW)
• NEF + JPEG
• TIFF *
• JPEG (EXIF 2.21)
NEF compression
• Compressed 12/14-bit NEF (RAW, Lossless compressed): approx. 60-80% *
• Compressed 12/14-bit NEF (RAW, Compressed): approx. 45-60%
Lens mount
• Nikon F mount with AF coupling and AF contacts
• 1.5x field of view crop
Usable lenses
• DX AF NIKKOR: All functions possible
• D-/G-type AF NIKKOR (excluding IX NIKKOR lenses): All functions possible (excluding PC Micro- NIKKOR)
• AF NIKKOR other than D-/G-type (excluding lenses for F3AF): All functions except 3D-Color Matrix Metering II possible
• AI-P NIKKOR: All functions except Autofocus, 3D-Color Matrix Metering II possible
• Non-CPU AI NIKKOR: Can be used in exposure modes A and M; electronic range finder can be used if maximum aperture is f/5.6 or faster; Color Matrix Metering and aperture value display supported if user provides lens data
Dust reduction *
• Self-cleaning sensor unit ('Clean image sensor') *
• Image dust-off data acquisition (Capture NX required)
Auto Focus
• 51 focus points (15 cross-type sensors) *
• Multi-CAM 3500DX *
• AF working range: -1 to +19 EV (ISO 100, normal temperature)
• Contrast Detect in Live View (Tripod) mode
Lens Servo
• Single Servo AF [S]
• Continuous Servo AF [C]
• Manual focus [M]
• Focus Tracking automatically activated by subject's status in [S] or [C] AF
Focus Point *
• Single point from 51 or 11 focus points
• Liveview (Tripod mode): Contrast AF on a desired point anywhere within frame
AF Area Mode *
• Single point AF
• Dynamic Area AF [9 points, 21 points, 51 points, 51 points (3D-tracking)]
• Automatic-area AF
Focus Lock
Focus can be locked by pressing shutter-release button halfway (single-servo AF) or by pressing AE-L/AF-L button
AF assist
Yes, lamp
Exposure modes
• Program Auto [P] with flexible program
• Shutter-Priority Auto [S]
• Aperture-Priority Auto [A]
• Manual [M]
Metering
TTL full-aperture exposure metering using 1005-pixel RGB sensor
• 3D Color Matrix Metering II (type G and D lenses); color matrix metering II (other CPU lenses); color matrix metering (non-CPU lenses if user provides lens data; metering performed)
• Center-weighted: Weight of 75% given to 6, 8, 10, or 13 mm dia. circle in center of frame or weighting based on average of entire frame (8 mm circle when non-CPU lens is used)
• Spot: Meters approx. 3 mm dia. circle (about 2.0% of frame) centered on selected focus point (on center focus point when non-CPU lens is used)
Metering range
• 3D Color Matrix Metering: 0 to 20 EV
• Center-Weighted Metering: 0 to 20 EV
• Spot Metering: 2 to 20 EV
• At normal temperature (20°C/68°F), ISO 100 equivalent, f/1.4 lens
Meter coupling
CPU and AI
Exposure lock
Locked using AE-L/AF-L button
Exposure bracketing
• 2 to 9 frames
• 1/3, 1/2, 2/3 or 1 EV steps *
Exposure compen.
• +/-5.0 EV
• 1/3, 1/2 or 1 EV steps
Sensitivity *
• Default: ISO 200 - 3200 in 1/3, 1/2 or 1.0 EV steps
• Boost: 100 - 6400 in 1/3, 1/2 or 1.0 EV steps
Shutter
• Electronically-controlled vertical-travel focal plane shutter
• 30 to 1/8000 sec (1/3, 1/2 or 1.0 EV steps)
• Flash X-Sync: 1/250 sec (up to 1/320 sec with reduced GN *)
• Bulb
DOF Preview
• Stop-down lens aperture by pressing button
• Activates modelling flash
White balance
• Auto (1005-pixel CCD, image sensor)
• Presets (seven) with fine tuning *
• Manual presets (four)
• Color temperature in Kelvin (2500 - 10000 K, 31 steps)
• White balance bracketing (2 to 9 frames, 10,20,30 MIRED steps)
Picture Control *
• Standard
• Neutral
• Vivid
• Monochrome
Image parameters *
• Sharpening: Auto, 7 levels
• Contrast: Auto, 5 levels, Custom tone curve
• Brightness: 3 levels
• Saturation: Auto, 5 levels
• Hue: 5 levels
Color space
• sRGB (Standard and Vivid modes)
• Adobe RGB (Neutral mode)
Viewfinder
• Optical-type fixed eye-level pentaprism
• Built-in diopter adjustment (-2 to +1m-1)
• Eyepoint: 19.5 mm (at -1.0m-1)
• Frame coverage 100% *
• Viewfinder magnification approx 0.94x with 50 mm f/1.4 lens
Focusing screen
• B-type BrightView Clear Matte Screen II
• Superimposed focus brackets
• On-demand grid lines
LCD monitor *
• 3.0 " TFT LCD
• 922,000 pixels (VGA; 640 x 480 x 3 colors)
• 170° viewing angle
• Brightness adjustment
LCD Liveview *
• Handheld mode: TLL phase-difference AF with 51 focus areas (15 cross-type sensors)
• Tripod mode: focal-plane contrast AF on a desired point within a specific area
Shooting modes
• Single frame
• Continuous Low [CL]
• Continuous High [CH]
• Liveview [LV]
• Self-Timer (programmable)
• Mirror-up mode
Continuous shooting *
• With built-in battery: up to 6 fps
• With AC adapter or MB-D10 pack and batteries other than EN-EL3e: up to 8 fps
• 12-bit RAW at full speed, 14-bit RAW only 2.5 fps
Continuous buffer
• JPEG Large/Normal: 100 shots (at 6 fps)
• RAW: no data yet
Self-timer
• 2 to 20 sec custom
Flash control
• TTL: TTL flash control by 1,005-pixel RGB sensor.
• Built-in Speedlight, SB-800, SB-600 or SB-400: i-TTL balanced fill-flash and standard i-TTL flash
• AA (Auto Aperture-type) flash: Available with SB-800 used with CPU lens
• Non-TTL Auto: Available with Speedlights such as SB-800, 28, 27, and 22S
• Range-priority manual flash; available with SB-800
Flash Sync Mode
• Front-curtain Sync (normal)
• Red-Eye Reduction
• Red-Eye Reduction with Slow Sync
• Slow Sync
• Rear-curtain Sync
Built-in Speedlight
• Manual pop-up with button release
• Guide number (ISO 200, m) approx 17 (manual 18)
• Guide number (ISO 100, m) approx 12 (manual 13)
Flash Accessory Shoe
ISO 518 standard-type hot shoe contact; Safety lock mechanism provided
Flash Sync Terminal
ISO 519 standard terminal, lock screw provided
Flash compensation
• -3 to +1 EV
• 1/3, 1/2 or 1 EV steps *
Creative Lighting System
With Speedlights such as SB-800, SB-600, SB-400, SB-R200, supports Advanced Wireless Lighting, Auto FP High-Speed Sync, Flash Color Information Communication, modeling flash and FV lock
Orientation sensor
Tags images with camera orientation
Playback mode
• Full frame
• Thumbnail (4 or 9 images)
• One-touch zoom
• Slideshow
• RGB histogram
• Shooting data
• Highlight point
• Auto image rotation
Languages *
• Chinese (Simplified and Traditional)
• Dutch
• English
• Finnish
• French
• German
• Italian
• Japanese
• Korean
• Polish
• Portuguese
• Russian
• Spanish
• Swedish
Custom functions
48 custom functions
Connectivity
• USB 2.0 (Hi-Speed) Mini-B connector
• HDMI video out (version 1.3a, Type A connector) *
• Remote control 10-pin terminal
• PC Sync flash terminal
10-pin terminal
• GPS: NMEA 0183 (Ver. 2.01 and 3.01) interface standard supported with 9-pin D-sub cable and GPS Cable MC-35 (optional)
• Remote control: via 10-pin terminal
Communications
FTP and PTP/IP file transfer with optional Wireless Transmitter WT-3 (IEEE 802.11 b/g)
Storage
• Compact Flash Type I or II
• UDMA *, Microdrive and FAT32 supported
• 36 characters of text can be input and stored in EXIF header
Power
• Lithium-Ion EN-EL3e (7.4 V, 1500 mAh)
• Included battery charger MH-18a
• Optional AC adapter EH-5a
• Optional MB-D10 battery pack / vertical grip *
Vertical grip *
• Optional MB-D10 battery pack / vertical grip
• One Rechargeable Li-ion Battery EN-EL4a, EN-EL4 or EN-EL3e or eight R6/AA-size alkaline (LR6), Ni-MH (HR6), lithium (FR6) batteries, or nickel-manganese ZR6 batteries
Battery monitoring
The LCD monitor on the camera back displays the following information
about the EN-EL3e battery:
• Remaining charge (%)
• No. of shots taken since last charge
• Battery life (5 stages)
Dimensions
147 x 114 x 74 mm (5.8 x 4.5 x 2.9 in)
Weight (no batt)
825 g (1.8 lb)
Weight (with batt)
903 g (2.0 lb)
Box contents
Rechargeable Li-ion Battery EN-EL3e, Quick Charger MH-18a, USB Cable UC-E4, Video Cable EG-D100, Strap AN-D300, LCD monitor cover BM-8, Body cap, Eyepiece Cap DK-5, Rubber Eyecup DK-23, Software Suite CD-ROM
Optional accessories
Multi-Power Battery Pack MB-D10, Wireless Transmitter WT-4, Magnifying Eyepiece DK-21M, AC Adapter EH-5a, Capture NX Software, Camera Control Pro 2
Body & Design
The D300 design is very similar to the D200, that's no bad thing, it's virtually the same size (very slightly taller), at the front there are new covers over the remote and PC sync terminals, at the rear a larger AF-ON button and a subtle re-arrange of the buttons down the left of the now larger LCD monitor. Build quality is just as good as the D200 (if not slightly better) and certainly in line with its 'bigger brother' the D3. The body is constructed from magnesium alloy, soft rubber is used on the grips both front and back as well as environmental seals on compartment doors. Just like the rest of the family the D300 features oversized buttons on the rear of the camera which are easier to use when wearing gloves.
There are numerous rubber gasket seals around body seams, controls and compartment doors. Nikon don't claim the camera to be waterproof but it's certainly more 'weather proof' than the average digital SLR. Remember that the camera is only as weather proof as its weakest link, this includes the lens mount and only a few of the more recent Nikkor lenses have rubber seals around the mount ring.

Side by side
Below you can see the D300 beside the recently announced ten megapixel Canon EOS 40D. Despite a $500 price difference (in Canon's favor) these two models are clear rivals and will be compared and contrasted by buyers and reviewers alike. The D300 weighs in at 903 g including its battery, the EOS 40D about 80 g lighter (the same weight as the D300's rechargeable battery).

In your hand
You really have to pick up the D300 to appreciate how nicely it fits into your hand, the ergonomics are great and the soft rubber used on the grip ensures holding the camera steady is an easy task. The control layout is also very sensible and easy to learn, even if you've never used a Nikon DSLR before clear labeling and logical positioning mean you'll be shooting and discovering the D300's features very quickly (and if you are coming from the D200 you'll be right at home because very little has changed).


LCD Monitor
One of the big changes to the D300 is the new high resolution screen. It has four times the number of dots than the 230,000 unit used on the D2X and other such cameras. For clarity, the words pixels and dots are interchanged almost randomly in specification sheets but strictly speaking we should talk of dots (these being red, green or blue sub-pixels) when referring to the figures quoted by manufacturers. The D300's LCD has 921,600 dots, 1920 columns by 480 rows, the dots are a third thinner than they are high and so each group of three dots (sub-pixels) make up one full color pixel.
This high resolution screen really has to be seen to be appreciated, it's beautifully detailed and extremely smooth in appearance because the tiny gaps between dots are too small to be seen with the eye. This extra detail is obvious in Liveview and playback modes where you really can see much 'more' of the image in one glance. Another difference comes when you magnify in playback as you find you don't need to magnify the image as much before you can clearly see sharpness, focus accuracy and even noise. Just like the D200 the D300 has a removable protective screen cover (shown with and without below).


One other difference between the D300/D3's screen and that used previously is the layout of the dots (sub-pixels), this new screen has the same layout as your computer LCD, a simple RGB layout with all rows the same ('stripe array'). The other layout used on small LCD screens is the 'delta array' which uses an RGB pattern on one row then a BRG pattern on the row below, offset by half a pixel.


Stripe array layout LCD Delta array layout LCD
Below you can see a real-life, same-size example of the difference in resolution between this new 921,600 dot screen and a more typical 230,400 dot screen (in this case on the Canon EOS 40D). Both cameras were set in play mode with the same image (note that the D300 doesn't use the whole screen in play unless you magnify), a shot was taken of each camera from the same distance (hence the screens were captured at the same magnification).


Crop from the D300's LCD
(1920 x 480 dots; 640 x 480 pixels) Crop from the EOS 40D's LCD
(960 x 240 dots; 320 x 240 pixels)
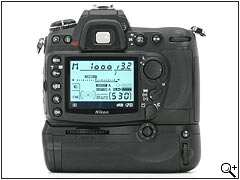
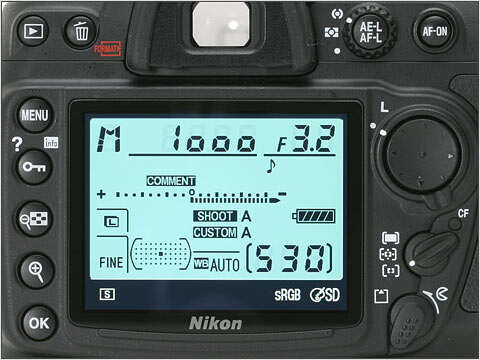
Top Control Panel
The D300 has one control panel on the top, this large display dominates the entire right top side of the camera and provides a full range of information covering photographic and digital settings. The panel has a green back light which can be illuminated by flicking the power switch to the lamp position, it's spring loaded and returns to 'ON', the back light stays on for the 'auto meter-off' time (CSM c2). You can also choose to have the backlights come on with any button press (CSM d8). Note that even when the camera is 'Off' this panel displays the number of frames remaining on the card or -E- if no card is inserted (an indication that the camera is never really powered off but instead in a sleep mode).

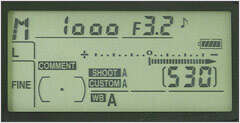
A breakdown of information displayed on the LCD panel can be found on the diagrams below.


*1 • Shutter-speed
• Exposure compensation value
• Flash compensation value
• ISO sensitivity
• White balance fine-tuning
• White balance preset number
• Number of shots in bracketing sequence
• Number of intervals
• Focal length (non-CPU lens) *2 • Aperture (f-number)
• Aperture (number of stops)
• Bracketing increment
• Number of shots per interval
• Maximum aperture (non-CPU lens)
• PC connection indicator
*3 • Number of frames remaining
• Number of shots remaining before buffer fills
• PC mode indicator
• Preset white balance recording indicator *4 • Electronic analog exposure display
• Exposure compensation
• Bracketing progress indicator
• PC mode indicator
Viewfinder
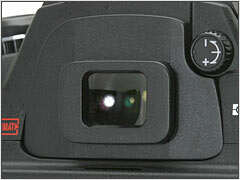
The D300's viewfinder view seems slightly larger than the D200 and the specs do note a frame coverage of 100% compared to the D200's 95%. To the right top corner of the removable eyepiece rubber is a diopter adjustment wheel. Unlike the D3 the D300 does not feature an internal viewfinder curtain.

The D300 features a new 51 point auto focus sensor, the center fifteen (3x5 grid) being cross point sensors even with F5.6 aperture lenses. There are two AF point selection modes (CSM a8), you can opt to be able to select from all 51 points or 11 points in the same layout as the D200.
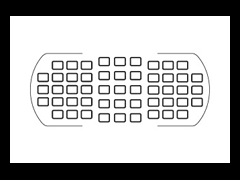

51 point AF selection mode 11 point AF selection mode
The image below isn't designed to be representative of a typical view through the viewfinder but instead shows the position of all possible information including all 51 AF points, battery status overlay and optional grid lines. Nikon has made it clear that they are not using etching to indicate the AF points but that all information is displayed using liquid crystal, hence when an AF point is not active there is no detrimental effect on the focusing screen.

1 Focus indicator 10 Electronic analog exposure display / compen.
2 Metering mode 11 Flash compensation indicator
3 Auto exposure lock 12 Exposure compensation indicator
4 Flash value (FV) Lock 13 ISO / Auto ISO indicator
5 Flash sync indicator 14 ISO sensitivity
6 Shutter speed 15 Exposures remaining / buffer / exp. value
7 Aperture stop indicator 16 Thousands indicator
8 Aperture (f-number / number of stops) 17 Flash-ready indicator
9 Exposure mode
Diagram reproduced with permission from the Nikon D300 user manual.
Battery and Charger
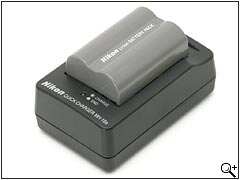 The D300 uses the same EN-EL3e battery we first saw on the D200. It has a quoted capacity of 1500 mAh at 7.4V (11.1 Wh) and charges on the supplied MH-18a quick charger. Note that the D300 is also compatible with the larger EN-EL4a battery when the MB-D10 battery grip is attached (see below).
Battery information available on the camera:
Top control panel has a five segment battery life indicator Camera Menu: Set Up -> Battery Info provides: Battery meter (as a percentage) Picture meter (estimated frames on current power) Charging Life (a scale from 0 to 4 indicating if the battery has come to the end of its useful life)
Battery Compartment
The battery compartment is located in the base of the hand grip. The compartment door is opened by pulling on a small lever, inside the battery holds itself part of the way in without dropping and without the use of a catch.

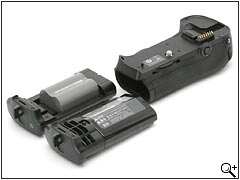
Battery pack / Vertical grip (optional)
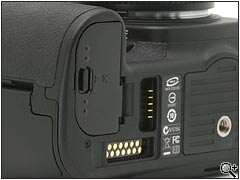
The D300 has a new battery pack / vertical grip, the MB-D10. This new grip no longer requires the removal of the internal battery or battery door instead connecting to a pair of terminals on the base of the camera (normally protected by rubber covers, removed for this shot). This allows the internal battery to be used in conjunction with the batteries in the MB-D10. This MB-D10 is more ergonomic than previous grips and integrates much better with the body, it also supports a wider range of batteries; the EN-EL3e, the large EN-EL4a used in the D3 as well as AA batteries. (Note that the MB-D10 plus batteries other than the EN-EL3e are required to achieve the full eight frames per second shooting speed).

Compact Flash Compartment
The D300's Compact Flash compartment is set in the side of the camera as part of the hand grip. To open the door you turn a small dial on the rear of the camera below the AF area mode selector. The door opens automatically on a spring loaded hinge and when closed fits flush into the body contour. The door itself has a rubber gasket around its edge to form a water resistant seal. The D300 can take Compact Flash Type I or II and supports FAT32 (for cards over 2 GB) as well as the new high speed UDMA cards.


Connections
The D300's connections are in two places, either at the front top (remote and flash PC sync) or the left side of the body (from the rear). The remote (which also allows for serial GPS) and flash PC sync terminals are now protected by a rubber cover which is itself attached to the strap eyelet. On the side are the largest group of connectors, from top to bottom; Video out (composite), HDMI (digital video out HD/SD), DC-IN and USB 2.0. The biggest story here must be HDMI output, from the camera menu you can select five different output options; Auto, 480p, 576p, 720p or 1080i. For an example and video clip of HDMI outputsee this page of this review.


Camera Base / Tripod Mount

The bottom of the D300 is a simple enough affair with the metal tripod mount located in line with the center of the lens and the imaging focal plane. I'm also a big fan of the large rubber foot which covers two thirds of the base.
You can also see the connectors for the optional MB-D10 grip (see previous page). These would normally have rubber covers over them.
Pop-Up Flash
The D300's pop-up flash is released manually by pressing a small button on the left side just below the flash. The long arm raises the flash unit a respectable distance above the top of the lens (useful for lens hoods and reducing red-eye). Just below the release button is another button which changes flash mode and flash exposure compensation control button. Hold the button and turn the main command dial (rear) to change flash mode, sub-command dial to change flash exposure compensation (-3.0 to +1.0 EV).


Flash Hot-shoe

The D300 has a standard (ISO 518) accessory shoe which is compatible with third party flash systems for flash sync and more advanced i-TTL with the SB-800, SB-600 or SB-400. Non-TTL Auto available with the 80DX, 28DX, 28, 27, and 22s.
Lens Mount / Sensor
Below on the left you can see the D300's lens mount with the mirror down, on the right with mirror up and shutter open (exposing the sensor). Lenses are inserted twisted clockwise and lock in place with an anticlockwise turn. This is a standard Nikon F lens mount and can use almost the complete range of Nikkor F lenses (although some features are only available with newer type G or type D lenses). As noted in our introduction the D300 also supports the aperture ring found on old AI lenses.


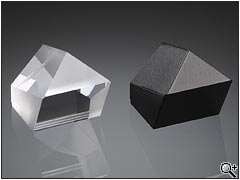
Self-cleaning sensor unit
We knew Nikon couldn't wait too long before implementing some kind of automatic sensor cleaning system, and so the D300 becomes the first Nikon with such a feature. It works in the same manner as other implementations, piezoelectric elements vibrate a cover filter which should in theory remove any light dust particles attached to it.
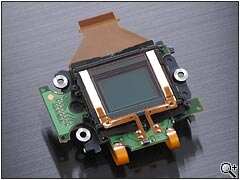

Sensor unit with LPF and cleaning unit in place Sensor cleaning unit diagram
Supplied In the Box
Box contents may vary by region:
Nikon D300 digital SLR body & body cap BM-8 protective LCD cover Shoulder strap Eyepiece Cap DK-5 Rubber Eyecup DK-23 EN-EL3e Lithium-Ion battery MH-18a Quick Charger & AC power cable USB cable A/V cable Software CD-ROM Manuals
Top of camera controls (right)

On the top of the camera on the right side you will find the power switch, shutter release button, exposure mode and exposure compensation buttons. At the front and rear edges of this side of the camera, in line with the shutter release button are the two command dials (with a soft rubber coating). On the rear of the camera surrounding the AE-L/AF-L button is the metering mode selector, to the right of this the now slightly more emphasized AF-ON button. Note that CSM f7 allows you define the exact function of the command dials including their rotation, which sets aperture / shutter speed and whether they can be used in menus and playback mode. The function of controls described below are for a camera with default settings.
Buttons combined with a dial turn are held while the dial is turned, however you can choose to simply have to press the button once and release, this is achieved via CSM f8 (like a Canon).
Power dial
OFF Power Off
Powers the camera off immediately, if there are images still buffered to be written the camera will remain on until the write has completed. When off the camera continues to display the remaining frames / frame count and CF status on the top LCD panel.
ON Power On
Switches the camera on, this is as fast as we can time it, as good as instant. There is simply no perceptible delay between turning the the dial and the first shot (you can even hold the shutter release and turn the power dial to test this).
 Illuminate backlight
Flick the power switch to this position to illuminate the control panels backlight's (top and rear). The backlight stays on for the 'auto meter-off' time (CSM c3).
Buttons (combined with dial turn)


MODE Exposure mode (detail below)
• Programmed Auto (flexible)
• Shutter-Priority Auto
• Aperture-Priority Auto
• Manual No function
 Exposure compensation
• +/- 5 EV
• 0.3, 0.5 or 1 EV steps (CSM b2) No function
Buttons (single press)
AF-ON AF-ON
The AF-ON button is an alternative to half-pressing the shutter release, it triggers the camera's auto focus system. You can if you wish have the camera set to that AF is not triggered by a shutter release half-press (CSM a5) and only by the AF-ON button (useful for fast action photography where continuous AF tracking is required).
AE-L
AF-L
AE / AF Lock
Pressing this button locks the current exposure and focus, in its default mode both AE and AF remain locked as long as you hold the button. CSM f6 allows you to change the function of this button with a range of AE / AF hold / lock options as well as other camera functions (such as metering, bracketing etc.)
Metering Mode
 3D Color matrix metering II / Color Matrix II / Color Matrix
3D Color matrix metering uses a 1005 pixel CCD to calculate the best exposure for the frame. 3D color matrix metering is only available with G type or D type lenses where the range information is used in conjunction with metered light. Color matrix II metering is used with other CPU lenses. Color matrix metering is used when focal length and aperture are entered manually using the 'Non-CPU lens data' menu item.
 Center-weighted metering
The camera uses the entire frame for light measurement but assigns a greater weight to an area in the center of the frame (by default an 8 mm circle indicated on the viewfinder focus screen). The size of the circle used to define the "center" of the frame can be set by CSM b5.
 Spot metering
The camera measures light only in a circle 3 mm in diameter. This is tied to the currently selected AF area point unless dynamic AF or a non-CPU lens is used when it defaults to the center of the frame.
Exposure Modes
P Programmed Auto (flexible)
In this mode the camera automatically selects aperture and shutter speed based on the current metered exposure value, exposure compensation and selected ISO sensitivity. Flexible program allows you to select one of a range of identical exposures (using different combinations of aperture and shutter speed) by turning the main command dial. Example:
• 1/125 sec, F9 (turn left one click)
• 1/160 sec, F8.0 (turn left one click)
• 1/200 sec, F7.1 (metered)
• 1/250 sec, F6.3 (turn right one click)
• 1/320 sec, F5.6 (turn right one click)
S Shutter-Priority Auto
In this mode you select the shutter speed and the camera will calculate the correct aperture depending on metered exposure, exposure compensation and ISO sensitivity. Turn the main command dial to select shutter speed in the range of 30 to 1/8000 sec (in 0.3, 0.5 or 1.0 EV exposure steps depending on CSM b3).
A Aperture-Priority Auto
In this mode you select the aperture and the camera will calculate the correct shutter speed depending on metered exposure, exposure compensation and ISO sensitivity. Turn the sub command dial to select aperture (in 0.3, 0.5 or 1.0 EV exposure steps depending on CSM b3). The exact range of apertures will depend on the lens used.
M
Manual Exposure
In this mode you define the exact exposure by selecting the aperture and the shutter speed manually. As above use the main command dial (rear) for shutter speed, sub command dial (front) for aperture. The meter on the viewfinder status bar and top LCD will immediately reflect the exposure level compared to the calculated ideal exposure, if outside of the range of the indicator bar (+/- 2 EV on the viewfinder LCD and +/- 3 EV on the top control panel) an arrow ('<' or '>') will appear at the end.
Top of camera controls (left)

The top left side of the camera has the mode dial which allows you to select the camera's drive mode, single, two continuous speeds, live view, self-timer or mirror up. This dial is locked from accidental change and can only be turned by holding the lock release pin to the top left of the dial. On the top of this dial are three buttons for quality, white balance and ISO sensitivity.
Mode Dial
S Single frame shooting
One frame is taken with one depression of the shutter release button. You can of course still 'pump' shots as quickly as you can re-press the shutter release. The D300's shutter release button is the soft-press type which easily facilitates quick re-press.
CL
Continuous low speed shooting
Camera shoots continuously while the shutter release is depressed. In this mode the actual shooting rate can be set between 1 and 4 frames per second (through CSM d4), the default is 3 frames per second. Images are buffered as they are taken and written out to the Compact Flash card in the background. Current buffer space is indicated on the viewfinder LCD status bar as a number prefixed with a lower case 'r' (eg. r25).
CH
Continuous high speed shooting
Camera shoots continuously while the shutter release is depressed. In this mode the camera shoots at its maximum speed of 6 frames per second. Images are buffered as they are taken and written out to the Compact Flash card in the background. Current buffer space is indicated on the viewfinder LCD status bar as a number prefixed with a lower case 'r' (eg. r25).
LV
Liveview
Puts the camera in live view shooting mode. In this mode you activate through-the-lens live view on the LCD monitor by first pressing the shutter release button (it's a bit counterintuitive) the mirror will raise (blanking the viewfinder) and the LCD will activate.To focus either use manual focus (press the magnify buttons to provide a larger magnified view) or press the AF-ON button to use contrast detect AF (slow but maintains live view) or phase detect AF (quicker but requires the mirror to drop first). The camera does not return to live view after a shutter release, you have to press the shutter release button once more.
 Self-timer
Camera takes a shot after a predefined delay. This can be set to 2, 5, 10, or 20 seconds via CSM c3.
M-UP
Mirror Up
Press the shutter release once to raise the mirror, again to take the shot. As I commented in my D2X and D200 reviews it would have been nice to have this combined with a self-timer so you don't need to touch the camera (or use a remote) to trigger the actual shutter release. (CSM d9; exposure delay mode; offers something similar but the delay is not long enough).
Buttons (combined with a command dial)


QUAL Image quality
• RAW
• TIFF
• Fine JPEG
• Normal JPEG
• Basic JPEG
• RAW + Fine JPEG
• RAW + Normal JPEG
• RAW + Basic JPEG
Image size (all except RAW quality)
• Large (4288 x 2848)
• Medium (3216 x 2136)
• Small (2144 x 1424)
WB White balance mode
• Auto
• Incandescent
• Fluorescent
• Direct sunlight
• Flash
• Cloudy
• Shade
• Color temperature (Kelvin)
• White balance preset White balance adjustment
- Fine tune -3 to +3
- Fine tune -3 to +3
- Fine tune -3 to +3
- Fine tune -3 to +3
- Fine tune -3 to +3
- Fine tune -3 to +3
- Fine tune -3 to +3
- Temperature 2500 K to 10000 K
- Preset 0 to 4
ISO Select sensitivity (ISO equiv.)
• L 1.0 (100 equiv.)
• L 0.7 (125 equiv.)
• L 0.3 (160 equiv.)
• 200
• 250
• 320
• 400
• 500
• 640
• 800
• 1000
• 1250
• 1600
• 2000
• 2500
• 3200
• H 0.3 (4000 equiv.)
• H 0.7 (5000 equiv.)
• H 1.0 (6400 equiv.)
(You can choose 0.3, 0.5 or 1.0 EV steps for ISO selection via CSM b2) No function
Rear of camera controls
The rear of the D300 looks almost the same as the D200 expect for the larger LCD monitor and subtly re-organized and more logical button layout; gone is the bracket button now replaced with the play button, the menu button now up a the top of the column of buttons followed by protect, zoom-out, zoom-in and the OK button (called Enter on the D200).
Buttons (single press)
 Playback
Enters or leaves playback mode, display mode used depends on the last used (left / right press of the multi selector) or thumbnail display mode. As with all shooting priority cameras the D300 immediately removes the playback display if you half-press the shutter release button although interestingly you can trigger AF (press AF-ON) without clearing the screen).
 Delete *p
In playback or record review, pressing this button displays a 'Delete?' confirmation dialog, press again to confirm deletion. Nikon's now de-facto 'double press delete' feature is very easy to use and understand and much faster than other delete implementations (why can't all cameras be this simple?).
 Format (Delete + Mode)
Hold the Delete and Mode (top right of camera) buttons simultaneously for approximately two seconds for a shortcut to format the Compact Flash card, the camera first blinks 'For' on the top display and you must release the buttons and press once more to confirm the card format.
MENU Menu
Display or cancel the camera menu, as with playback mode the menu is automatically cancelled if you half-press the shutter release button.

Protect / Info / Menu Help *p
In playback mode press to toggle the 'read only' flag on the displayed / selected image. This button can be used in both playback and record review modes. In shooting mode press this button to toggle the shooting information display on the LCD monitor. In menu mode (with a menu option selected) you can press and hold this button to display a page of help about the currently highlighted function, this is especially useful for the custom functions.
 Thumbnail / zoom out *p
In playback mode with a single image displayed pressing this button switches to a four image thumbnail index, press again to switch to a nine image thumbnail index. In playback magnify mode steps back a single zoom level.
 Zoom in *p / Live view magnify
In playback mode with a single image displayed enters magnify mode and steps in a zoom level, there are eight zoom steps. In live view mode magnifies the live view image (move around the live image, very useful for checking focus accuracy, there are six live view magnification levels, use the multi selector to move around.
OK OK / Retouching menu *p
The OK button is used to confirm menu selections and dialog options. In Playback mode displays a pop-up version of the retouching menu.
 Multi selector
With no image displayed on the screen the multi selector is used to choose AF area, note that this function can be locked by turning the lock lever which surrounds the multi selector (this doesn't affect function in playback or menu mode). The multi selector is also used to change playback display modes (left / right), browse images in playback (up / down) and navigate menus / select dialog options. Various options are available for customizing this control: CSM f1, CSM f2 and CSM f3.
*p - In record review or playback mode
Auto Focus Area Mode selector
Note that the exact function of the AF area mode also depends on the focus mode (AF-S or AF-C), a full summary of all combinations of focus mode and AF area mode can be found at the bottom of this page.
 Auto-area AF
The camera uses all focus areas and automatically selects the correct focus points. From the D300 user manual: "If type G or D lens is used, camera can distinguish human subjects
from background for improved subject detection."
 Dynamic-area AF
Allows you to manually select one of the fifty-one focus points, however the camera will use information from multiple focus areas to determine focus. Useful for focusing on specific subjects which may move out of the focus area briefly. CSM a3 allows you to choose between 9 points, 21 points, 51 points or 51 points with 3D tracking.
 Single-area AF
Allows you to manually select one of the fifty-one focus areas, the camera will only use this area for auto focus.
Front of camera controls


On the left side of the camera front are two buttons, both of these buttons can be customized to perform a range of functions via CSM f4 and f5. By default the top button is is depth of field preview, press and hold this button to stop the lens down to the selected aperture, the button button performs flash value lock. On the right side of the camera front is the focus mode dial and above this the flash mode / compensation button.
Buttons (combined with a command dial)
 Flash sync mode
• Front-curtain sync (normal)
• Slow sync
• Rear-curtain sync
• Red-eye reduction
• Red-eye reduction with slow sync Flash exposure compensation
• -3.0 EV to +1.0 EV
• 0.3, 0.5 or 1 EV steps (CSM b2)
Focus Mode selector
S Single servo AF (AF-S)
Camera focus when shutter release button is half pressed and locks when the in-focus indicator (a solid dot) appears on the viewfinder status LCD. If the subject is moving when the shutter release button is half pressed the camera will focus track until a lock can be obtained. In this mode the default is for focus priority, this means that a shot can only be taken with a good focus lock, you can also choose release priority via CSM a2.
C Continuous servo AF (AF-C)
The camera will focus continuously while the shutter release button is half pressed, if the subject moves the camera will adjust focus to compensate. In this mode the default is for release priority, this means that a shot will be taken whether or not the camera has a good focus lock, you can also choose focus priority via CSM a1.
M Manual Focus
Focusing is achieved manually by turning the lens manual focus ring. Focus indicator on the viewfinder status LCD will still indicate whether or not the selected manual focus is the same as the calculated auto focus. This mode is always release priority.
Displays
We've already described the technical side of D300's new VGA resolution monitor, its super-fine pixel pitch means extremely detailed images in playback and live view, it delivers fine gradations and a smooth display with no visible gaps between pixels. This may sound like a marketing tag line but viewing images on the D300's high resolution screen is far more photo-realistic and easier on the eye, a notable advantage is that in playback you don't need to zoom into images as much to be sure of sharpness / focus accuracy as the extra resolution reveals this at lower magnification.
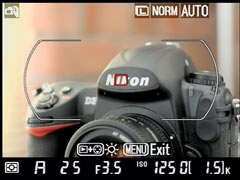
Shooting information
Press the info button in shooting mode (except live view) to show a full screen 'shooting information' display, we first saw a screen like this implemented in the D40 and there are certainly circumstances where having this level of information on one single screen can be very useful. The D300's shooting information screen automatically (or optionally manually) switches from light background to dark background in low light situations. My only gripe with this feature was that the information display disappears as soon as you half-press the shutter release button and does not return, you have to press info again, it would have been nice to have a 'persistent shooting information' custom function.


Light screen background Dark screen background (low light)
Record Review
You can choose for the D300 to display a review of the image taken immediately after shutter release. The type of display used will be the same as the last mode used in playback (histogram, thumbnail index, details etc.). Note that record review has all of the functionality of playback mode, this means its easy to delete, magnify, protect etc. The image will remain on the screen for the 'Monitor off delay' CSM c4 or until you half-press the shutter release.
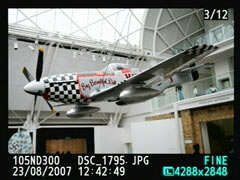
Playback
Press the Playback button to enter playback mode, press the multi selector up or down to change display mode, up to six different pages of display detail are available. You can change the amount of information available in the basic and detailed photo display modes including optional blinking highlights and focus point display as well as the three pages of shooting information in detail mode. Note that you can switch the up/down and left/right functions of the multi selector via CSM f3 and that you can choose to also use the command dials to browse / change page via CSM f7.

Basic photo display: file number, folder, filename, date & time, quality, size
Basic photo display with optional Highlights and Focus point enabled


Detailed photo display: image thumbnail, histogram, exposure information and other data as per default display
Detailed photo display optional RGB histogram page


Detailed photo display data 1: metering mode, shutter speed, aperture, exposure mode, ISO, exposure compensation, focal length, lens used, AF mode, VR mode, flash mode and flash compensation Detailed photo display data 2: white balance & fine tuning, color space, picture control and image parameter adjustments

Detailed photo display data 3: noise reduction, active d-lighting, retouching, comment
Playback Zoom
Unlike the D200 the D300 now has dedicated zoom-in and zoom-out buttons, with an image displayed simply press zoom-in to begin magnifying. While magnified use the multi selector to move around the image, the navigation box and loupe at the bottom right of the image (as can be seen below) disappears after a couple of seconds. There are eight magnification levels, on the D300's high resolution screen the last two go beyond 1:1 and provide an enlarged pixelated view.


Playback thumbnail views
The D300 has two levels of thumbnail view, now easier thanks to the dedicated zoom-out button, just press to switch to the initial 2x2 (4 image) view and press again for the 3x3 (9 image view). Use the multi selector to move around the index. Note that if you have the 'Rotate Tall' option enabled images taken in the portrait orientation are displayed vertically (we had this option turned off in the captures below).
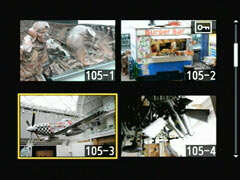

One click right for a 2 x 2 thumbnail view Two clicks right for a 3 x 3 thumbnail view
Other Playback displays


After pressing the delete button just press once more to confirm the deletion An example of a protected image
Live view
Nikon's live view implementation on the D300 is one of the most usable and comprehensive to date, the high resolution screen and addition of contrast detect auto focus, in addition to the now typical mirror down / mirror up passive auto focus system, mean that are more situations where live view becomes useful.
Live view (auto focus) mode
As noted the D300 supports two AF methods which Nikon call Tripod and Hand-held modes, both require you to use the AF-ON button to achieve auto focus. In Tripod mode auto-focus is achieved using the main image sensor in a "contrast detect" manner (the same as a compact camera), this tends to be slower than normal passive AF but does maintain the live view. In Tripod mode you can move the AF point anywhere within the frame using the multi-selector. In Hand-held mode the live view blanks out when you press AF-ON, the mirror drops and the camera focuses using the normal "passive" auto-focus sensor. Live view only returns when you release the AF-ON button, I personally found this a bit annoying, it should return as soon as the camera achieves AF lock.

Live view in Tripod mode Live view in Hand-held mode
Live view display modes
Press the info button to remove any overlaid information, you can also optionally enable grid lines which are in the same position as the grid lines shown on the viewfinder focusing screen.


Default live view display Live view without information


Live view with grid lines and information Live view with grid lines but without information
Live view magnification
Just as in playback mode you can magnify live view by pressing the zoom-in button (or back out again with zoom-out). While magnified you can use the multi-selector to move around the live image. The D300 appears to be able to go all the way to 1:1 magnification (one pixel on the sensor for one pixel on the LCD) which makes it easy to achieve absolutely perfect focus.


Live view focus, magnify and exposure video clip
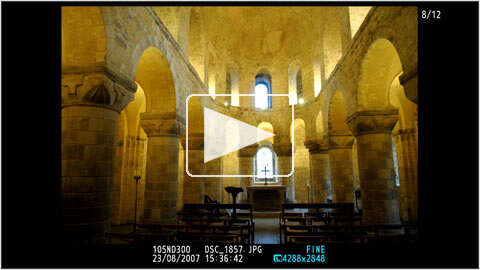
The following video clip shows live view in use to manually focus roughly, magnify to focus more accurately, zoom out, take an exposure and finally magnify the image in record review. (We wanted to provide a video clip of contrast detect AF but on our pre-production unit color reproduction suffered during AF so we chose to focus manually). Just click on the play button below to start the video.
',1)">
HDMI output / High Definition display
Announced just a few days before the Sony DSLR-A700 the Nikon D3 and D300 were officially the first digital cameras with HDMI digital high definition video output. From the setup menu you can select between Auto, 480p, 576p, 720p or 1080i output, in this section we are only going to examine the 720p and 1080i options. HDMI output works in any mode which would otherwise use the LCD monitor; shooting information, menus, live view and playback. It has to be said that using live view over HDMI to a HD LCD or Plasma screen really is an amazing experience and could be extremely useful in studio photography situations. Below we have provided captures of HDMI output in both 720p (1280 x 720) and 1080i (1920 x 1080) resolutions just to give you a sense of the amount of detail visible. My only disappointment would be that there didn't seem to be a way to display the image without any shooting information (except when magnifying), this means that the default display (top image below) is only using 74% of screen width (theoretically, given aspect ratio differences this could be 84% without the status lines at the bottom).

Normal playback via HDMI (720p; 137 KB or1080i; 241 KB)

Zoomed playback via HDMI (720p; 108 KB or1080i; 207 KB)
High definition video clips
Below are two short high definition video clips captured via HDMI from the D300 (720p; 1280 x 720). The first taken in live view, manually focusing and using live view magnification to fine tune the focus point, the second a quick run-through in playback mode. Note that these videos, while compressed, are still large.

Live view over HDMI video clip (720p; Apple Quicktime; 9,979 KB)
Playback over HDMI video clip (720p; Apple Quicktime; 2,500 KB)
Menus

The D300's menus are similar to the D200 but as they are designed for the larger (and higher resolution) LCD they feature a slightly smaller font size which allows each menu page to show eight options over the D200's seven. Navigation remains the same, the multi-way controller and Enter button. You can also configure the command dials to provide menu navigation.
Shooting / CSM menu banks
When working in the Shooting or CSM menus you are in actual fact changing the settings of a 'menu bank'. There are four banks for each of the Shooting and Custom function menus; A to D, each bank can be given a more meaningful label and the currently selected bank letter is indicated on the top control panel for quick reference. This is very useful for quickly switching between a type of shot or situation.


Help pages
The D300 has the same help feature we first saw on the D2X, a setting with available help is indicated by a circular question mark icon (?) at the bottom left of the screen. Press and hold the protect button to display a context sensitive help page.

Playback Menu

Option Values / Actions Notes
Delete • Selected
• All
- Thumbnail selection
Playback folder • ND300
• All
• Current
Hide image • Select / set
• Deselect all? - Thumbnail selection
Display mode • Basic photo info
 Highlights
 Focus point
• Detailed photo info
RGB Histogram
Data Allows you to toggle different items of information shown in either basic or detailed photo display modes.
Image review • Off
• On
After delete • Show next
• Show previous
• Continue as before
Rotate tall • Off
• On When enabled portrait shots appear vertically orientated.
Slide show • Start
• Frame interval
2 sec
3 sec
5 sec
10 sec
Print set (DPOF) • Select / set
• Cancel Order - Thumbnail selection
Shooting Menu
A green superscript one (¹) indicates the default setting.

Option Values / Actions Notes / Sub options
Shooting menu bank • A ¹
• B
• C
• D
• Rename
Text entry
Four banks of settings can be memorized and quickly switched, each bank can be labeled (see above).
Reset shooting menu • Yes
• No
Active folder • New folder number
• Select folder - Create new folder.
File naming • File naming
Text entry Change name prefix (default DSC).
Image quality • NEF (RAW) + JPEG Fine
• NEF (RAW) + JPEG Normal
• NEF (RAW) + JPEG Basic
• NEF (RAW)
• TIFF (RGB)
• JPEG Fine
• JPEG Normal ¹
• JPEG Basic Select image quality.
Image size • Large ¹
• Medium
• Small - 4288 x 2848 / 12.2 M
- 3216 x 2136 / 6.9 M
- 2144 x 1424 / 3.1 M
JPEG compression • Size priority ¹
• Optimal quality
NEF (RAW) recording • Type
Lossless compressed ¹
Compressed
Uncompressed
• NEF (RAW) bit depth
12-bit ¹
14-bit Set the type of compression used in the NEF file as well as the bit-depth recorded. Note that 14-bit NEF files are about 1.3 times larger than 12-bit NEF and that continuous shooting rate drops to 2.5 fps.
White balance • Auto ¹
• Incandescent
• Fluorescent
• Direct Sunlight
• Flash
• Cloudy
• Shade
• Choose color temp.
• Preset manual - A-B, G-M grid to fine tune WB
-"
-"
-"
-"
-"
-"
- 2500 K - 10000 K
- Select / program preset WB
Set Picture Control • Standard
Quick adjust (-2 to +2)
Sharpening (A, 0 to 9)
Contrast (A, -3 to +3)
Brightness (-1 to +1)
Saturation (A, -3 to +3)
Hue (-3 to +3)
• Neutral
Quick adjust (-2 to +2)
Sharpening (A, 0 to 9)
Contrast (A, -3 to +3)
Brightness (-1 to +1)
Saturation (A, -3 to +3)
Hue (-3 to +3)
• Vivid
Quick adjust (-2 to +2)
Sharpening (A, 0 to 9)
Contrast (A, -3 to +3)
Brightness (-1 to +1)
Saturation (A, -3 to +3)
Hue (-3 to +3)
• Monochrome
Sharpening (A, 0 to 9)
Contrast (A, -3 to +3)
Brightness (-1 to +1)
Filter (Off, Y, O, R, G)
Toning (10 options)
• [custom] - Default (3, 0, 0, 0, 0)
- Default (2, 0, 0, 0, 0)
- Default (4, 0, 0, 0, 0)
- Default (3, 0, 0, 0, 0)
Manage Picture Control • Save/edit
• Rename
• Delete
• Load/save
- Create custom Picture Control sets
- Load / save from card
Color Space • sRGB ¹
• Adobe RGB
Active D-Lighting • Enhanced
• Normal
• Moderate
• Off ¹
Long exp. NR • On
• Off ¹ Enables dark frame subtraction NR for exposures of 1/2 sec or longer.
High ISO NR • High
• Normal
• Low
• Off ¹
ISO sensitivity settings • ISO
LO 1
LO 0.7
LO 0.3
200 ¹
250
320
400
500
640
800
1000
1250
1600
2000
2500
3200
HI 0.3
HI 0.7
HI 1.0
• ISO sensitivity auto control
On / Off ¹
Maximum sensitivity
 400
400
800
1600
3200
HI 1 ¹
Minimum shutter speed
1/250 - 1 sec Available sensitivities depend on ISO step custom setting (CSM b2).
Live view • Live view mode
Hand-held
Tripod
• Release mode
Single frame
Continuous low-speed
Continuous high-speed
- Phase detect AF
- Contrast detect AF
Multiple exposure • Done
• Number of shots
2 - 10
• Auto gain
On
Off Create a new image from between two and ten exposures.
Interval timer shooting • Start
Now
Start time
• Interval
[hh:mm:ss]
• Select Intvl*Shots
[000] x [0] = 0001
• Start
Off
On Time lapse / interval shooting.
Non-CPU Lens Data • Focal length
N/A
6 - 45 mm
50 - 180 mm
200 - 4000 mm
• Maximum aperture
N/A
F1.2 - F22
Menus (contd.)
The cameras custom settings are split into six alphabetical color coded categories, this makes it easier to remember a specific option and quicker to enter the custom settings menu at the correct position. You can still scroll through all custom settings options as one big menu if you wish. Note that on this menu an asterisk (*) next to a custom setting means that it has been changed to something other than the camera default. A green superscript one (¹) indicates the default setting.
Custom Settings Menu (a: Autofocus)
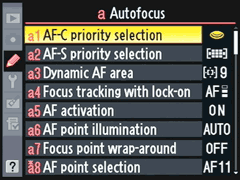
Option Values / Actions Notes
a1 AF-C priority selection • Release ¹
• Release + focus
• Focus
Defines if camera must have focus lock before shutter release.
a2 AF-S priority selection • Focus ¹
• Release Defines if focus lock is required before shutter release.
a3 Dynamic AF area • 9 points ¹
• 21 points
• 51 points
• 51 points (3D-tracking)
a4 Focus tracking with lock-on • Long
• Normal ¹
• Short
• Off
Controls how focusing is affected by subject distance changing and how quickly the system should react.
a5 AF activation • Shutter / AF-ON ¹
• AF-ON Only
a6 AF point illumination • Auto ¹
• Off
• On
a7 Focus point wrap-around • Wrap
• No wrap ¹
a8 AF point selection • 51 points ¹
• 11 points
a9 Built-in AF-assist illuminator • On ¹
• Off Controls the built-in AF assist illuminator.
a10 AF-ON for MB-D10 • AF-ON ¹
• AE/AF-L lock
• AE lock (reset on rel.)
• AE lock (hold)
• AF lock only
• Same as FUNC button Customize the function of the AF-ON button on the MB-D10 vertical-grip / battery pack.
Custom Settings Menu (b: Metering / exposure)

Option Values / Actions Notes
b1 ISO sensitivity step value • 1/3 step ¹
• 1/2 step
• 1 step Set the steps used for selection of ISO sensitivity.
b2 EV steps for exposure ctl. • 1/3 step ¹
• 1/2 step
• 1 step
b3 Exp comp/fine tune • 1/3 step ¹
• 1/2 step
• 1 step
b4 Easy exposure compens. • On (Auto reset)
• On
• Off ¹
Enables 'Easy Exposure Compensation' which can be accessed by turning a dial.
b5 Center weight area • 6 mm
• 8 mm ¹
• 10 mm
• 13 mm
• Average
b6 Fine tune exposure • Yes
Matrix metering
Center-weighted
Spot metering
• No ¹
Allows you to fine tune metered exposure values in the range of -1.0 EV to +1.0 EV in 1/6 EV steps.
Custom Settings Menu (c: Timers / AE Lock)

Option Values / Actions Notes
c1 Shutter-release butt. AE-L • On
• Off ¹
Define lock AE during shutter release half-press.
c2 Auto meter-off delay • 4 s
• 6 s ¹
• 8 s
• 16 s
• 30 s
• 1 min
• 5 min
• 10 min
• 30 min
• No Limit
c3 Self-timer delay • 2 s
• 5 s
• 10 s ¹
• 20 s
c4 Monitor off delay • 10 s
• 20 s ¹
• 1 m
• 5 m
• 10 m
Custom Settings Menu (d: Shooting / display)

Option Values / Actions Notes
d1 Beep
• High ¹
• Low
• Off
d2 Viewfinder grid display
• Off ¹
• On
Enables a 'thirds' grid overlay on the focusing screen.
d3 Viewfinder warning display
• On ¹
• Off
d4 CL mode shooting speed
• 7 fps
• 6 fps
• 5 fps
• 4 fps
• 3 fps ¹
• 2 fps
• 1 fps
d5 Max. continuous release • 1 - 100 Maximum shots in a burst.
d6 File Number Sequence • On ¹
• Off
• Reset
d7 Shooting info display • Auto
• Manual Defines if shooting info display should automatically change color in dark
d8 LCD illumination • Off ¹
• On When on any button will light the control panel.
d9 Exposure delay mode • Off ¹
• On Shutter release is delayed 1.0 sec to avoid vibration.
d10 MB-D10 battery type • LR6 (AA, Alkaline) ¹
• HR6 (AA, Ni-MH)
• FR6 (AA, Lithium)
• ZR6 (AA, Ni-Mn) Tell the camera what type of batteries are being used in the optional vertical grip.
d11 Battery order • Use MB-D10 batt first
• Use camera batt first
Custom Settings Menu (e: Bracketing / flash)

Option Values / Actions Notes
e1 Flash sync speed
• 1/320 (Auto FP)
• 1/250 (Auto FP)
• 1/250 ¹
• 1/200
• 1/160
• 1/125
• 1/100
• 1/80
• 1/60
e2 Flash shutter speed • 1/60 s ¹
• 1/30 s
• 1/15 s
• 1/8 s
• 1/4 s
• 1/2 s
• 1 s
• 2 s
• 4 s
• 8 s
• 15 s
• 30 s Slowest flash shutter speed.
e3 Flash cntrl for built-in flash • TTL ¹
• Manual
• Repeating Flash
• Commander Mode Set the mode for the built-in flash.
e4 Modeling flash • On ¹
• Off DOF preview button.
e5 Auto bracketing set • AE & Flash ¹
• AE only
• Flash only
• WB bracketing
e6 Auto bracketing (Mode M) • Flash / Speed ¹
• Flash / Speed / Apt.
• Flash / Aperture
• Flash Only
e7 Bracketing order • Meter > Under > Over ¹
• Under > Meter > Over
e8 Auto BKT Selection • Manual Value Select ¹
• Preset Value Select
Custom Settings Menu (f: Controls)

Option Values / Actions Notes
f1 Multi selector center button
• Shooting mode
Select cent. focus pt ¹
Highlight act. focus pt
Not Used
• Playback mode
Thumbnail On/Off ¹
Histogram On/Off
Zoom On/Off
Choose folder
Multi selector center button function.
f2 Multi selector • Reset meter-off delay
• Do nothing ¹
f3 Photo info / playback • Info <>, PB ^v
• Info ^v, PB <> ¹
Multi selector role in single image playback.
f4 Assign FUNC button
• FUNC button press
Preview
FV Lock ¹
AE/AF lock
AE lock only
AE lock (reset on rel.)
AE lock (hold)
AF lock only
Flash off
Bracketing burst
Matrix metering
Center-weighted mtr.
Spot metering
None
• FUNC button + dials
1 step spd / aperture
Choose non-CPU lens
Auto bracketing
Dynamic AF area
None ¹
Define the function of the FUNC button (front of the camera below the DOF preview button), both a single press and a hold with dial turn.
f5 Assign preview button
• Preview button press
Preview ¹
FV Lock
AE/AF lock
AE lock only
AE lock (reset on rel.)
AE lock (hold)
AF lock only
Flash off
Bracketing burst
Matrix metering
Center-weighted mtr.
Spot metering
None
• Preview button + dials
1 step spd / aperture
Choose non-CPU lens
Auto bracketing
Dynamic AF area
None ¹
Define the function of the preview button (front of the camera above the FUNC button), both a single press and a hold with dial turn.
f6 Assign AE-L/AF-L button • Preview button press
Preview ¹
FV Lock
AE/AF lock
AE lock only
AE lock (reset on rel.)
AE lock (hold)
AF lock only
Flash off
Bracketing burst
Matrix metering
Center-weighted mtr.
Spot metering
None
• Preview button + dials
Choose non-CPU lens
Auto bracketing
Dynamic AF area
None ¹
f7 Customize command dials • Reverse rotation
Yes
No ¹
• Change main / sub
On
Off ¹
• Aperture setting
Sub-command dial ¹
Aperture ring
• Menus and Playback
On
Off ¹
f8 Release button to use dial • Yes
• No ¹
f9 No memory card? • Release locked ¹
• Enable release
f10 Reverse indicators • + ---- 0 ---- - ¹
• - ---- 0 ---- +
Menus (contd.)
Setup Menu

Option Values / Actions Notes
Format memory card • Yes
• No
LCD brightness • -3 to +3
Clean image sensor • Clean now
• Clean at startup / shut.
Clean at startup
Clean at shutdown
Clean at start & shut
Cleaning off
Lock mirror up for cleaning • Start
Video Mode • NTSC
• PAL
HDMI • Auto
• 480p
• 576p
• 720p
• 1080i
World Time • Time zone
Select
• Date and time
Date set
Time set
• Date format
yy/mm/dd
mm/dd/yy
dd/mm/yy
• Daylight saving time
Off
On
Language • German
• English
• Spanish
• Finnish
• French
• Italian
• Dutch
• Polish
• Portuguese
• Russian
• Swedish
• Chinese Traditional
• Chinese Simplified
• Japanese
• Korean
Image comment • Done
• Input comment
Text entry
• Attach comment
When enabled the comment is written into the header of each image.
Auto image rotation • On
• Off
USB • Mass Storage
• MTP / PTP
Dust off ref photo • Start
• Clean sensor then start Used to capture a 'dust reference image' for the 'Dust Off' feature of Nikon Capture. (RAW only).
Battery Info • Battery meter
• Picture meter
• Charging life Information display only.
Wireless transmitter
Image authentication • On
• Off
Save/load settings • Save settings
• Load settings
GPS • Auto meter off
• Position
Non-CPU lens data • Done
• Lens number (1 - 9)
• Focal length (6 - 4000)
• Max aperture (F1.2 - F22)
AF fine tune • AF fine tune (On/Off)
Off
On
• Saved value (+/- 20)
• Default (+/- 20)
• List saved values
Firmware Version • Version No.
A x.00
B x.00 Information display only.
Timings & File Sizes
The D200 represented a serious step forward in performance over its predecessor, the D100. Performance metrics such as power on / sleep to on and user interface response were as fast as you could ever need (indeed virtually instant). Despite having fewer areas in which to demonstrate an improvement the D300 still manages to feel faster than the D200. Examples of additional improvements are shorter record review times, faster playback and extremely high throughput with a fast CF card such as the SanDisk Extreme IV. Continuous shooting was consistent with the published specs, six frames per second with the standard battery and eight frames per second with the battery girp and higher powered batteries. It's hard to pick out any one area where the D300's performance could be improved.
Timing Notes: All times calculated as an average of three operations. Unless otherwise stated all timings were made on a 4288 x 2848 JPEG Fine (approx. 4.2 MB per image).
The media used for these tests were:
2 GB SanDisk Extreme IV CF card 2 GB Lexar Pro 133x CF card 16 GB SanDisk Extreme III CF card
Media comparison
Action Time, secs
(2 GB SanDisk)
Time, secs
(2 GB Lexar)
Time, secs
(16 GB SanDisk)
Power Off to On
<0.1 <0.1 <0.1
Power Off to Shot <0.1 <0.1 <0.1
Sleep to On <0.1 <0.1 <0.1
Power On to Off <0.1 <0.1 <0.1
Record Review JPEG *1 0.5 0.5 0.5
Record Review RAW 12-bit *1 0.5 0.5 0.5
Record Review RAW 14-bit *1 0.8 0.8 0.8
Enter Live View 0.6 0.6 0.6
Exit Live View <0.2 <0.2 <0.2
Play RAW 12-bit *2 ~0.3 / <0.1 ~0.3 / <0.1 ~0.3 / <0.1
Play RAW 14-bit *2 ~0.3 / <0.1 ~0.3 / <0.1 ~0.3 / <0.1
Play JPEG *2 ~0.3 / <0.1 ~0.3 / <0.1 ~0.3 / <0.1
Play Image to Image RAW <0.2 <0.2 <0.2
Play Image to Image JPEG <0.2 <0.2 <0.2
*1 Time taken from the shutter release being pressed to the review image being displayed on the LCD monitor.
*2 The first number is the time from shooting to play mode for an image which hasn't yet been displayed, the second figure is the time to display if the image has been displayed (and 'cached').
Continuous Drive mode
Caveats / notes
Continuous rate with battery grip
Depending on the camera's power supply the D300 has two different maximum continuous shooting rates. With the standard EN-EL3e battery in the camera or the optional MB-D10 grip the maximum rate is six frames per second. Using either EN-EL4(a)* or AA batteries in the MB-D10 increases the maximum rate to eight frames per second.
Active D-Lighting
As you may expect the additional processing required by Active D-Lighting has a significant impact on image processing speed and hence number of frames in a burst. Instead of a burst of 100 frames using 'Normal' Active D-Lighting reduced the burst to 15 frames before slowing.
Max. continuous release (c.fn d5)
The D300 imposes a maximum 100 frame limit on continuous bursts. Put simply assuming the CF card is fast enough the camera will shoot continuously until it reaches the set limit (by default 100 frames) and then simply stop unless you lift your finger off the shutter release and re-press. This doesn't appear to be a hard buffer limt, just a soft limit.
* To use EN-EL4(a) batteries in the MB-D10 you also need the BL-3 'Battery Chamber Cover'.
Continuous drive tests
To test continuous drive mode the camera had the following settings: Manual Focus, ISO 100, Shutter Priority (1/500 sec). Measurements were taken from audio recordings of the tests. Media used were the same as above.
The tests carried out below measured the following results for JPEG and RAW:
Frame rate - Initial frame rate, without battery grip ~6.1 fps, with battery grip ~8.0 fps Number of frames - Number of frames in a burst (until buffer full) Buffer full rate - Frame rate if shutter release held down after burst (buffer full) Next burst - How soon after the burst the buffer has emptied / CF compartment light goes out
Burst of JPEG Large/Fine images (6 fps mode, internal EN-EL3a only)
Timing 2 GB SanDisk
Extreme IV CF
2 GB Lexar
Pro 133x CF
16 GB SanDisk
Extreme III CF
Frame rate 6.1 fps 6.1 fps 6.1 fps
Number of frames 100 49 34
Buffer full rate n/a 3.3 fps 1.6 fps
Next burst n/a 8.8 sec 17.5 sec
Burst of JPEG Large/Fine images (8 fps mode, MB-D10 + EN-EL4a)
Timing 2 GB SanDisk
Extreme IV CF
2 GB Lexar
Pro 133x CF
16 GB SanDisk
Extreme III CF
Frame rate 8.0 fps 8.0 fps 8.0 fps
Number of frames 62 37 32
Buffer full rate 6.0 fps (uneven) 3.3 fps 1.6 fps
Next burst 20.7 sec 8.8 sec 18.4 sec
Burst of RAW images (12-bit NEF, 6 fps mode)
Timing 2 GB SanDisk
Extreme IV CF
2 GB Lexar
Pro 133x CF
16 GB SanDisk
Extreme III CF
Frame rate 6.1 fps 6.1 fps 6.1 fps
Number of frames 28 18 17
Buffer full rate 3.5 fps (uneven) 1.3 fps (uneven) 1.1 fps (uneven)
Next burst 7.0 sec 17.5 sec 19.4 sec
Burst of RAW images (12-bit NEF, 8 fps mode)
Timing 2 GB SanDisk
Extreme IV CF
2 GB Lexar
Pro 133x CF
16 GB SanDisk
Extreme III CF
Frame rate 8.0 fps 8.0 fps 8.0 fps
Number of frames 17 17 16
Buffer full rate 2.5 fps (uneven) 1.3 fps (uneven) 0.9 fps (uneven)
Next burst 7.5 sec 14.6 sec 20.1 sec
The D300 did exactly what it said on the box, just over six frames per second without the battery grip (and more powerful battery) and eight frames per second with them (and this at 1/500 sec, bearing in mind the issues we had achieving maximum shooting rate with theCanon EOS 40D). The D300 only hit the 100 frame limit at full rate once in our tests, in JPEG mode with the 2 GB SanDisk Extreme IV otherwise the buffer filled and the shooting rate slowed (and was often fairly uneven). The biggest surprise here was the significant difference in write speed between the SanDisk and Lexar cards.
File Flush Timing
RAW options; 12-bit / 14-bit, compression
The D300 provides a fairly wide range of RAW options, you can choose between recording 12 or 14 bits of data (as the analogue to digital converter on the D300 is 14 bit) as well as lossless compression, 'normal compression' (same as previous Nikon NEF's, partially lossy) and uncompressed.
Timings shown below are the time taken for the camera to process and "flush" the image out to the storage card. Timing was taken from the instant the shutter release was pressed to the time the storage card activity lamp beside the compartment door went out. Media used were the same as above.
Image type
(4288x 2848 size) Time, secs
(2 GB SanDisk)
Time, secs
(2 GB Lexar)
Time, secs
(16 GB SanDisk)
Approx.
size
RAW 14-bit + JPEG *2 1.9 2.6 3.2 18.2 MB
RAW 12-bit + JPEG *2 1.5 2.1 2.7 15.3 MB
RAW 14-bit Lossless 1.6 2.3 2.6 14.0 MB
RAW 12-bit Lossless 1.2 1.6 2.0 11.1 MB
RAW 12-bit Compressed 1.2 1.6 1.9 9.9 MB
RAW 12-bit Uncompress. 1.5 2.3 2.5 18.7 MB
JPEG Fine ~1.0 ~1.1 1.4 4.2 MB
JPEG Normal ~1.0 ~1.0 1.2 3.1 MB
*1 The D300 begins writing about 0.9 seconds (1.2 seconds for 14-bit RAW) after the shutter release is pressed, hence you must subtract this from the timings shown above to get the actual write time.
*2 RAW Lossless compression and JPEG Fine. File size reported is the RAW and JPEG added together.
With a fast card the D300 delivers crushingly fast write times, in more thorough tests we measured write throughput as 24.5 MB/sec for the SanDisk Extreme IV, 14.1 MB/sec for the Lexar 133x and 20.4 MB/sec for a Lexar 300x UDMA (not shown above). This combined with excellent 'shoot and forget' background buffering means that you never really need to think about write times, no matter how large the file.
USB transfer speed
Method Transfer rate
CardBus PCMCIA adapter 10.5 MB/sec
Nikon D300 (Mass Storage device) 11.5 MB/sec
SanDisk Extreme IV USB 2.0 card reader 13.3 MB/sec
SanDisk Extreme IV Firewire 800 card reader 26.6 MB/sec
To test the D300's USB transfer speed we transferred approximately 256 MB of images (mixed RAW and JPEG) from a SanDisk Extreme IV 2 GB CF card. In this test the D300 performed fairly well, delivering about the same throughput as a typical USB 2.0 card reader.
Image parameters
With the introduction of the D300 and D3 digital SLRs Nikon has considerably improved its image parameter functionality. You now have four standard 'Picture Control' presets (Standard, Neutral, Vivid and Monochrome) plus the ability to load and save custom sets. Adjustment options have been expanded providing a much wider latitude for sharpening, contrast and saturation as well as the new brightness adjustment. Note also the 'Quick adjust' feature which allows for linked adjustment of sharpening, contrast and saturation. Lastly there's also a grid view which allows you to see all of the current picture control modes on a saturation vs. contrast (plus sharpness) grid.


Image parameter adjustments
Picture Control presets: Standard, Neutral, Vivid, Monochrome Picture Control adjustments Sharpening: 0 to 9 (10 levels) Contrast: Auto, -3,to +3 (7 levels) Brightness: -1, 0, +1 (3 levels) Saturation: Auto, -3 to +3 (7 levels) Hue: -3 to +3 (7 levels)
Picture Control presets
Below are samples of our test scene taken in each of the Image Optimization presets, we've also included a 100% crop from each image so you can see the sharpness level of each preset.
Thumbnail 100% crop
S
t
a
n
d
a
r
d
N
e
u
t
r
a
l


V
i
v
i
d
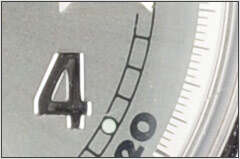
M
o
n
o
c
h
r
o
m
e


'Quick' adjustment
The 'quick adjust' option allows you to modify sharpening, contrast and saturation together to produce a more vivid / sharp image (positive adjustment) or neutral / softer image (negative adjustment). It's worth noting that making negative 'quick adjust' changes doesn't appear to affect these three parameters equally.
Thumbnail Luminosity histogram
-2


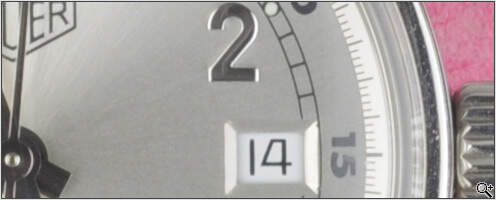
0


+2


Sharpening adjustment
The D300 provides a total of ten manual sharpening levels plus the traditional Nikon 'Auto' mode. The default sharpening level for Standard Picture Control mode is three, below you can see examples of Auto and levels 0, 2, 4, 6 and 8. Kudos to Nikon for providing a wide range of sharpening options which cover a wide latitude of adjustment, and for delivering higher sharpening by default than they have in the past.
Sharpening: Auto

Sharpening: 0

Sharpening: 2

Sharpening: 4

Sharpening: 6

Sharpening: 8
Contrast adjustment
Adjusting the tone alters the shape of the 'S curve' used to map the linear image data captured by the sensor into the correct gamma. A lower contrast setting maintains more of the original data's dynamic range but leads to a flatter looking image. A higher contrast setting stretches the grayscale (dark to light) of the image and could lead to clipping of both shadow detail and highlights. I'm very pleased to see Nikon providing a wider range of adjustment (seven levels in total) however the latitude of change is smaller than I would have expected, we would expect -3 to provide very flat images and +3 very contrasty.
Thumbnail Luminosity histogram
-3

0

+3

Brightness adjustment
New and unique is the Brightness adjustment which makes a subtle linear brightness adjustment to the image, essentially shifting the 'black point' slightly from the default, it may have been more useful if it had more latitude of adjustment than just -1 or +1.
Thumbnail Luminosity histogram
-1

0

+1

Saturation (color) adjustment
Saturation adjustment allows you to control the strength of color in the final image. Compared to previous Nikon digital SLRs the range of saturation adjustment on the D300 is considerably larger (Kudos for that) but I would perhaps have liked even less saturation at the -3 end of the scale.
Thumbnail 50% crop
-3

0

+3

Hue (color) adjustment
The hue adjustment setting allows you to make some subtle changes to the hue output of the image, it is useful for compensation of hue shifts caused by certain artificial light, a negative setting makes color appear more blue-ish, a positive setting makes color appear more yellow-ish.
Thumbnail 50% crop
-3

0
+3

Active D-Lighting
D-Lighting is a shadow & highlight enhancement feature first seen on Nikon's Coolpix range of compact cameras and later on the D200. On previous models it was an after-the-fact filter which you could apply to images in playback mode. With the D300 'Active' D-Lighting is a menu setting which is applied to all images if enabled. There are four levels available; Off, Low, Normal and High. Rather than only adjusting the shape of the tone curve (as most similar systems do) setting higher levels appears to apply a third of a stop negative exposure compensation (typically slightly higher shutter speed). Unlike the Sony DRO system Nikon's works best if you meter for shadows (apply some positive exposure compensation) and allow Active D-Lighting to maintain / recover highlight detail.
To demonstrate the difference Active D-Lighting can make we set up our simple 'shadow scene' and shot it at increasing exposure compensation levels with Active D-Lighting Off and also set to High. As you can see the High setting manages to maintain highlight detail with about +1.0 EV compensation, beyond that while it is better than Off even the High setting can't maintain full highlight detail.
Active D-Lighting: Off Active D-Lighting: High

1/25 sec, F8 1/30 sec, F8


1/13 sec, F8 (+1.0 EV) 1/15 sec, F8 (+1.0 EV)


1/6 sec, F8 (+2.0 EV) 1/8 sec, F8 (+2.0 EV)


0.3 sec, F8 (+3.0 EV) 1/4 sec, F8 (+3.0 EV)
Software
The D300 is provided with a software CD which contains:
Nikon View NX (Windows / Mac OS X) - A new simplified image browser / organization / basic manipulation application based on the Capture NX design (although it has to be said, easier to use). Provides basic RAW to JPEG conversion with adjustment of exposure compensation, white balance and picture control.
Nikon Transfer (Windows / Mac OS X) - Automated transfer of images from camera or card reader.
Nikon Capture NX (Windows / Mac OS X) - Nikon's advanced workflow and RAW development application, has traditionally been an 'optional extra' however a current promotion means that the D300 and D3 are being shipped with Capture NX keys in many regions enabling the 'trial download' to be upgraded to a full release.
RAW conversion
As is normal in our digital SLR reviews I like to compare the supplied RAW conversion software, any optional manufacturer RAW conversion software and some third party RAW converter. In the case of the A700 we had the supplied Image Data Converter SR as well as Adobe Camera RAW 4.3 beta.
JPEG - Large/Fine, Default settings View NX - Nikon View NX 1.0.3 Capture NX - Nikon Capture NX 1.3 ACR - Adobe Camera RAW 4.3.1 Bibble - Bibble Pro 4.9.9b
Color reproduction
Place your mouse over the label below the image to see the color from a GretagMacbeth ColorChecker chart produced using each RAW converter. As you can see both View NX and Capture NX match the color response of the cameras internal image processor identically. As usual the third party converters, in this case Adobe Camera RAW and Bibble Pro have their own 'different' color response.

JPEG Standard RAW View NX RAW Capture NX RAW Adobe ACR
RAW Bibble Pro
Sharpness and Detail
As expected the RAW converted images look sharper than JPEG (images look crisper and demostrate better per-pixel sharpness), it does appear as though View NX and Capture NX are using the same engine as their output is identical. Overall there's little difference in sharpness between the three RAW conversion engines compared here.
J
P
E
G
V
i
e
w
N
X

C
a
p
t
u
r
e
N
X
A
C
R
B
i
b
b
l
e
Resolution
Again, the sharpness advantage to RAW conversion is fairly clear to see, all converters delivering higher resolution than JPEG straight from the camera. The image with the most resolution and fewest artifacts appears to be that produced by Bibble Pro.


JPEG from camera Nikon View NX 1.0.3 (RAW)

Nikon Capture NX 1.3 (RAW) Adobe Camera RAW 4.3.1 (RAW)

Bibble Pro 4.9.9b (RAW)
ISO / Sensitivity accuracy
In a new addition to our reviews we are now measuring the actual sensitivity of each indicated ISO sensitivity. This is achieved using the same shots as are used to measure ISO noise levels, we simply compare the exposure for each shot to the metered light level (using Sekonic L-358), middle gray matched. We estimate the accuracy of these results to be +/- 1/6 EV.
Like many recent digital SLRs all four in this comparison proved to be right on the spot with their indicated sensitivity, that is to say an indicated sensitivity of say ISO 200 was exactly that (unlike some older digital SLRs which were slightly more or less sensitive than indicated).
Indicated
sensitivity Nikon D300
(actual sensitivity) Sony DSLR-A700
(actual sensitivity) Canon EOS 40D
(actual sensitivity) Olympus E-3
(actual sensitivity)
ISO 100 ISO 100 ISO 100 ISO 100 ISO 100
ISO 200 ISO 200 ISO 200 ISO 200 ISO 200
ISO 400 ISO 400 ISO 400 ISO 400 ISO 400
ISO 800 ISO 800 ISO 800 ISO 800 ISO 800
ISO 1600 ISO 1600 ISO 1600 ISO 1600 ISO 1600
ISO 3200 ISO 3200 ISO 3200 ISO 3200 ISO 3200
ISO 6400 ISO 6400 ISO 6400 n/a n/a
ISO Sensitivity / Noise levels
ISO equivalence on a digital camera is the ability to increase the sensitivity of the sensor. The works by turning up the "volume" (gain) on the sensor's signal amplifiers (remember the sensor is an analogue device). By amplifying the signal you also amplify the noise which becomes more visible at higher ISO's. Many modern cameras also employ noise reduction and / or sharpness reduction at higher sensitivities.
To measure noise levels we take a sequence of images of a GretagMacBeth ColorChecker chart (controlled artificial daylight lighting). The exposure is matched to the ISO (ie. ISO 200, 1/200 sec for consistency of exposure between cameras). The image sequence is run through our own proprietary noise measurement tool (version 1.4 in this review).Click here for more information. (Note that noise values indicated on the graphs here can not be compared to those in other reviews). Room temperature is approximately 22°C (~72°F), simulated daylight lighting.
Nikon D300 vs. Canon EOS 40D vs. Sony DSLR-A700 vs. Olympus E-3
Nikon D300: Nikkor 50 mm F1.4 lens, Manual exposure, Manual WB,
Default Parameters (Normal), High ISO NR (Normal), JPEG Large / Fine
Canon EOS 40D: Canon 50 mm F1.4 lens, Manual exposure, Manual WB,
Default Parameters (Standard), High ISO NR (Default; Off), JPEG Large / Fine
Sony DSLR-A700: Minolta 50 mm F1.4 lens, Manual exposure, Manual WB,
Default Parameters (Standard), High ISO NR (Normal - default), JPEG Large / Fine
Olympus E-3: Olympus 50 mm F2.0 Macro lens, Manual exposure, Manual WB,
Default Parameters (Natural), JPEG Large / Fine
Nikon D300
ISO 100 Canon EOS 40D
ISO 100 Sony DSLR-A700
ISO 100 Olympus E-3
ISO 100


Nikon D300
ISO 200 Canon EOS 40D
ISO 200 Sony DSLR-A700
ISO 200 Olympus E-3
ISO 200


Nikon D300
ISO 400 Canon EOS 40D
ISO 400 Sony DSLR-A700
ISO 400 Olympus E-3
ISO 400


Nikon D300
ISO 800 Canon EOS 40D
ISO 800 Sony DSLR-A700
ISO 800 Olympus E-3
ISO 800


Nikon D300
ISO 1600 Canon EOS 40D
ISO 1600 Sony DSLR-A700
ISO 1600 Olympus E-3
ISO 1600


Nikon D300
ISO 3200 Canon EOS 40D
ISO 3200 Sony DSLR-A700
ISO 3200 Olympus E-3
ISO 3200


Nikon D300
ISO 6400 Canon EOS 40D
n/a Sony DSLR-A700
ISO 6400 Olympus E-3
n/a


From ISO 100 to 400 there is virtually no difference from a noise point of view between any of these cameras, none exhibit noticeable any noise. Indeed visible noise only begins to creep into the D300 shots at around ISO 1600, at which point it has a very 'natural' monochromatic grain appearance (not want to be too cliched but 'film like'). At ISO 3200 the effects of the D300's noise reduction are more obvious if you look closely at the detail crop. ISO 6400 really is only for the brave or those emergency situations. It has to be said that out of these four cameras the D300 has the nicest appearance to its higher sensitivity images, Nikon's decision to preserve as much luminance detail as possible by using mostly chroma noise reduction really pays off.
* These results are with the cameras in their default modes, the EOS 40D for example does have anoptional stronger chroma noise reduction option which delivers images with almost no chroma noise.
Noise graphs
Note that we normally show both gray and black results on the same graph, comparing four cameras this became too difficult to read hence we have two separate graphs, one for the gray patch (middle gray) and one for the black patch (shadows).
Luminance noise graph (gray patch)
The D300's noise reduction kicks in at ISO 800 from their upwards noise around the middle gray level increases in a steady manner to ISO 3200 then there's a fairly obvious jump at ISO 6400 (which can also be seen in the crops above as fine grain).

Indicated ISO sensitivity is on the horizontal axis of this graph, standard deviation of luminosity on the vertical axis.
Luminance noise graph (black patch)
Much the same story for the black patch (which generally represents shadow noise), noise reduction drops the noise level at ISO 800, consistent growth from there to ISO 3200 then a jump at ISO 6400.

Indicated ISO sensitivity is on the horizontal axis of this graph, standard deviation of luminosity on the vertical axis.
Chroma (color) noise graph
Because the D300's noise reduction appears to be mostly chroma based we get the biggest change in noise levels when measuring chroma (color) noise, at ISO 800 chroma noise is actually lower than at ISO 200.

Indicated ISO sensitivity is on the horizontal axis of this graph, standard deviation of color on the vertical axis.
In-camera High ISO noise reduction
The D300 has four different levels of noise reduction; Off, Low, Normal and High (with Normal as the default). The good news is that the Normal setting is tuned quite nicely to give a good answer to the compromise between noise levels and detail and that the latitude of adjustment between 'Off' and 'High' is great enough for this option to be useful. If you have your own noise reduction workflow or prefer your images with no potential NR smearing you can choose the Off option, if you want to avoid noise almost completely and aren't too concerned that detail may be compromised High is for you.

Indicated ISO sensitivity is on the horizontal axis of this graph, standard deviation of luminosity on the vertical axis (note that the standard deviation scale here has been extended 3x compared to the graphs on the previous page).
Noise reduction crop comparisons (ISO 800 - 6400)
ISO 800
NR Off ISO 800
NR Low ISO 800
NR Normal ISO 800
NR High


ISO 1600
NR Off ISO 1600
NR Low ISO 1600
NR Normal ISO 1600
NR High


ISO 3200
NR Off ISO 3200
NR Low ISO 3200
NR Normal ISO 3200
NR High


ISO 6400
NR Off ISO 6400
NR Low ISO 6400
NR Normal ISO 6400
NR High


Dynamic Range
Our new Dynamic Range measurement system involves shooting a calibrated Stouffer Step Wedge (13 stops total range) which is backlit using a daylight balanced lamp (98 CRI). A single shot of this produces a gray scale wedge from (the cameras) black to clipped white (example below). Each step of the scale is equivalent to 1/3 EV (a third of a stop), we select one step as 'middle gray' and measure outwards to define the dynamic range. Hence there are 'two sides' to our results, the amount of shadow range (below middle gray) and the amount of highlight range (above middle gray).

To most people highlight range is the first thing they think about when talking about dynamic range, that is the amount of highlight detail the camera can capture before it clips to white. Shadow range is more complicated, in our test we stop measuring values below middle gray as soon as the luminance value drops below our defined 'black point' (about 2% luminance) or the signal-to-noise ratio drops below a predefined value (where shadow detail would be swamped by noise), whichever comes first.
Active D-Lighting feature
We've already covered the visible effect of Active D-Lighting on a simple test sceneearlier in this review, below you can see a graphical representation of the curve produced by each mode. As you can see none of these modes actually extend highlight range, they do improve shadow range somewhat and also the response from middle gray upwards.
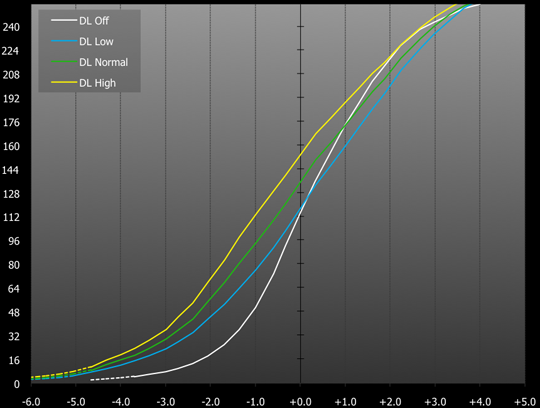
Picture Control presets
The graph below shows the dynamic range response from each of the D300's three Picture Control presets (excluding monochrome). As you can see each has a slightly different tone curve but none achieves any better highlight range. Arguably the best overall range (because of its lighter and hence extended shadow range) comes from the Neutral setting.

ISO Sensitivity and Dynamic Range
The D300 has an indicated base sensitivity of ISO 200, sensitivities below this (ISO 160, 125 and 100) are indicated as L0.3, L0.7 and L1.0 respectively. The same is true above ISO 3200 with ISO 6400 indicated as H1.0. As you can see from graph below the compromise at ISO 100 is highlight range which falls just over two thirds of a stop (0.7 EV) short of the highlight range seen from ISO 200 upwards.
From ISO 200 upwards the D300 demonstrates excellent dynamic range, around nine stops in total with a useful four stops of that above middle gray (what we call highlight range). This is a significant improvement over the D200 which had a highlight range of around three and a third EV. Shadow range is slightly better at ISO 400 and 800 because of increased noise reduction (not specifically an improvement in actual range).
Sensitivity Shadow range Highlight range Usable range
ISO 100* -5.2 EV 3.3 EV 8.5 EV
ISO 200 -4.7 EV 4.1 EV 8.8 EV
ISO 400 -5.1 EV 4.1 EV 9.2 EV
ISO 800 -5.1 EV 4.1 EV 9.2 EV
ISO 1600 -4.3 EV 4.1 EV 8.4 EV
ISO 3200 -4.0 EV 4.0 EV 8.0 EV
ISO 6400* -3.7 EV 3.9 EV 7.6 EV
360docimg_501_
* Non-standard sensitivities
Dynamic Range compared
All of the current crop of 'advanced amateur / semi-professional' digital SLRs (D300, A700, 40D and E-3) deliver around nine stops of dynamic range. The biggest difference is in the balance of the range, the D300 and A700 both deliver around four stops of highlight range (above middle gray) where as the 40D around three and a half and the E-3 around three. Both the 40D and E-3 deliver more shadow range.
Camera Shadow range
Highlight range
Usable range
Nikon D300 (ISO 200) -4.7 EV 4.1 EV 8.8 EV
Sony DSLR-A700 (ISO 200) -4.9 EV 3.9 EV 8.8 EV
Canon EOS 40D (ISO 100) -5.7 EV 3.4 EV 9.1 EV
Olympus E-3 (ISO 100) -5.7 EV 3.0 EV 8.8 EV
Nikon D200 (ISO 100) -5.0 EV 3.2 EV 8.2 EV
360docimg_502_
The wedges below are created by our measurement system from the values read from the step wedge, the red lines indicate approximate shadow and highlight range (the dotted line indicating middle gray).
360docimg_503_
360docimg_504_
360docimg_505_
360docimg_506_
360docimg_507_
RAW headroom
Experience has told us that there is typically around 1 EV (one stop) of extra information available at the highlight end in RAW files and that a negative digital exposure compensation when converting such files can recover detail lost to over-exposure. As with previous reviews we settled on Adobe Camera RAW for conversion to retrieve the maximum dynamic range from our test shots.
As you can see the default Adobe Camera RAW conversion delivers less dynamic range than JPEG from the camera (a more contrasty tone curve and less noise reduction in shadows). The best we could achieve was just under ten stops (10 EV) of total dynamic range - at the optimum ISO 200, more importantly almost a stop of that is in highlights (although with no guarantee of color accuracy).
It's also worth noting that we are indeed plotting both 12-bit and 14-bit RAW modes on the graphs below but that because their results were absolutely identical you can't really distinguish one from the other. 14-bit RAW in theory provides you with more 'data points' between the maximum and minimum brightness (the dynamic range) which could be useful for level-type adjustments.
ACR Default: Exp. 0.0 EV, Blacks 5, Contrast +25, Curve Medium ACR Best: Exp. -1.5 EV, Blacks 1, Brightness + 50, Contrast -50, Curve Linear
360docimg_508_
360docimg_509_
360docimg_510_
360docimg_511_
360docimg_512_
360docimg_513_
360docimg_514_
WARNING: Although ACR was able to retrieve the 'luminance' (brightness) of wedge steps which were previously clipped there's no guarantee of color accuracy as individual channels may clip before others. This can be seen fairly clearly in the examples below, on the right the negative digital exposure compensation has revealed some more detail but this soon turns into gray as one or more of the color channels clips.
Adobe Camera RAW default conversion Adobe Camera RAW with -2.5 EV digital comp.
360docimg_515_
360docimg_516_
360docimg_517_360docimg_518_
Color reproduction
Here you can see a generated GretagMacbeth ColorChecker chart, place your mouse over any of the labels below it to see the color reproduction in that mode. Select a camera/setting combination from the 'Compared to' drop-down to comparative boxes inside each patch.
Apart from a few subtle contrast differences the D300 delivers virtually identical color response (hue and saturation) as the D200, and to a large degree this is a good thing as it means consistent results for upgraders and heps to maintain a 'family look' for all Nikon DSLR models.
Nikon D300 Compared to: - Nothing - Canon EOS 1000D (Standard) Canon EOS 1000D (Neutral) Canon EOS-1Ds Mk III (Standard) Canon EOS-1Ds Mk III (Faithful) Canon EOS 30D (Standard) Canon EOS 30D (Neutral) Canon EOS 400D (Standard) Canon EOS 400D (Neutral) Canon EOS 40D (Standard) Canon EOS 40D (Neutral) Canon EOS 450D (Standard) Canon EOS 450D (Neutral) Canon EOS 500D (Standard) Canon EOS 500D (Portrait) Canon EOS 50D (Standard) Canon EOS 50D (Natural) Canon EOS 5D MK2 (Standard) Canon EOS 5D MK2 (Natural) Fujifilm S5 Pro (Std) Fujifilm S5 Pro (Film F1) Leica M8 (sRGB) Leica M8 (Adobe RGB) Nikon D200 (Normal) Nikon D200 (Softer) Nikon D3 (Standard) Nikon D3 (Neutral) Nikon D300 (Standard) Nikon D300 (Neutral) Nikon D3x (Standard) Nikon D3x (Neutral) Nikon D40 (Normal) Nikon D40 (Softer) Nikon D40 (Vivid) Nikon D40X (Normal) Nikon D40X (Softer) Nikon D40X (Vivid) Nikon D5000 (Standard) Nikon D5000 (Neutral) Nikon D60 (Normal) Nikon D60 (Softer) Nikon D60 (Vivid) Nikon D700 (Standard) Nikon D700 (Neutral) Nikon D80 (Normal) Nikon D80 (Softer) Nikon D80 (Vivid) Nikon D90 (Standard) Nikon D90 (Neutral) Olympus E-3 (Natural) Olympus E-3 (Vivid) Olympus E-30 (Natural) Olympus E-30 (vivid) Olympus E-330 (Vivid) Olympus E-330 (Natural) Olympus E-410 (Natural) Olympus E-410 (Vivid) Olympus E-420 (Natural) Olympus E-420 (Vivid) Olympus E-510 (Natural) Olympus E-510 (Vivid) Olympus E-520 (Natural) Olympus E-520 (Vivid) Olympus E-620 (Natural) Olympus E-620 (Vivid) Panasonic DMC-G1 (Standard) Panasonic DMC-G1 (Dynamic) Panasonic DMC-GH1 (Standard) Panasonic DMC-GH1 (Dynamic) Panasonic DMC-L1 (Standard) Panasonic DMC-L1 (Dynamic) Panasonic DMC-L10 (Standard) Panasonic DMC-L10 (Dynamic) Pentax K100D (Bright) Pentax K100D (Natural) Pentax K10D (Natural) Pentax K10D (Bright) Pentax K200D (Bright) Pentax K200D (Natural) Pentax K20D (Bright) Pentax K20D (Natural) Pentax K2000 (Bright) Pentax K2000 (Natural) Sigma DP1 (Standard) Sigma DP1 (Adobe RGB) Sony DSLR-A200 (Standard) Sony DSLR-A200 (Vivid) Sony DSC-R1 (Standard) Sony DSC-R1 (Vivid) Sony DSLR-A100 (Standard) Sony DSLR-A100 (Vivid) Sony DSLR-A200 (Standard) Sony DSLR-A200 (Vivid) Sony DSLR-A350 (Standard) Sony DSLR-A350 (Vivid) Sony DSLR-A700 (Standard) Sony DSLR-A700 (Vivid) Sony DSLR-A900 (Standard) Sony DSLR-A900 (Natural)
360docimg_519_
Standard Neutral Vivid Monochrome
Adobe RGB
Artificial light White Balance
The D300's automatic white balance in artificial light could be described as slightly better than the average but still poor enough for you to consider using the bulit-in presets, to shoot manual white balance or better still shoot RAW and sort out the white balance later. It's still a curiosity to me that the DSLR manufacturers haven't yet sorted out automatic white balance in artificial light, there isn't one current DSLR which stands out as allowing you to shoot confidently in auto white balance mode in such light.
360docimg_520_360docimg_521_
Incandescent - Auto WB
Red: 9.9%, Blue: -19.8%, Poor Incandescent - Incandescent preset WB
Red: 7.6%, Blue: -12.7%, Poor
360docimg_522_360docimg_523_
Fluorescent - Auto WB
Red: 6.0%, Blue: -15.6%, Average
Fluorescent - Fluorescent preset WB
Red: 5.4%, Blue: -4.2%, Average
Long Exposure noise reduction / Night shots
As is becoming the norm our 30 second 'night shot' exposure produced no hot pixels with noise reduction turned off. The D300 does provide optional 'dark frame subtraction' noise reduction which requires a noise sample frame to be taken directly after the main exposure.
Noise reduction Off Noise reduction On
360docimg_524_360docimg_525_
ISO 100, 30 sec, F8 ISO 100, 30 sec, F8
360docimg_526_360docimg_527_
(100% crops)
Flash
The D300's built-in flash produced a decent enough performance, well metered, no color cast and even coped well with our test chart with its white background (something which often throws out most metering systems). The D300 uses the newer i-TTL metering for internal (and external if compatible) flash which produces three lower powered pre-flashes before the main flash.
360docimg_528_360docimg_529_
Overall Image Quality / Specifics
Overall the D300's image quality is very impressive, Nikon have taken big strides in the last few years to catch up with and I would go so far as saying overtake much of the competition. On almost every metric image quality is improved; lower noise, higher dynamic range, better default JPEG sharpness and a now brand-consistent color response.
As we have come to expect Nikon have taken a more conservative approach to image sharpening than we see from their competitors, that said the situation is certainly better than it was with the D200 where our general recommendation was to turn sharpening up to its maximum setting when shooting JPEG.
Mentioned before, but it's worth mentioning again; we do prefer Nikon's approach to noise reduction. The visibility of noise comes in two distinguishable flavors; luminance (monochromatic grain) and chroma (color grain / blotches), Nikon tend to use mostly chroma noise reduction leaving luminance either untouched or reduced using very low levels of NR. This tends to leave higher sensitivity images looking grainy but without the smeary loss of detail we see from other noise reduction systems. The appearance of monochromatic grain in an image is far less of a concern than the loss of real detail because of overpowering luminance noise reduction, indeed many prefer this look as a more 'film like' response.
Built-in Chromatic Aberration correction
The D300 and D3 feature built-in Chromatic Aberration (CA) correction. This feature works by analysing the image, the image processor looks for CA in the image and actively corrects for it. If you're shooting RAW the analysis still occurs but instead of being applied the results of the analysis are simply written into metadata and are used by Capture NX to (optionally) correct. Obviously if you're using a third party RAW converter you won't get automatic CA correction. Our experience was that this worked very well and delivered surprising levels of CA reduction while also improving sharpness (probably due to the fact that the correction itself is effectively drawing the color channels back into alignment).
The amount of correction achieved can be demonstrated pretty clearly with the following graphs (from our lens analysis software). The top graph from Adobe Camera RAW with no CA correction, the bottom from a camera JPEG with the D300's automatic CA correction. Lens: 18-200 mm @ 18 mm, F3.5 (wide open).
360docimg_530_
360docimg_531_
Below you can see a visual comparison of the difference between images, shot as RAW+JPEG, the RAW image converted using Adobe Camera RAW.
Adobe Camera RAW JPEG
360docimg_532_360docimg_533_
A crop from our lens test chart, magnified 200% The same crop but shot as JPEG
360docimg_534_360docimg_535_
360docimg_536_360docimg_537_
360docimg_538_360docimg_539_
360docimg_540_360docimg_541_
Compared to...
As you can see from the balance between the positives / negatives versus the competition (below) the D300 is, on paper at least, one of the strongest DSLRs on the market. Its Live View feature provides both contrast-detect (like a compact digital camera) and passive (mirror-down) auto-focus options as well as a highly magnified option, these deliver excellent usability on the D300's next strong feature; its large, high resolution (640 x 480) LCD monitor and also in a studio setting through its HDMI output. Auto focus is mature and flexible with the highest number of AF points and largest range of selection / grouping options of any camera here and there's almost no need to mention the superb 1005 pixel RGB metering sensor which is widely accepted as probably the best in the business. Dive into the menus and the D300's extensive custom functions make it (along with the D3) one of the most configurable cameras on the market, providing the photographer with a massive range of customization and adjustment.
Positives versus the competition
Both passive (mirror-down) and contrast-detect auto-focus in Live View Full 1:1 magnified view in Live View 51 point AF with wide range of selection / grouping options White light AF assist lamp (over the EOS 40D and E-3 which require flash to be raised) AF 'fine tuning' adjustment can be set for body and per lens Arguably the best metering of the bunch (1005 pixel RGB sensor) High shutter life Fully flexible Auto ISO function (max ISO and min shutter speed configurable) Up to eight frames per second continuous shooting with optional grip and battery Very flexible control system, various configurable buttons, dial operation 3.0" 922,000 dot LCD monitor (also on DSLR-A700) Detailed battery information (including lifetime / aging) High definition HDMI video output (also on DSLR-A700)
Negatives versus the competition
Fixed LCD reduces the usefulness of Live View No built-in body stabilization (arguable as a negative but seen in two other SLRs here) No mirror lock-up (although 'exposure delay' can be used)
360docimg_542_
Nikon D300
360docimg_543_
Canon EOS 40D
360docimg_544_
Olympus E-3
360docimg_545_
Sony DSLR-A700
Price (body only) $1800[check] $1300[check] $1700[check] $1400[check]
Quality zoom price • Nikon 18-200mm VR
• F3.5-F5.6
• 27-300 mm equiv.
• $750
• Canon 17-85mm IS
• F4.0-F5.6
• 27.2-136 mm equiv.
• $600
• Olympus 14-54 mm
• F2.8-F3.5
• 28-108 mm equiv.
• $500 • Sony 16-105mm DT
• F3.5-F5.6
• 24-157.5 mm equiv.
• $550
Dust removal • Self-cleaning filter
• Dust-off image • Self-cleaning filter
• Anti-static coating
• Dust delete data • SSW filter • CCD-shift shake
• Anti-static coating
Environmental sealing • Splash proof
• Dust proof
• Sealed lenses available • Environmental seals on battery and CF compartment doors
• Sealed lenses available • Weatherproof seals throughout
• Sealed lenses available • Weatherproof seals throughout
Sensor type CMOS CMOS Live MOS CMOS
Sensor size 23.6 x 15.8 mm 22.2 x 14.8 mm 17.3 x 13.0 mm 23.5 x 15.6 mm
Sensor area 373 mm² 329 mm² 225 mm² 367 mm²
Image Stabilization Lenses only Lenses only Built-in sensor shift Built-in sensor shift
Effective pixels 12.3 million 10.1 million 10.1 million 12.3 million
Aspect ratio 3:2 3:2 4:3 3:2
FOV crop 1.5x 1.6x 2.0x 1.5x
Image size 4288 x 2848 3888 x 2592 3648 x 2736 4272 x 2848
Live View • Yes
• Up to 1:1 pixel view
• Contrast detect AF
• Mirror flip AF • Yes
• Up to 10x magnify
• Mirror flip AF
• Different modes • Yes
• Up to 10x magnify
• Mirror flip AF No
Lens support • Nikon F mount • Canon EF / EF-S • Four Thirds • Sony Alpha
• Minolta A-type
File formats JPEG, TIFF, RAW (NEF 12-bit / NEF 14-bit) JPEG, RAW (CR2) JPEG, RAW (ORF) JPEG, RAW (ARW), cRAW (ARW)
Auto focus • 51 point
• 15 cross-type
• -1 to 19 EV • 9 point
• 9 cross-type
• -0.5 to 18 EV • 11 point
• 11 cross-type
• -2 to 19 EV • 11 point
• 1 double cross-type
• 0 to 18 EV
• Eye-start AF option
AF illuminator White lamp Flash strobe Flash strobe Red lamp pattern
AF adjustment Yes, body and per lens No No No
Metering sensor 1005 pixel RGB 35 zone 49 zone 40 segment
Metering range 0 to 20 EV 0 to 20 EV 1 to 20 EV 0 to 20 EV
Metering modes 3D Color Matrix, CWA, Spot Evaluative, Partial, Spot, CWA ESP, CWA, Spot, Highlight spot, Shadow spot Multi-segment, CWA, Spot
Exp. comp. +/- 5.0 EV +/- 2.0 EV +/- 5.0 EV +/- 3.0 EV
Exp. comp. EV steps 0.3, 0.5 or 1.0 EV 0.3 or 0.5 EV 0.3, 0.5 or 1.0 EV 0.3 or 0.5 EV
Manual EV steps 0.3, 0.5 or 1.0 EV 0.3 or 0.5 EV 0.3, 0.5 or 1.0 EV 0.3 or 0.5 EV
Sensitivity range (boost setting) (100), 200 - 3200, (6400) 100 - 1600, (3200) 100 - 3200 100 - 1600, (3200, 6400)
Auto ISO adjust Max ISO & Min shutter speed selectable No Max & Min ISO selectable Max & Min ISO selectable
Shutter speed 30 - 1/8000 sec 30 - 1/8000 sec 60 - 1/8000 sec 30 - 1/8000 sec
Shutter life 150,000 exposures 100,000 exposures 150,000 exposures 100,000 exposures
Continuous rate (high) 6.0 fps (8.0 fps with battery grip) 6.5 fps 5.0 fps 5.0 fps
Continuous buffer • 100 JPEG Norm
• 17 RAW • 75 JPEG
• 17 RAW • ?? JPEG
• 19 RAW • Unlimited JPEG
• 18 RAW / 25 cRAW
White balance • 7 presets
• Color temp (K)
• Manual (4 mem.) • 6 presets
• Color temp (K)
• Manual • 7 presets
• Color temp (K)
• Manual (4 mem.) • 6 presets
• Color temp (K)
• Manual (3 mem.)
Image parameters • 4 presets
• Saturation +/- 3, A
• Contrast +/- 3, A
• Brightness +/- 1
• Hue +/- 3
• Sharpness 0-9, A
• Quick adjust +/- 2
• 6 presets / 3 user
• Saturation +/- 4
• Contrast +/- 4
• Color tone +/- 4
• Sharpness 0-7
• 5 presets / 1 user
• Saturation +/- 2
• Contrast +/- 2
• Sharpness +/- 2
• Gradation (3) • 13 presets / 3 user
• Saturation +/- 3
• Contrast +/- 3
• Brightness +/-3
• Sharpness +/- 3
• Zone -1 to +2
Noise reduction control 4 levels 1 additional level 4 levels 3 levels
DR / Shadow adjust. Active D-Lighting (4 levels) None Shadow adjustment DRO (3 modes plus 5 manual settings)
Built-in flash • Manual pop-up
• Guide no. 12 (ISO 100) • Electronic pop-up
• Guide no. 13 (ISO 100) • Electronic pop-up
• Guide no. 13 (ISO 100) • Manual pop-up
• Guide no. 12 (ISO 100)
External flash • Hot-shoe
• PC sync terminal
• Wireless flash • Hot-shoe
• PC sync terminal
• Wireless flash • Hot-shoe
• PC sync terminal
• Wireless flash • Hot-shoe
• PC sync terminal
• Wireless flash
Flash sync speed 1/250 sec (1/320 sec reduced Guide no.) 1/250 sec 1/250 sec 1/250 sec
Customizable controls • FUNC button
• FUNC+dials
• Multi-selector cent.
• Preview button
• AE-L/AF-L button
• Dials • SET button
• AF-ON button
• AE lock button
• Dials
• Fn button
• AEL/AFL button
• Dials
• Custom button
• Preview button
• AF/MF button
• AEL button
• Dials
User memories 4 via menu 3 via dial positions 2 via menu 3 via 1 dial position
Delete in record review Yes Yes No Yes
Storage CF (inc. UDMA) CF (inc. UDMA) • CF (inc. UDMA)
• xD-Picture Card • CF (inc. UDMA)
• MS Duo / Pro Duo
Viewfinder • 100% coverage
• 0.94x magnification • 95% coverage
• 0.95x magnification • 100% coverage
• 1.15x magnification • 95% coverage
• 0.9x magnification
LCD monitor • 3.0" TFT LCD
• 922,000 dots • 3.0" TFT LCD
• 230,000 dots • 2.5" TFT LCD
• 230,000 dots • 3.0" TFT LCD
• 922,000 dots
LCD articulation No No Yes (flip-out & twist) No
Top panel LCD Yes Yes Yes No
Battery 11.1 Wh 10.3 Wh 10.8 Wh 11.8 Wh
Battery status • Percentage (%)
• Shots since charge
• Battery aging 5 stages 4 stages Percentage (%)
Vertical grip Yes, MB-D10 Yes, BP-E2N, BP-E2 & WFT-E3/E3A (WiFi) Yes, HLD-4 Yes, VG-C70AM
Mirror lock-up No, exposure delay Yes, custom function Yes, 1-30 sec Yes, with self-timer
Other features • On demand viewfinder grid
• GPS record with optional cable
• Retouching • Custom 'My Menu' • RAW development
• JPEG edit • Included IR remote
Video output HDMI (up to 1080i) Composite Composite HDMI (up to 1080i)
Dimensions 147 x 114 x 74 mm
(5.8 x 4.5 x 2.9 in) 146 x 108 x 74 mm
(5.7 x 4.2 x 2.9 in) 142 x 116 x 75 mm
(5.6 x 4.6 x 2.9 in) 142 x 105 x 80 mm
(5.6 x 4.3 x 3.3 in)
Weight (no batt) 825 g (1.8 lb) 740 g (1.6 lb) 800 g (1.8 lb) 690 g (1.5 lb)
Compared to...
The choice of cameras for comparison is the same as the specification comparison on the previous page, so that's the D300 versus the Canon EOS 40D, Olympus E-3 and Sony DSLR-A700. In addition we'll add the D200 in for a relative improvement comparison over the camera it replaces.
Lenses used
For direct comparisons we always use sharp prime lenses stopped down (F8-F9 or F6.3 for the Four Thirds lens). Here we have used the Minolta 50 mm F1.4, Canon EF 50 mm F1.4, Nikon 50 mm F1.8 and Olympus 50 mm F2.0 Macro.
Studio scene comparison (JPEG)
This is our standard studio scene comparison shot taken from exactly the same tripod position. Lighting: daylight simulation, >98% CRI. Crops are 100%. Ambient temperature was approximately 22°C (~72°F).
Nikon D300 vs Nikon D200
There are a few caveats you should consider when looking at the comparison below; firstly that the D200's default sharpening is less than the D300 and secondly that the D200's base sensitivity is ISO 100 where as it is ISO 200 with the D300.
Camera settings:
Nikon D300: Nikkor 50 mm F1.8 lens, Aperture Priority, ISO 200 (default base)
JPEG Large/Fine, Manual WB, Default Parameters (Normal), Self-Timer (with exposure delay)
Nikon D200: Nikkor 50 mm F1.8 lens, Aperture Priority, ISO 100 (default base)
JPEG Large/Fine, Manual WB, Default Parameters (Normal), Self-Timer
Nikon D300
Nikon D200
360docimg_546_360docimg_547_
4.4 MB JPEG (4288 x 2848)
4.2 MB JPEG (3872 x 2592)
360docimg_548_360docimg_549_
Firstly you can see the improvement in edge sharpness and texture definition gained from the slightly stronger sharpening employed by the D300. You can also see an improvement in the level and definition of detail thanks to two more megapixels (which equates to just 256 additional vertical lines). Tone and color balance are very similar, the D300 perhaps just a little more saturated, especially reds.
Studio scene comparison (JPEG)
This is our standard studio scene comparison shot taken from exactly the same tripod position. Lighting: daylight simulation, >98% CRI. Crops are 100%. Ambient temperature was approximately 22°C (~72°F).
Nikon D300 vs. Canon EOS 40D
Camera settings:
Nikon D300: Nikkor 50 mm F1.8 lens, Aperture Priority, ISO 200
JPEG Large/Fine, Manual WB, Default Parameters (Normal), Self-Timer (with exposure delay)
Canon EOS 40D: Canon EF 50 mm F1.4 lens, Aperture Priority, ISO 100
JPEG Large/Fine, Manual WB, Default Parameters (Standard), Self-Timer (with MLU)
Nikon D300
Canon EOS 40D
360docimg_550_360docimg_551_
4.4 MB JPEG (4288 x 2848)
3.2 MB JPEG (3888 x 2592)
360docimg_552_360docimg_553_
As with the D200 on the previous page the Canon EOS 40D comes to this comparison with a two megapixel (256 vertical lines) deficit, however it does appear to stand its ground a little better (helped somewhat by slightly stronger sharpening)*. The D300 does eke out a little more detail in some areas of the image and there's definitely a feeling of more natural texture response on the Baily's label crop (second from bottom). Overall however apart from the base sharpening differences there's not a huge amount between these two cameras and certainly in print it would be very difficult to pick a clear winner.
* The difference in sharpening with the D300 is not as significant as it was with the D200. If you prefer your images sharper (although obviously with the risk of sharpening halos) you can turn sharpening up to 4 or 5 from the default of 3, for comparison download links are below.
Also available
Nikon D300 JPEG, sharpening 4 (4.4 MB)Nikon D300 JPEG, sharpening 5 (4.6 MB)
Studio scene comparison (JPEG)
This is our standard studio scene comparison shot taken from exactly the same tripod position. Lighting: daylight simulation, >98% CRI. Crops are 100%. Ambient temperature was approximately 22°C (~72°F).
Nikon D300 vs. Sony DSLR-A700
Camera settings:
Nikon D300: Nikkor 50 mm F1.8 lens, Aperture Priority, ISO 200
JPEG Large/Fine, Manual WB, Default Parameters (Normal), Self-Timer (with exposure delay)
Sony DSLR-A700: Minolta 50 mm F1.4 lens, Aperture Priority, ISO 200
JPEG Large/Fine, Manual WB, Default Parameters (Standard), Self-Timer (auto MLU)
Nikon D300
Sony DSLR-A700
360docimg_554_360docimg_555_
4.4 MB JPEG (4288 x 2848)
3.5 MB JPEG (4272 x 2848)
360docimg_556_360docimg_557_
If you've read ourSony DSLR-A700 review you may already have seen this comparison. Both cameras have twelve megapixels, both have the same vertical pixel count, the D300 has 16 extra horizontal columns but that makes no difference. A quick scan down these crops indicates that there's very little difference in absolute image quality apart from perhaps slightly more low contrast ('texture') detail from the D300 and a very slightly more conservative approach to sharpening.
Studio scene comparison (JPEG)
This is our standard studio scene comparison shot taken from exactly the same tripod position. Lighting: daylight simulation, >98% CRI. Crops are 100%. Ambient temperature was approximately 22°C (~72°F).
Nikon D300 vs. Olympus E-3
Camera settings:
Nikon D300: Nikkor 50 mm F1.8 lens, Aperture Priority, ISO 200
JPEG Large/Fine, Manual WB, Default Parameters (Normal), Self-Timer (with exposure delay)
Olympus E-3: Olympus 50 mm F2.0 Macro lens, Aperture Priority, ISO 100
JPEG Large/Fine, Manual WB, Default Parameters (Natural), Self-Timer (with MLU)
Nikon D300
Olympus E-3
360docimg_558_360docimg_559_
4.4 MB JPEG (4288 x 2848)
4.5 MB JPEG (3648 x 2736)
360docimg_560_360docimg_561_
Because of the difference in aspect ratio between the Olympus E-3 and the D300 there isn't a huge vertical pixel count difference (just 112 lines) despite the two megapixel deficit, what's lost are to the left and right of the scene (and we frame these studio comparisons vertically). The E-3 produces very nice sharp images with plenty of low contrast detail (texture) and pretty good per pixel sharpness (we should note that the Olympus 50 mm F2.0 macro is a very sharp lens and may help a little here). As we have noted in both our E-3 and DSLR-A700 reviews you should perhaps compare the E-3's handling of highlights on the paperclips versus the D300.
Studio scene comparison (RAW)
For a (more) level playing field for comparison we also shot our studio scene in RAW mode with each camera and converted it using Adobe Camera RAW. Because Adobe Camera RAW applies different levels of sharpening to different cameras (this confirmed) we had to use the following workflow for these conversions:
Load RAW file into Adobe Camera RAW (Auto mode disabled) Set Sharpness to 0 (all other settings default) Open file to Photoshop Apply a Unsharp mask: 80%, Radius 1.0, Threshold 0 Save as a TIFF (for cropping) and as a JPEG quality 11 for download
This is our standard studio scene comparison shot taken from exactly the same tripod position. Lighting: daylight simulation, >98% CRI. Crops are 100%. Ambient temperature was approximately 22°C (~72°F). Camera settings as per previous pages.
Nikon D300 (RAW) vs. Canon EOS 40D (RAW)
Nikon D300 (RAW)
Canon EOS 40D (RAW)
360docimg_562_360docimg_563_
3.7 MB JPEG (4288 x 2848)
3.1 MB JPEG (3888 x 2592)
360docimg_564_360docimg_565_
Switching to a standard RAW converter (in this case our benchmark; Adobe Camera RAW) means that the image processing pipeline is equalized between the cameras. Both cameras gain from the use of ACR with images looking considerably sharper and better detailed than their JPEG equivalents. There is now a more obvious advantage to the D300, better defined areas of fine detail and more texture, although as previously mentioned you would need to be outputing at a very large size for these differences to be noticeable.
Studio scene comparison (RAW)
See previous page for RAW conversion notes.
This is our standard studio scene comparison shot taken from exactly the same tripod position. Lighting: daylight simulation, >98% CRI. Crops are 100%. Ambient temperature was approximately 22°C (~72°F). Camera settings as per previous pages.
Nikon D300 (RAW) vs. Sony DSLR-A700 (RAW)
Nikon D300 (RAW)
Sony DSLR-A700 (RAW)
360docimg_566_360docimg_567_
3.7 MB JPEG (4288 x 2848)
3.4 MB JPEG (4272 x 2848)
360docimg_568_360docimg_569_
Using a RAW conversion workflow there really is almost no difference between the DSLR-A700 and the Nikon D300, not hugely surprising as we suspect they share the same sensor (or at least very similar).
Studio scene comparison (RAW)
See previous page for RAW conversion notes.
This is our standard studio scene comparison shot taken from exactly the same tripod position. Lighting: daylight simulation, >98% CRI. Crops are 100%. Ambient temperature was approximately 22°C (~72°F). Camera settings as per previous pages.
Nikon D300 (RAW) vs. Olympus E-3 (RAW)
Nikon D300 (RAW)
Olympus E-3 (RAW)
360docimg_570_360docimg_571_
3.7 MB JPEG (4288 x 2848)
2.8 MB JPEG (3648 x 2736)
360docimg_572_360docimg_573_
As we have noted previously the E-3's RAW converted images actually look less sharp than JPEG, this is probably down to a stronger anti-alias filter which is compensated for by the camera processor with more sharpening. Using this comparison we can surmise that the D300 has a much lighter anti-alias filter which makes it easier to extract detail (less sharpening is required) with the compromise of potentially visible moire (although none is visible here).
Studio scene comparison (higher sensitivities)
Nikon's approach to noise reduction has always been chroma (color) noise reduction first, then relatively mild amounts of luminance noise reduction. This tends to leave its high sensitivity images looking more detailed but with potentially more visible luminance 'grain' noise (which isn't generally as objectionable as the more digital-like blotchy color noise).
ISO 1600
360docimg_574_360docimg_575_
Nikon D300 Canon EOS 40D
360docimg_576_360docimg_577_
Sony DSLR-A700 Olympus E-3
ISO 3200
360docimg_578_360docimg_579_
Nikon D300 Canon EOS 40D
360docimg_580_360docimg_581_
Sony DSLR-A700 Olympus E-3
ISO 6400
360docimg_582_360docimg_583_
Nikon D300 Sony DSLR-A700
Resolution Chart Comparison
Shots here are of our 'version two' resolution chart which provides for measurement of resolution up to 4000 LPH (Lines Per Picture Height). A value of 20 equates to 2000 lines per picture height. For each camera the relevant prime lens was used. The chart is shot at a full range of apertures and the sharpest image selected. Studio light, cameras set to aperture priority (optimum aperture selected), image parameters default. Exposure compensation set to deliver approximately 80% luminance of white area.
360docimg_584_360docimg_585_
Nikon D300 (3.3 KB; 12 MP)Canon EOS 40D (2.6 MB, 10 MP)
360docimg_586_360docimg_587_
Sony DSLR-A700 (2.6 MB, 12 MP)Olympus E-3 (3.3 MB; 10 MP)
360docimg_588_360docimg_589_
Nikon D300 Canon EOS 40D
360docimg_590_360docimg_591_
Sony DSLR-A700 Olympus E-3
360docimg_592_360docimg_593_
Nikon D300 Canon EOS 40D
360docimg_594_360docimg_595_
Sony DSLR-A700 Olympus E-3
360docimg_596_360docimg_597_
Nikon D300 Canon EOS 40D
360docimg_598_360docimg_599_
Sony DSLR-A700 Olympus E-3
Measurable results
Camera Measurement Absolute
resolution
Extinction
resolution
Nikon D300 Horizontal LPH 2200 2600
Vertical LPH 2100 2600
Canon EOS 40D Horizontal LPH 2100 2300
Vertical LPH 1800 2300
Sony DSLR-A700 Horizontal LPH * 2200 2900
Vertical LPH 2100 2800
Olympus E-3 Horizontal LPH * 2100 2400
Vertical LPH * 1800 2200
* Moire is visible
+ Chart maximum
LPH Lines per Picture Height (to allow for different aspect ratios the measurement is the same for horizontal and vertical)
Absolute resolution
Point at which all lines of a resolution bar are still visible and defined, beyond this resolution loss of detail occurs (below Nyquist frequency).
Extinction resolution Detail beyond camera's definition (becomes aliased)
As you can see from the figures (and crops) above there really is very little difference between ten and twelve megapixels, however the sensor design (anti-alias filter strength), imaging pipeline (demosaicing, sharpening) have a much more significant effect that megapixels alone. The D300's image is the cleanest here with no noticeable moire and almost invisible sharpening artifacts. The DSLR-A700 delivers as much absolute resolution and manages to delve a bit deeper beyond nyquist (to extinction resolution) but seemingly at the expense of some visible moire.
Conclusion - Pros
Very good resolution and detail without looking over-processed, even up to ISO 1600 Better balanced noise reduction than most; more chroma NR, less luminance NR High ISO 3200 perfectly usable (if slightly softer due to NR), ISO 6400 usable for small output Highly configurable Auto ISO function (can set maximum ISO and minimum shutter speed) Conservative approach to image processing (slightly lower sharpening) helps to avoid 'digital' artifacts Excellent dynamic range from ISO 200 - 800 (good highlight 'reach'), typical at ISO 1600 Seldom mentioned built-in chromatic aberration reduction is very effective (JPEG, RAWs through NX) Compact, solid body design with environmental sealing Quality glass pentaprism viewfinder (bright, large view) with electronic grid lines Professional in-use performance (instant power-up, short shutter lag and short viewfinder black-out) Improved auto-focus module (Multi-CAM3500DX) delivers fast and accurate AF lock even in low light Auto-focus fine-tuning by body or per lens Nikon's excellent 1005 pixel RGB metering sensor Numerous 'hidden' designed-in features; AF tracking by color, scene recognition system High speed continuous shooting (6 fps) can be boosted to 8 fps with grip & battery 150,000 exposure shutter life Now Nikon standard range of image parameter presets, addition of brightness adjustment Superb large, high resolution LCD (delivers full-color VGA; 640xRGB x 480) Live view with up to 1:1 pixel view, contrast detect AF as well as passive (mirror flip) AF HDMI video output (up to 1080i) Compact Flash UDMA support, very fast throughput overall Menu system is a pleasure to use, attractive, logical and built-in help Easy to use playback with very logical delete system (press delete button twice) Highly configurable via custom functions (6 configurable hard buttons / dials) Sophisticated interval timer feature Unique in-camera features: Overlay, Multiple exposures GPS data recording feature (requires optional cable, NMEA compatible) Built-in AF assist lamp (white light) Probably the best battery information display in the business (% charge, shots, aging) Optional wireless WiFi transmitter (802.11 b/g)
Conclusion - Cons
No timed mirror lock-up function (could be automatic with self-timer) Non-articulating LCD (increases the usefulness of Live View considerably) Average automatic white balance performance, still very poor under incandescent light
Overall conclusion
The D200 was a big step forward for Nikon, the 'baby D2X' certainly gave the competition a thing or two to think about. Its big problem was the fact that Canon was still a generation ahead in the noise stakes, managing to consistently deliver clean images despite megapixel jumps. With the advent of the D300 however Nikon has conclusively removed this disparity and if anything stepped ahead of Canon (mostly thanks to its chroma based noise reduction delivering more film-like grain rather than color blotches).
But that's just one aspect of the D300 story, almost everything else about this camera has been improved. Starting on the outside there's that stunning high resolution three inch LCD monitor, the usefulness of which shouldn't be underestimated (you'll find you get enough detail without magnifying as far), there's perhaps the best implementation of Live View to date with both contrast detect (like a compact camera, although not particularly fast) and passive auto-focus options, and there's HDMI output; a boon no doubt to studio photographers who can now provide live high resolution previews of a shot. And of course we can't talk about the D300 without giving Nikon credit for the superb build quality and robust 'go anywhere' feel the body has.
On the inside Nikon has worked hard to deliver both better image quality and better performance; you get usable images up to ISO 3200, extended image parameter control, improved dynamic range, automatic CA removal (which immediately improves the performance of all your lenses), six frames per second continuous shooting (eight with the grip / battery combo), a new AF sensor, AF tracking by color and scene recognition. There are also an almost infinite range of customization options available, everything from how many AF areas are used to the size of the center-weighted metering circle to what happens when you hold the FUNC button and turn the command dial.
My biggest problem writing this conclusion has been picking out the D300's weak points. The usefulness of Live View would certainly be improved with an articulating LCD monitor (although I'm sure Nikon would argue that this could compromise the integrity of the body), auto white-balance is poor in artificial light (although this isn't anything unique to the D300) and there's still no true mirror lock-up feature. But really, these few niggles are really the only things we could pick out as criticism.
There is price, but sometimes the best products demand a premium and the D300 is no exception. Nikon's biggest problem now will be bettering the D300; it raises the bar to a new high, and represents the state of the art despite strong competition from the likes of Canon, Sony and Olympus. There's simply no better semi-professional digital SLR on the market.
Detail (D-SLR) Rating (out of 10)
Build quality 9.5
Ergonomics & handling 8.5
Features 9.5
Image quality 9.0
Performance (speed) 9.5
Value 9.0
Highly Recommended
360docimg_600_
Want to make sure you don't miss out on any future articles?Sign up for our free weekly newsletter!
Enter the 'Nikon D300/D200/D100 Talk' Discussion Forum
Samples Galleries
There are 36 images in the samples gallery. Please do not reproduce any of these images on a website or any newsletter / magazine without prior permission (see ourcopyright page). We make the originals available for private users to download to their own machines for personal examination or printing (in conjunction with this review), we do so in good faith, please don't abuse it.
Unless otherwise noted images taken with no particular settings at full resolution. A reduced size image (within 1024 x 1024 bounds) is provided to be more easily viewed in your browser. As always the original untouched image is available by clicking on this reduced image.
360docimg_601_
Nikon D300 Samples Gallery - Posted 12 March 2008
Review based on a production Nikon D300
Just under two years since the D200 Nikon reveals the D300, the range of changes is so significant that it wouldn't be inappropriate to call it a 'compact D3' (less the full-frame sensor of course). From the top there's a new CMOS sensor with twelve megapixels, a new auto-focus sensor with 51-points (15 of which are cross-type sensitive), there's focus tracking by color, scene recognition, Picture Control presets, six frames per second continuous shooting (or eight frames per second with a battery pack), Compact Flash UDMA support, Live View (with contrast detect AF) and the mighty impressive 3.0" 922,000 pixel LCD monitor (oh and HDMI video output). It's an impressive list, the D200 was a fair step up from the D100, the D300 can be seen as just as big a step, certainly more than enough to make the competition sweat.
Model line history
Model
Announced
Effective pixels
Auto focus
Continuous highest (JPEG)
LCD monitor
D100
Feb 2002
6.0 mp
5 point
3.0 fps, 6 frames
1.8", 120K pixels
D200
Nov 2005
10.2 mp
11 point
5.0 fps, 37 frames
2.5" 230K pixels
D300
Aug 2007
12.3 mp
51 point
6.0/8.0 fps, 100 frames
3.0" 922K pixels + Live View
Nikon D300 Key Features
12.3 megapixel DX format CMOS sensor
Self-cleaning sensor unit (low-pass filter vibration)
ISO 200 - 3200 (6400 with boost)
14-bit A/D conversion
Nikon EXPEED image processor (Capture NX processing and NR algorithms, lower power)
Super fast operation (power-up 13 ms, shutter lag 45 ms, black-out 100 ms)
Shutter life 150,000 exposures
New Multi-CAM3500DX Auto Focus sensor (51-point, 15 cross-type, more vertical coverage)
Auto-focus tracking by color (using information from 1005-pixel AE sensor)
Auto-focus calibration (fine-tuning) now available (fixed body or up to 20 separate lens settings)
Scene Recognition System (uses AE sensor, AF sensor)
Picture Control image parameter presets (replace Color Modes I, II and III)
Custom image parameters now support brightness as well as contrast
Six frames per second continuous shooting (eight frames per second with battery pack)
Compact Flash UDMA support
3.0" 922,000 pixel LCD monitor
Live View with either phase detect (mirror up/down) or contrast detect Auto Focus
HDMI HD video output
'Active D-Lighting' (adjusts metering as well as applying D-Lighting curve)
Detailed 'Control Panel' type display on LCD monitor, changes color in darkness
New MB-D10 vertical grip fully integrates into body, multi battery type compatible
Buttons sealed against moisture
12.3 megapixel DX format CMOS sensor
Viewfinder pentaprism
Main board with EXPEED processor
EXPEED processor
51-point Multi-CAM 3500DX AF sensor module
51 AF point locations in frame (approx.)
1005-pixel metering sensor
Shutter
Nikon D300 vs. D200 feature and specification differences
Nikon D300
Nikon D200
Sensor
• 12.3 million effective pixel CMOS
• DX format
• 10.2 million effective pixel CCD
• DX format
A/D converter
14-bit
12-bit
Image processor
Nikon EXPEED
Unspecified
Image sizes
• 4288 x 2848
• 3216 x 2136
• 2144 x 1424
• 3872 x 2592
• 2896 x 1944
• 1936 x 1296
RAW files
NEF / Compressed NEF 14-bit
NEF 12-bit
TIFF files
Yes
No
Dust reduction
Self-cleaning sensor unit
No
Auto focus
• 51-point Multi-CAM 3500DX
• 15 cross-type sensors
• Contrast detect in Live View mode
• 11-point Multi-CAM 1000
Focus tracking by color
Yes
No
AF area mode
• Single point AF
• Dynamic Area AF [9 points, 21 points, 51 points, 51 points (3D-tracking)]
• Automatic-area AF
• Single Area AF
• Dynamic AF with Focus Tracking and Lock-on
• Group Dynamic AF
• Closest Subject Priority Dynamic AF
Sensitivity
• Default: ISO 200 - 3200
• Boost: ISO 100 - 6400
• 1/3, 1/2 or 1.0 EV steps
• Default: ISO 100 - 1600
• Boost: Up to ISO 3200
• 1/3, 1/2 or 1.0 EV steps
Continuous shooting
• With built-in battery: up to 6 fps
• With AC adapter or MB-D10 pack and batteries other than EN-EL3e: up to 8 fps
5 fps
Image Parameters
• Picture Control (4 presets)
• Sharpening
• Contrast
• Brightness
• Saturation
• Hue
• Presets (6 presets)
• Sharpening
• Tone
• Color mode
• Saturation
• Hue
Active D-Lighting
Yes (also adjusts exposure)
No
Viewfinder
100% frame coverage
95% frame coverage
LCD monitor
• 3.0 " TFT LCD
• 922,000 pixels
• 2.5 " TFT LCD
• 230,000 pixels
LCD Live View
• Handheld mode (phase detect AF)
• Tripod mode (contrast detect AF)
No
Compact Flash
Type I / II (UDMA support)
Type I / II
Vertical grip
MB-D10
MB-D200
Video output
HDMI (HD)
Composite (SD)
Menu languages
14
13
Dimensions
147 x 114 x 74 mm (5.8 x 4.5 x 2.9 in)
147 x 113 x 74 mm (5.8 x 4.4 x 2.9 in)
Weight (no batt)
825 g (1.82 lb)
830 g (1.8 lb)
Foreword / notes
If you're new to digital photography you may wish to read some of ourDigital Photography Glossary before diving into this article (it may help you understand some of the terms used).
Conclusion / recommendation / ratings are based on the opinion of the author, we recommend that you read the entire review before making any decision. Images which can be viewed at a larger size have a small magnifying glass icon in the bottom right corner of them, click to display a larger image in a new window.
To navigate this article simply use the next / previous page buttons or jump to a specific page by using the drop-down list in the navigation bar at the top of the page. You can support this site by ordering through the affiliate links shown at the bottom of each page (where available).
This article is protected byCopyright and may not be reproduced in part or as a whole in any electronic or printed medium without prior permission from the author.
Dpreview use calibrated monitors at the PC normal gamma 2.2, this means that on our monitors we can make out the difference between all of the grayscale blocks below. We recommend to make the most of this review you should be able to see the difference (at least) between X,Y and Z and ideally also A, B and C.
Nikon D300 specifications
Price (body only)
[check]
• US: $ 1799
• UK: £ 1299
• EU: € 1980
Body material
Magnesium alloy
Sensor *
• 23.6 x 15.8 mm CMOS sensor
• DX format
• RGB Color Filter Array
• Built-in fixed low-pass filter (with self-cleaning unit)
• 13.1 million total pixels
• 12.3 million effective pixels
• 3:2 aspect ratio
Image processor *
Nikon EXPEED
A/D conversion *
14 bit
Image sizes *
• 4288 x 2848 [L; 12.2 MP]
• 3216 x 2136 [M; 6.9 MP]
• 2144 x 1424 [S; 3.1 MP]
File formats
• NEF (12-bit or 14-bit *, compressed or lossless compressed RAW)
• NEF + JPEG
• TIFF *
• JPEG (EXIF 2.21)
NEF compression
• Compressed 12/14-bit NEF (RAW, Lossless compressed): approx. 60-80% *
• Compressed 12/14-bit NEF (RAW, Compressed): approx. 45-60%
Lens mount
• Nikon F mount with AF coupling and AF contacts
• 1.5x field of view crop
Usable lenses
• DX AF NIKKOR: All functions possible
• D-/G-type AF NIKKOR (excluding IX NIKKOR lenses): All functions possible (excluding PC Micro- NIKKOR)
• AF NIKKOR other than D-/G-type (excluding lenses for F3AF): All functions except 3D-Color Matrix Metering II possible
• AI-P NIKKOR: All functions except Autofocus, 3D-Color Matrix Metering II possible
• Non-CPU AI NIKKOR: Can be used in exposure modes A and M; electronic range finder can be used if maximum aperture is f/5.6 or faster; Color Matrix Metering and aperture value display supported if user provides lens data
Dust reduction *
• Self-cleaning sensor unit ('Clean image sensor') *
• Image dust-off data acquisition (Capture NX required)
Auto Focus
• 51 focus points (15 cross-type sensors) *
• Multi-CAM 3500DX *
• AF working range: -1 to +19 EV (ISO 100, normal temperature)
• Contrast Detect in Live View (Tripod) mode
Lens Servo
• Single Servo AF [S]
• Continuous Servo AF [C]
• Manual focus [M]
• Focus Tracking automatically activated by subject's status in [S] or [C] AF
Focus Point *
• Single point from 51 or 11 focus points
• Liveview (Tripod mode): Contrast AF on a desired point anywhere within frame
AF Area Mode *
• Single point AF
• Dynamic Area AF [9 points, 21 points, 51 points, 51 points (3D-tracking)]
• Automatic-area AF
Focus Lock
Focus can be locked by pressing shutter-release button halfway (single-servo AF) or by pressing AE-L/AF-L button
AF assist
Yes, lamp
Exposure modes
• Program Auto [P] with flexible program
• Shutter-Priority Auto [S]
• Aperture-Priority Auto [A]
• Manual [M]
Metering
TTL full-aperture exposure metering using 1005-pixel RGB sensor
• 3D Color Matrix Metering II (type G and D lenses); color matrix metering II (other CPU lenses); color matrix metering (non-CPU lenses if user provides lens data; metering performed)
• Center-weighted: Weight of 75% given to 6, 8, 10, or 13 mm dia. circle in center of frame or weighting based on average of entire frame (8 mm circle when non-CPU lens is used)
• Spot: Meters approx. 3 mm dia. circle (about 2.0% of frame) centered on selected focus point (on center focus point when non-CPU lens is used)
Metering range
• 3D Color Matrix Metering: 0 to 20 EV
• Center-Weighted Metering: 0 to 20 EV
• Spot Metering: 2 to 20 EV
• At normal temperature (20°C/68°F), ISO 100 equivalent, f/1.4 lens
Meter coupling
CPU and AI
Exposure lock
Locked using AE-L/AF-L button
Exposure bracketing
• 2 to 9 frames
• 1/3, 1/2, 2/3 or 1 EV steps *
Exposure compen.
• +/-5.0 EV
• 1/3, 1/2 or 1 EV steps
Sensitivity *
• Default: ISO 200 - 3200 in 1/3, 1/2 or 1.0 EV steps
• Boost: 100 - 6400 in 1/3, 1/2 or 1.0 EV steps
Shutter
• Electronically-controlled vertical-travel focal plane shutter
• 30 to 1/8000 sec (1/3, 1/2 or 1.0 EV steps)
• Flash X-Sync: 1/250 sec (up to 1/320 sec with reduced GN *)
• Bulb
DOF Preview
• Stop-down lens aperture by pressing button
• Activates modelling flash
White balance
• Auto (1005-pixel CCD, image sensor)
• Presets (seven) with fine tuning *
• Manual presets (four)
• Color temperature in Kelvin (2500 - 10000 K, 31 steps)
• White balance bracketing (2 to 9 frames, 10,20,30 MIRED steps)
Picture Control *
• Standard
• Neutral
• Vivid
• Monochrome
Image parameters *
• Sharpening: Auto, 7 levels
• Contrast: Auto, 5 levels, Custom tone curve
• Brightness: 3 levels
• Saturation: Auto, 5 levels
• Hue: 5 levels
Color space
• sRGB (Standard and Vivid modes)
• Adobe RGB (Neutral mode)
Viewfinder
• Optical-type fixed eye-level pentaprism
• Built-in diopter adjustment (-2 to +1m-1)
• Eyepoint: 19.5 mm (at -1.0m-1)
• Frame coverage 100% *
• Viewfinder magnification approx 0.94x with 50 mm f/1.4 lens
Focusing screen
• B-type BrightView Clear Matte Screen II
• Superimposed focus brackets
• On-demand grid lines
LCD monitor *
• 3.0 " TFT LCD
• 922,000 pixels (VGA; 640 x 480 x 3 colors)
• 170° viewing angle
• Brightness adjustment
LCD Liveview *
• Handheld mode: TLL phase-difference AF with 51 focus areas (15 cross-type sensors)
• Tripod mode: focal-plane contrast AF on a desired point within a specific area
Shooting modes
• Single frame
• Continuous Low [CL]
• Continuous High [CH]
• Liveview [LV]
• Self-Timer (programmable)
• Mirror-up mode
Continuous shooting *
• With built-in battery: up to 6 fps
• With AC adapter or MB-D10 pack and batteries other than EN-EL3e: up to 8 fps
• 12-bit RAW at full speed, 14-bit RAW only 2.5 fps
Continuous buffer
• JPEG Large/Normal: 100 shots (at 6 fps)
• RAW: no data yet
Self-timer
• 2 to 20 sec custom
Flash control
• TTL: TTL flash control by 1,005-pixel RGB sensor.
• Built-in Speedlight, SB-800, SB-600 or SB-400: i-TTL balanced fill-flash and standard i-TTL flash
• AA (Auto Aperture-type) flash: Available with SB-800 used with CPU lens
• Non-TTL Auto: Available with Speedlights such as SB-800, 28, 27, and 22S
• Range-priority manual flash; available with SB-800
Flash Sync Mode
• Front-curtain Sync (normal)
• Red-Eye Reduction
• Red-Eye Reduction with Slow Sync
• Slow Sync
• Rear-curtain Sync
Built-in Speedlight
• Manual pop-up with button release
• Guide number (ISO 200, m) approx 17 (manual 18)
• Guide number (ISO 100, m) approx 12 (manual 13)
Flash Accessory Shoe
ISO 518 standard-type hot shoe contact; Safety lock mechanism provided
Flash Sync Terminal
ISO 519 standard terminal, lock screw provided
Flash compensation
• -3 to +1 EV
• 1/3, 1/2 or 1 EV steps *
Creative Lighting System
With Speedlights such as SB-800, SB-600, SB-400, SB-R200, supports Advanced Wireless Lighting, Auto FP High-Speed Sync, Flash Color Information Communication, modeling flash and FV lock
Orientation sensor
Tags images with camera orientation
Playback mode
• Full frame
• Thumbnail (4 or 9 images)
• One-touch zoom
• Slideshow
• RGB histogram
• Shooting data
• Highlight point
• Auto image rotation
Languages *
• Chinese (Simplified and Traditional)
• Dutch
• English
• Finnish
• French
• German
• Italian
• Japanese
• Korean
• Polish
• Portuguese
• Russian
• Spanish
• Swedish
Custom functions
48 custom functions
Connectivity
• USB 2.0 (Hi-Speed) Mini-B connector
• HDMI video out (version 1.3a, Type A connector) *
• Remote control 10-pin terminal
• PC Sync flash terminal
10-pin terminal
• GPS: NMEA 0183 (Ver. 2.01 and 3.01) interface standard supported with 9-pin D-sub cable and GPS Cable MC-35 (optional)
• Remote control: via 10-pin terminal
Communications
FTP and PTP/IP file transfer with optional Wireless Transmitter WT-3 (IEEE 802.11 b/g)
Storage
• Compact Flash Type I or II
• UDMA *, Microdrive and FAT32 supported
• 36 characters of text can be input and stored in EXIF header
Power
• Lithium-Ion EN-EL3e (7.4 V, 1500 mAh)
• Included battery charger MH-18a
• Optional AC adapter EH-5a
• Optional MB-D10 battery pack / vertical grip *
Vertical grip *
• Optional MB-D10 battery pack / vertical grip
• One Rechargeable Li-ion Battery EN-EL4a, EN-EL4 or EN-EL3e or eight R6/AA-size alkaline (LR6), Ni-MH (HR6), lithium (FR6) batteries, or nickel-manganese ZR6 batteries
Battery monitoring
The LCD monitor on the camera back displays the following information
about the EN-EL3e battery:
• Remaining charge (%)
• No. of shots taken since last charge
• Battery life (5 stages)
Dimensions
147 x 114 x 74 mm (5.8 x 4.5 x 2.9 in)
Weight (no batt)
825 g (1.8 lb)
Weight (with batt)
903 g (2.0 lb)
Box contents
Rechargeable Li-ion Battery EN-EL3e, Quick Charger MH-18a, USB Cable UC-E4, Video Cable EG-D100, Strap AN-D300, LCD monitor cover BM-8, Body cap, Eyepiece Cap DK-5, Rubber Eyecup DK-23, Software Suite CD-ROM
Optional accessories
Multi-Power Battery Pack MB-D10, Wireless Transmitter WT-4, Magnifying Eyepiece DK-21M, AC Adapter EH-5a, Capture NX Software, Camera Control Pro 2
Body & Design
The D300 design is very similar to the D200, that's no bad thing, it's virtually the same size (very slightly taller), at the front there are new covers over the remote and PC sync terminals, at the rear a larger AF-ON button and a subtle re-arrange of the buttons down the left of the now larger LCD monitor. Build quality is just as good as the D200 (if not slightly better) and certainly in line with its 'bigger brother' the D3. The body is constructed from magnesium alloy, soft rubber is used on the grips both front and back as well as environmental seals on compartment doors. Just like the rest of the family the D300 features oversized buttons on the rear of the camera which are easier to use when wearing gloves.
There are numerous rubber gasket seals around body seams, controls and compartment doors. Nikon don't claim the camera to be waterproof but it's certainly more 'weather proof' than the average digital SLR. Remember that the camera is only as weather proof as its weakest link, this includes the lens mount and only a few of the more recent Nikkor lenses have rubber seals around the mount ring.
Side by side
Below you can see the D300 beside the recently announced ten megapixel Canon EOS 40D. Despite a $500 price difference (in Canon's favor) these two models are clear rivals and will be compared and contrasted by buyers and reviewers alike. The D300 weighs in at 903 g including its battery, the EOS 40D about 80 g lighter (the same weight as the D300's rechargeable battery).
In your hand
You really have to pick up the D300 to appreciate how nicely it fits into your hand, the ergonomics are great and the soft rubber used on the grip ensures holding the camera steady is an easy task. The control layout is also very sensible and easy to learn, even if you've never used a Nikon DSLR before clear labeling and logical positioning mean you'll be shooting and discovering the D300's features very quickly (and if you are coming from the D200 you'll be right at home because very little has changed).
LCD Monitor
One of the big changes to the D300 is the new high resolution screen. It has four times the number of dots than the 230,000 unit used on the D2X and other such cameras. For clarity, the words pixels and dots are interchanged almost randomly in specification sheets but strictly speaking we should talk of dots (these being red, green or blue sub-pixels) when referring to the figures quoted by manufacturers. The D300's LCD has 921,600 dots, 1920 columns by 480 rows, the dots are a third thinner than they are high and so each group of three dots (sub-pixels) make up one full color pixel.
This high resolution screen really has to be seen to be appreciated, it's beautifully detailed and extremely smooth in appearance because the tiny gaps between dots are too small to be seen with the eye. This extra detail is obvious in Liveview and playback modes where you really can see much 'more' of the image in one glance. Another difference comes when you magnify in playback as you find you don't need to magnify the image as much before you can clearly see sharpness, focus accuracy and even noise. Just like the D200 the D300 has a removable protective screen cover (shown with and without below).
One other difference between the D300/D3's screen and that used previously is the layout of the dots (sub-pixels), this new screen has the same layout as your computer LCD, a simple RGB layout with all rows the same ('stripe array'). The other layout used on small LCD screens is the 'delta array' which uses an RGB pattern on one row then a BRG pattern on the row below, offset by half a pixel.
Stripe array layout LCD Delta array layout LCD
Below you can see a real-life, same-size example of the difference in resolution between this new 921,600 dot screen and a more typical 230,400 dot screen (in this case on the Canon EOS 40D). Both cameras were set in play mode with the same image (note that the D300 doesn't use the whole screen in play unless you magnify), a shot was taken of each camera from the same distance (hence the screens were captured at the same magnification).
Crop from the D300's LCD
(1920 x 480 dots; 640 x 480 pixels) Crop from the EOS 40D's LCD
(960 x 240 dots; 320 x 240 pixels)
Top Control Panel
The D300 has one control panel on the top, this large display dominates the entire right top side of the camera and provides a full range of information covering photographic and digital settings. The panel has a green back light which can be illuminated by flicking the power switch to the lamp position, it's spring loaded and returns to 'ON', the back light stays on for the 'auto meter-off' time (CSM c2). You can also choose to have the backlights come on with any button press (CSM d8). Note that even when the camera is 'Off' this panel displays the number of frames remaining on the card or -E- if no card is inserted (an indication that the camera is never really powered off but instead in a sleep mode).
A breakdown of information displayed on the LCD panel can be found on the diagrams below.
*1 • Shutter-speed
• Exposure compensation value
• Flash compensation value
• ISO sensitivity
• White balance fine-tuning
• White balance preset number
• Number of shots in bracketing sequence
• Number of intervals
• Focal length (non-CPU lens) *2 • Aperture (f-number)
• Aperture (number of stops)
• Bracketing increment
• Number of shots per interval
• Maximum aperture (non-CPU lens)
• PC connection indicator
*3 • Number of frames remaining
• Number of shots remaining before buffer fills
• PC mode indicator
• Preset white balance recording indicator *4 • Electronic analog exposure display
• Exposure compensation
• Bracketing progress indicator
• PC mode indicator
Viewfinder
The D300's viewfinder view seems slightly larger than the D200 and the specs do note a frame coverage of 100% compared to the D200's 95%. To the right top corner of the removable eyepiece rubber is a diopter adjustment wheel. Unlike the D3 the D300 does not feature an internal viewfinder curtain.
The D300 features a new 51 point auto focus sensor, the center fifteen (3x5 grid) being cross point sensors even with F5.6 aperture lenses. There are two AF point selection modes (CSM a8), you can opt to be able to select from all 51 points or 11 points in the same layout as the D200.
51 point AF selection mode 11 point AF selection mode
The image below isn't designed to be representative of a typical view through the viewfinder but instead shows the position of all possible information including all 51 AF points, battery status overlay and optional grid lines. Nikon has made it clear that they are not using etching to indicate the AF points but that all information is displayed using liquid crystal, hence when an AF point is not active there is no detrimental effect on the focusing screen.
1 Focus indicator 10 Electronic analog exposure display / compen.
2 Metering mode 11 Flash compensation indicator
3 Auto exposure lock 12 Exposure compensation indicator
4 Flash value (FV) Lock 13 ISO / Auto ISO indicator
5 Flash sync indicator 14 ISO sensitivity
6 Shutter speed 15 Exposures remaining / buffer / exp. value
7 Aperture stop indicator 16 Thousands indicator
8 Aperture (f-number / number of stops) 17 Flash-ready indicator
9 Exposure mode
Diagram reproduced with permission from the Nikon D300 user manual.
Battery and Charger
Battery information available on the camera:
Top control panel has a five segment battery life indicator Camera Menu: Set Up -> Battery Info provides: Battery meter (as a percentage) Picture meter (estimated frames on current power) Charging Life (a scale from 0 to 4 indicating if the battery has come to the end of its useful life)
Battery Compartment
The battery compartment is located in the base of the hand grip. The compartment door is opened by pulling on a small lever, inside the battery holds itself part of the way in without dropping and without the use of a catch.
Battery pack / Vertical grip (optional)
The D300 has a new battery pack / vertical grip, the MB-D10. This new grip no longer requires the removal of the internal battery or battery door instead connecting to a pair of terminals on the base of the camera (normally protected by rubber covers, removed for this shot). This allows the internal battery to be used in conjunction with the batteries in the MB-D10. This MB-D10 is more ergonomic than previous grips and integrates much better with the body, it also supports a wider range of batteries; the EN-EL3e, the large EN-EL4a used in the D3 as well as AA batteries. (Note that the MB-D10 plus batteries other than the EN-EL3e are required to achieve the full eight frames per second shooting speed).
Compact Flash Compartment
The D300's Compact Flash compartment is set in the side of the camera as part of the hand grip. To open the door you turn a small dial on the rear of the camera below the AF area mode selector. The door opens automatically on a spring loaded hinge and when closed fits flush into the body contour. The door itself has a rubber gasket around its edge to form a water resistant seal. The D300 can take Compact Flash Type I or II and supports FAT32 (for cards over 2 GB) as well as the new high speed UDMA cards.
Connections
The D300's connections are in two places, either at the front top (remote and flash PC sync) or the left side of the body (from the rear). The remote (which also allows for serial GPS) and flash PC sync terminals are now protected by a rubber cover which is itself attached to the strap eyelet. On the side are the largest group of connectors, from top to bottom; Video out (composite), HDMI (digital video out HD/SD), DC-IN and USB 2.0. The biggest story here must be HDMI output, from the camera menu you can select five different output options; Auto, 480p, 576p, 720p or 1080i. For an example and video clip of HDMI outputsee this page of this review.
Camera Base / Tripod Mount
The bottom of the D300 is a simple enough affair with the metal tripod mount located in line with the center of the lens and the imaging focal plane. I'm also a big fan of the large rubber foot which covers two thirds of the base.
You can also see the connectors for the optional MB-D10 grip (see previous page). These would normally have rubber covers over them.
Pop-Up Flash
The D300's pop-up flash is released manually by pressing a small button on the left side just below the flash. The long arm raises the flash unit a respectable distance above the top of the lens (useful for lens hoods and reducing red-eye). Just below the release button is another button which changes flash mode and flash exposure compensation control button. Hold the button and turn the main command dial (rear) to change flash mode, sub-command dial to change flash exposure compensation (-3.0 to +1.0 EV).
Flash Hot-shoe
The D300 has a standard (ISO 518) accessory shoe which is compatible with third party flash systems for flash sync and more advanced i-TTL with the SB-800, SB-600 or SB-400. Non-TTL Auto available with the 80DX, 28DX, 28, 27, and 22s.
Lens Mount / Sensor
Below on the left you can see the D300's lens mount with the mirror down, on the right with mirror up and shutter open (exposing the sensor). Lenses are inserted twisted clockwise and lock in place with an anticlockwise turn. This is a standard Nikon F lens mount and can use almost the complete range of Nikkor F lenses (although some features are only available with newer type G or type D lenses). As noted in our introduction the D300 also supports the aperture ring found on old AI lenses.
Self-cleaning sensor unit
We knew Nikon couldn't wait too long before implementing some kind of automatic sensor cleaning system, and so the D300 becomes the first Nikon with such a feature. It works in the same manner as other implementations, piezoelectric elements vibrate a cover filter which should in theory remove any light dust particles attached to it.
Sensor unit with LPF and cleaning unit in place Sensor cleaning unit diagram
Supplied In the Box
Box contents may vary by region:
Nikon D300 digital SLR body & body cap BM-8 protective LCD cover Shoulder strap Eyepiece Cap DK-5 Rubber Eyecup DK-23 EN-EL3e Lithium-Ion battery MH-18a Quick Charger & AC power cable USB cable A/V cable Software CD-ROM Manuals
Top of camera controls (right)
On the top of the camera on the right side you will find the power switch, shutter release button, exposure mode and exposure compensation buttons. At the front and rear edges of this side of the camera, in line with the shutter release button are the two command dials (with a soft rubber coating). On the rear of the camera surrounding the AE-L/AF-L button is the metering mode selector, to the right of this the now slightly more emphasized AF-ON button. Note that CSM f7 allows you define the exact function of the command dials including their rotation, which sets aperture / shutter speed and whether they can be used in menus and playback mode. The function of controls described below are for a camera with default settings.
Buttons combined with a dial turn are held while the dial is turned, however you can choose to simply have to press the button once and release, this is achieved via CSM f8 (like a Canon).
Power dial
OFF Power Off
Powers the camera off immediately, if there are images still buffered to be written the camera will remain on until the write has completed. When off the camera continues to display the remaining frames / frame count and CF status on the top LCD panel.
ON Power On
Switches the camera on, this is as fast as we can time it, as good as instant. There is simply no perceptible delay between turning the the dial and the first shot (you can even hold the shutter release and turn the power dial to test this).
Flick the power switch to this position to illuminate the control panels backlight's (top and rear). The backlight stays on for the 'auto meter-off' time (CSM c3).
Buttons (combined with dial turn)
MODE Exposure mode (detail below)
• Programmed Auto (flexible)
• Shutter-Priority Auto
• Aperture-Priority Auto
• Manual No function
• +/- 5 EV
• 0.3, 0.5 or 1 EV steps (CSM b2) No function
Buttons (single press)
AF-ON AF-ON
The AF-ON button is an alternative to half-pressing the shutter release, it triggers the camera's auto focus system. You can if you wish have the camera set to that AF is not triggered by a shutter release half-press (CSM a5) and only by the AF-ON button (useful for fast action photography where continuous AF tracking is required).
AE-L
AF-L
AE / AF Lock
Pressing this button locks the current exposure and focus, in its default mode both AE and AF remain locked as long as you hold the button. CSM f6 allows you to change the function of this button with a range of AE / AF hold / lock options as well as other camera functions (such as metering, bracketing etc.)
Metering Mode
3D Color matrix metering uses a 1005 pixel CCD to calculate the best exposure for the frame. 3D color matrix metering is only available with G type or D type lenses where the range information is used in conjunction with metered light. Color matrix II metering is used with other CPU lenses. Color matrix metering is used when focal length and aperture are entered manually using the 'Non-CPU lens data' menu item.
The camera uses the entire frame for light measurement but assigns a greater weight to an area in the center of the frame (by default an 8 mm circle indicated on the viewfinder focus screen). The size of the circle used to define the "center" of the frame can be set by CSM b5.
The camera measures light only in a circle 3 mm in diameter. This is tied to the currently selected AF area point unless dynamic AF or a non-CPU lens is used when it defaults to the center of the frame.
Exposure Modes
P Programmed Auto (flexible)
In this mode the camera automatically selects aperture and shutter speed based on the current metered exposure value, exposure compensation and selected ISO sensitivity. Flexible program allows you to select one of a range of identical exposures (using different combinations of aperture and shutter speed) by turning the main command dial. Example:
• 1/125 sec, F9 (turn left one click)
• 1/160 sec, F8.0 (turn left one click)
• 1/200 sec, F7.1 (metered)
• 1/250 sec, F6.3 (turn right one click)
• 1/320 sec, F5.6 (turn right one click)
S Shutter-Priority Auto
In this mode you select the shutter speed and the camera will calculate the correct aperture depending on metered exposure, exposure compensation and ISO sensitivity. Turn the main command dial to select shutter speed in the range of 30 to 1/8000 sec (in 0.3, 0.5 or 1.0 EV exposure steps depending on CSM b3).
A Aperture-Priority Auto
In this mode you select the aperture and the camera will calculate the correct shutter speed depending on metered exposure, exposure compensation and ISO sensitivity. Turn the sub command dial to select aperture (in 0.3, 0.5 or 1.0 EV exposure steps depending on CSM b3). The exact range of apertures will depend on the lens used.
M
Manual Exposure
In this mode you define the exact exposure by selecting the aperture and the shutter speed manually. As above use the main command dial (rear) for shutter speed, sub command dial (front) for aperture. The meter on the viewfinder status bar and top LCD will immediately reflect the exposure level compared to the calculated ideal exposure, if outside of the range of the indicator bar (+/- 2 EV on the viewfinder LCD and +/- 3 EV on the top control panel) an arrow ('<' or '>') will appear at the end.
Top of camera controls (left)
The top left side of the camera has the mode dial which allows you to select the camera's drive mode, single, two continuous speeds, live view, self-timer or mirror up. This dial is locked from accidental change and can only be turned by holding the lock release pin to the top left of the dial. On the top of this dial are three buttons for quality, white balance and ISO sensitivity.
Mode Dial
S Single frame shooting
One frame is taken with one depression of the shutter release button. You can of course still 'pump' shots as quickly as you can re-press the shutter release. The D300's shutter release button is the soft-press type which easily facilitates quick re-press.
CL
Continuous low speed shooting
Camera shoots continuously while the shutter release is depressed. In this mode the actual shooting rate can be set between 1 and 4 frames per second (through CSM d4), the default is 3 frames per second. Images are buffered as they are taken and written out to the Compact Flash card in the background. Current buffer space is indicated on the viewfinder LCD status bar as a number prefixed with a lower case 'r' (eg. r25).
CH
Continuous high speed shooting
Camera shoots continuously while the shutter release is depressed. In this mode the camera shoots at its maximum speed of 6 frames per second. Images are buffered as they are taken and written out to the Compact Flash card in the background. Current buffer space is indicated on the viewfinder LCD status bar as a number prefixed with a lower case 'r' (eg. r25).
LV
Liveview
Puts the camera in live view shooting mode. In this mode you activate through-the-lens live view on the LCD monitor by first pressing the shutter release button (it's a bit counterintuitive) the mirror will raise (blanking the viewfinder) and the LCD will activate.To focus either use manual focus (press the magnify buttons to provide a larger magnified view) or press the AF-ON button to use contrast detect AF (slow but maintains live view) or phase detect AF (quicker but requires the mirror to drop first). The camera does not return to live view after a shutter release, you have to press the shutter release button once more.
Camera takes a shot after a predefined delay. This can be set to 2, 5, 10, or 20 seconds via CSM c3.
M-UP
Mirror Up
Press the shutter release once to raise the mirror, again to take the shot. As I commented in my D2X and D200 reviews it would have been nice to have this combined with a self-timer so you don't need to touch the camera (or use a remote) to trigger the actual shutter release. (CSM d9; exposure delay mode; offers something similar but the delay is not long enough).
Buttons (combined with a command dial)
QUAL Image quality
• RAW
• TIFF
• Fine JPEG
• Normal JPEG
• Basic JPEG
• RAW + Fine JPEG
• RAW + Normal JPEG
• RAW + Basic JPEG
Image size (all except RAW quality)
• Large (4288 x 2848)
• Medium (3216 x 2136)
• Small (2144 x 1424)
WB White balance mode
• Auto
• Incandescent
• Fluorescent
• Direct sunlight
• Flash
• Cloudy
• Shade
• Color temperature (Kelvin)
• White balance preset White balance adjustment
- Fine tune -3 to +3
- Fine tune -3 to +3
- Fine tune -3 to +3
- Fine tune -3 to +3
- Fine tune -3 to +3
- Fine tune -3 to +3
- Fine tune -3 to +3
- Temperature 2500 K to 10000 K
- Preset 0 to 4
ISO Select sensitivity (ISO equiv.)
• L 1.0 (100 equiv.)
• L 0.7 (125 equiv.)
• L 0.3 (160 equiv.)
• 200
• 250
• 320
• 400
• 500
• 640
• 800
• 1000
• 1250
• 1600
• 2000
• 2500
• 3200
• H 0.3 (4000 equiv.)
• H 0.7 (5000 equiv.)
• H 1.0 (6400 equiv.)
(You can choose 0.3, 0.5 or 1.0 EV steps for ISO selection via CSM b2) No function
Rear of camera controls
The rear of the D300 looks almost the same as the D200 expect for the larger LCD monitor and subtly re-organized and more logical button layout; gone is the bracket button now replaced with the play button, the menu button now up a the top of the column of buttons followed by protect, zoom-out, zoom-in and the OK button (called Enter on the D200).
Buttons (single press)
Enters or leaves playback mode, display mode used depends on the last used (left / right press of the multi selector) or thumbnail display mode. As with all shooting priority cameras the D300 immediately removes the playback display if you half-press the shutter release button although interestingly you can trigger AF (press AF-ON) without clearing the screen).
In playback or record review, pressing this button displays a 'Delete?' confirmation dialog, press again to confirm deletion. Nikon's now de-facto 'double press delete' feature is very easy to use and understand and much faster than other delete implementations (why can't all cameras be this simple?).
Hold the Delete and Mode (top right of camera) buttons simultaneously for approximately two seconds for a shortcut to format the Compact Flash card, the camera first blinks 'For' on the top display and you must release the buttons and press once more to confirm the card format.
MENU Menu
Display or cancel the camera menu, as with playback mode the menu is automatically cancelled if you half-press the shutter release button.
Protect / Info / Menu Help *p
In playback mode press to toggle the 'read only' flag on the displayed / selected image. This button can be used in both playback and record review modes. In shooting mode press this button to toggle the shooting information display on the LCD monitor. In menu mode (with a menu option selected) you can press and hold this button to display a page of help about the currently highlighted function, this is especially useful for the custom functions.
In playback mode with a single image displayed pressing this button switches to a four image thumbnail index, press again to switch to a nine image thumbnail index. In playback magnify mode steps back a single zoom level.
In playback mode with a single image displayed enters magnify mode and steps in a zoom level, there are eight zoom steps. In live view mode magnifies the live view image (move around the live image, very useful for checking focus accuracy, there are six live view magnification levels, use the multi selector to move around.
OK OK / Retouching menu *p
The OK button is used to confirm menu selections and dialog options. In Playback mode displays a pop-up version of the retouching menu.
With no image displayed on the screen the multi selector is used to choose AF area, note that this function can be locked by turning the lock lever which surrounds the multi selector (this doesn't affect function in playback or menu mode). The multi selector is also used to change playback display modes (left / right), browse images in playback (up / down) and navigate menus / select dialog options. Various options are available for customizing this control: CSM f1, CSM f2 and CSM f3.
*p - In record review or playback mode
Auto Focus Area Mode selector
Note that the exact function of the AF area mode also depends on the focus mode (AF-S or AF-C), a full summary of all combinations of focus mode and AF area mode can be found at the bottom of this page.
The camera uses all focus areas and automatically selects the correct focus points. From the D300 user manual: "If type G or D lens is used, camera can distinguish human subjects
from background for improved subject detection."
Allows you to manually select one of the fifty-one focus points, however the camera will use information from multiple focus areas to determine focus. Useful for focusing on specific subjects which may move out of the focus area briefly. CSM a3 allows you to choose between 9 points, 21 points, 51 points or 51 points with 3D tracking.
Allows you to manually select one of the fifty-one focus areas, the camera will only use this area for auto focus.
Front of camera controls
On the left side of the camera front are two buttons, both of these buttons can be customized to perform a range of functions via CSM f4 and f5. By default the top button is is depth of field preview, press and hold this button to stop the lens down to the selected aperture, the button button performs flash value lock. On the right side of the camera front is the focus mode dial and above this the flash mode / compensation button.
Buttons (combined with a command dial)
• Front-curtain sync (normal)
• Slow sync
• Rear-curtain sync
• Red-eye reduction
• Red-eye reduction with slow sync Flash exposure compensation
• -3.0 EV to +1.0 EV
• 0.3, 0.5 or 1 EV steps (CSM b2)
Focus Mode selector
S Single servo AF (AF-S)
Camera focus when shutter release button is half pressed and locks when the in-focus indicator (a solid dot) appears on the viewfinder status LCD. If the subject is moving when the shutter release button is half pressed the camera will focus track until a lock can be obtained. In this mode the default is for focus priority, this means that a shot can only be taken with a good focus lock, you can also choose release priority via CSM a2.
C Continuous servo AF (AF-C)
The camera will focus continuously while the shutter release button is half pressed, if the subject moves the camera will adjust focus to compensate. In this mode the default is for release priority, this means that a shot will be taken whether or not the camera has a good focus lock, you can also choose focus priority via CSM a1.
M Manual Focus
Focusing is achieved manually by turning the lens manual focus ring. Focus indicator on the viewfinder status LCD will still indicate whether or not the selected manual focus is the same as the calculated auto focus. This mode is always release priority.
Displays
We've already described the technical side of D300's new VGA resolution monitor, its super-fine pixel pitch means extremely detailed images in playback and live view, it delivers fine gradations and a smooth display with no visible gaps between pixels. This may sound like a marketing tag line but viewing images on the D300's high resolution screen is far more photo-realistic and easier on the eye, a notable advantage is that in playback you don't need to zoom into images as much to be sure of sharpness / focus accuracy as the extra resolution reveals this at lower magnification.
Shooting information
Press the info button in shooting mode (except live view) to show a full screen 'shooting information' display, we first saw a screen like this implemented in the D40 and there are certainly circumstances where having this level of information on one single screen can be very useful. The D300's shooting information screen automatically (or optionally manually) switches from light background to dark background in low light situations. My only gripe with this feature was that the information display disappears as soon as you half-press the shutter release button and does not return, you have to press info again, it would have been nice to have a 'persistent shooting information' custom function.
Light screen background Dark screen background (low light)
Record Review
You can choose for the D300 to display a review of the image taken immediately after shutter release. The type of display used will be the same as the last mode used in playback (histogram, thumbnail index, details etc.). Note that record review has all of the functionality of playback mode, this means its easy to delete, magnify, protect etc. The image will remain on the screen for the 'Monitor off delay' CSM c4 or until you half-press the shutter release.
Playback
Press the Playback button to enter playback mode, press the multi selector up or down to change display mode, up to six different pages of display detail are available. You can change the amount of information available in the basic and detailed photo display modes including optional blinking highlights and focus point display as well as the three pages of shooting information in detail mode. Note that you can switch the up/down and left/right functions of the multi selector via CSM f3 and that you can choose to also use the command dials to browse / change page via CSM f7.
Basic photo display: file number, folder, filename, date & time, quality, size
Basic photo display with optional Highlights and Focus point enabled
Detailed photo display: image thumbnail, histogram, exposure information and other data as per default display
Detailed photo display optional RGB histogram page
Detailed photo display data 1: metering mode, shutter speed, aperture, exposure mode, ISO, exposure compensation, focal length, lens used, AF mode, VR mode, flash mode and flash compensation Detailed photo display data 2: white balance & fine tuning, color space, picture control and image parameter adjustments
Detailed photo display data 3: noise reduction, active d-lighting, retouching, comment
Playback Zoom
Unlike the D200 the D300 now has dedicated zoom-in and zoom-out buttons, with an image displayed simply press zoom-in to begin magnifying. While magnified use the multi selector to move around the image, the navigation box and loupe at the bottom right of the image (as can be seen below) disappears after a couple of seconds. There are eight magnification levels, on the D300's high resolution screen the last two go beyond 1:1 and provide an enlarged pixelated view.
Playback thumbnail views
The D300 has two levels of thumbnail view, now easier thanks to the dedicated zoom-out button, just press to switch to the initial 2x2 (4 image) view and press again for the 3x3 (9 image view). Use the multi selector to move around the index. Note that if you have the 'Rotate Tall' option enabled images taken in the portrait orientation are displayed vertically (we had this option turned off in the captures below).
One click right for a 2 x 2 thumbnail view Two clicks right for a 3 x 3 thumbnail view
Other Playback displays
After pressing the delete button just press once more to confirm the deletion An example of a protected image
Live view
Nikon's live view implementation on the D300 is one of the most usable and comprehensive to date, the high resolution screen and addition of contrast detect auto focus, in addition to the now typical mirror down / mirror up passive auto focus system, mean that are more situations where live view becomes useful.
Live view (auto focus) mode
As noted the D300 supports two AF methods which Nikon call Tripod and Hand-held modes, both require you to use the AF-ON button to achieve auto focus. In Tripod mode auto-focus is achieved using the main image sensor in a "contrast detect" manner (the same as a compact camera), this tends to be slower than normal passive AF but does maintain the live view. In Tripod mode you can move the AF point anywhere within the frame using the multi-selector. In Hand-held mode the live view blanks out when you press AF-ON, the mirror drops and the camera focuses using the normal "passive" auto-focus sensor. Live view only returns when you release the AF-ON button, I personally found this a bit annoying, it should return as soon as the camera achieves AF lock.
Live view in Tripod mode Live view in Hand-held mode
Live view display modes
Press the info button to remove any overlaid information, you can also optionally enable grid lines which are in the same position as the grid lines shown on the viewfinder focusing screen.
Default live view display Live view without information
Live view with grid lines and information Live view with grid lines but without information
Live view magnification
Just as in playback mode you can magnify live view by pressing the zoom-in button (or back out again with zoom-out). While magnified you can use the multi-selector to move around the live image. The D300 appears to be able to go all the way to 1:1 magnification (one pixel on the sensor for one pixel on the LCD) which makes it easy to achieve absolutely perfect focus.
Live view focus, magnify and exposure video clip
The following video clip shows live view in use to manually focus roughly, magnify to focus more accurately, zoom out, take an exposure and finally magnify the image in record review. (We wanted to provide a video clip of contrast detect AF but on our pre-production unit color reproduction suffered during AF so we chose to focus manually). Just click on the play button below to start the video.
',1)">
HDMI output / High Definition display
Announced just a few days before the Sony DSLR-A700 the Nikon D3 and D300 were officially the first digital cameras with HDMI digital high definition video output. From the setup menu you can select between Auto, 480p, 576p, 720p or 1080i output, in this section we are only going to examine the 720p and 1080i options. HDMI output works in any mode which would otherwise use the LCD monitor; shooting information, menus, live view and playback. It has to be said that using live view over HDMI to a HD LCD or Plasma screen really is an amazing experience and could be extremely useful in studio photography situations. Below we have provided captures of HDMI output in both 720p (1280 x 720) and 1080i (1920 x 1080) resolutions just to give you a sense of the amount of detail visible. My only disappointment would be that there didn't seem to be a way to display the image without any shooting information (except when magnifying), this means that the default display (top image below) is only using 74% of screen width (theoretically, given aspect ratio differences this could be 84% without the status lines at the bottom).
Normal playback via HDMI (720p; 137 KB or1080i; 241 KB)
Zoomed playback via HDMI (720p; 108 KB or1080i; 207 KB)
High definition video clips
Below are two short high definition video clips captured via HDMI from the D300 (720p; 1280 x 720). The first taken in live view, manually focusing and using live view magnification to fine tune the focus point, the second a quick run-through in playback mode. Note that these videos, while compressed, are still large.
Live view over HDMI video clip (720p; Apple Quicktime; 9,979 KB)
Playback over HDMI video clip (720p; Apple Quicktime; 2,500 KB)
Menus
The D300's menus are similar to the D200 but as they are designed for the larger (and higher resolution) LCD they feature a slightly smaller font size which allows each menu page to show eight options over the D200's seven. Navigation remains the same, the multi-way controller and Enter button. You can also configure the command dials to provide menu navigation.
Shooting / CSM menu banks
When working in the Shooting or CSM menus you are in actual fact changing the settings of a 'menu bank'. There are four banks for each of the Shooting and Custom function menus; A to D, each bank can be given a more meaningful label and the currently selected bank letter is indicated on the top control panel for quick reference. This is very useful for quickly switching between a type of shot or situation.
Help pages
The D300 has the same help feature we first saw on the D2X, a setting with available help is indicated by a circular question mark icon (?) at the bottom left of the screen. Press and hold the protect button to display a context sensitive help page.
Playback Menu
Option Values / Actions Notes
Delete • Selected
• All
- Thumbnail selection
Playback folder • ND300
• All
• Current
Hide image • Select / set
• Deselect all? - Thumbnail selection
Display mode • Basic photo info
• Detailed photo info
Image review • Off
• On
After delete • Show next
• Show previous
• Continue as before
Rotate tall • Off
• On When enabled portrait shots appear vertically orientated.
Slide show • Start
• Frame interval
Print set (DPOF) • Select / set
• Cancel Order - Thumbnail selection
Shooting Menu
A green superscript one (¹) indicates the default setting.
Option Values / Actions Notes / Sub options
Shooting menu bank • A ¹
• B
• C
• D
• Rename
Four banks of settings can be memorized and quickly switched, each bank can be labeled (see above).
Reset shooting menu • Yes
• No
Active folder • New folder number
• Select folder - Create new folder.
File naming • File naming
Image quality • NEF (RAW) + JPEG Fine
• NEF (RAW) + JPEG Normal
• NEF (RAW) + JPEG Basic
• NEF (RAW)
• TIFF (RGB)
• JPEG Fine
• JPEG Normal ¹
• JPEG Basic Select image quality.
Image size • Large ¹
• Medium
• Small - 4288 x 2848 / 12.2 M
- 3216 x 2136 / 6.9 M
- 2144 x 1424 / 3.1 M
JPEG compression • Size priority ¹
• Optimal quality
NEF (RAW) recording • Type
• NEF (RAW) bit depth
White balance • Auto ¹
• Incandescent
• Fluorescent
• Direct Sunlight
• Flash
• Cloudy
• Shade
• Choose color temp.
• Preset manual - A-B, G-M grid to fine tune WB
-
-
-
-
-
-
- 2500 K - 10000 K
- Select / program preset WB
Set Picture Control • Standard
• Neutral
• Vivid
• Monochrome
• [custom] - Default (3, 0, 0, 0, 0)
- Default (2, 0, 0, 0, 0)
- Default (4, 0, 0, 0, 0)
- Default (3, 0, 0, 0, 0)
Manage Picture Control • Save/edit
• Rename
• Delete
• Load/save
- Create custom Picture Control sets
- Load / save from card
Color Space • sRGB ¹
• Adobe RGB
Active D-Lighting • Enhanced
• Normal
• Moderate
• Off ¹
Long exp. NR • On
• Off ¹ Enables dark frame subtraction NR for exposures of 1/2 sec or longer.
High ISO NR • High
• Normal
• Low
• Off ¹
ISO sensitivity settings • ISO
• ISO sensitivity auto control
Live view • Live view mode
• Release mode
- Phase detect AF
- Contrast detect AF
Multiple exposure • Done
• Number of shots
• Auto gain
Interval timer shooting • Start
• Interval
• Select Intvl*Shots
• Start
Non-CPU Lens Data • Focal length
• Maximum aperture
Menus (contd.)
The cameras custom settings are split into six alphabetical color coded categories, this makes it easier to remember a specific option and quicker to enter the custom settings menu at the correct position. You can still scroll through all custom settings options as one big menu if you wish. Note that on this menu an asterisk (*) next to a custom setting means that it has been changed to something other than the camera default. A green superscript one (¹) indicates the default setting.
Custom Settings Menu (a: Autofocus)
Option Values / Actions Notes
a1 AF-C priority selection • Release ¹
• Release + focus
• Focus
Defines if camera must have focus lock before shutter release.
a2 AF-S priority selection • Focus ¹
• Release Defines if focus lock is required before shutter release.
a3 Dynamic AF area • 9 points ¹
• 21 points
• 51 points
• 51 points (3D-tracking)
a4 Focus tracking with lock-on • Long
• Normal ¹
• Short
• Off
Controls how focusing is affected by subject distance changing and how quickly the system should react.
a5 AF activation • Shutter / AF-ON ¹
• AF-ON Only
a6 AF point illumination • Auto ¹
• Off
• On
a7 Focus point wrap-around • Wrap
• No wrap ¹
a8 AF point selection • 51 points ¹
• 11 points
a9 Built-in AF-assist illuminator • On ¹
• Off Controls the built-in AF assist illuminator.
a10 AF-ON for MB-D10 • AF-ON ¹
• AE/AF-L lock
• AE lock (reset on rel.)
• AE lock (hold)
• AF lock only
• Same as FUNC button Customize the function of the AF-ON button on the MB-D10 vertical-grip / battery pack.
Custom Settings Menu (b: Metering / exposure)
Option Values / Actions Notes
b1 ISO sensitivity step value • 1/3 step ¹
• 1/2 step
• 1 step Set the steps used for selection of ISO sensitivity.
b2 EV steps for exposure ctl. • 1/3 step ¹
• 1/2 step
• 1 step
b3 Exp comp/fine tune • 1/3 step ¹
• 1/2 step
• 1 step
b4 Easy exposure compens. • On (Auto reset)
• On
• Off ¹
Enables 'Easy Exposure Compensation' which can be accessed by turning a dial.
b5 Center weight area • 6 mm
• 8 mm ¹
• 10 mm
• 13 mm
• Average
b6 Fine tune exposure • Yes
• No ¹
Allows you to fine tune metered exposure values in the range of -1.0 EV to +1.0 EV in 1/6 EV steps.
Custom Settings Menu (c: Timers / AE Lock)
Option Values / Actions Notes
c1 Shutter-release butt. AE-L • On
• Off ¹
Define lock AE during shutter release half-press.
c2 Auto meter-off delay • 4 s
• 6 s ¹
• 8 s
• 16 s
• 30 s
• 1 min
• 5 min
• 10 min
• 30 min
• No Limit
c3 Self-timer delay • 2 s
• 5 s
• 10 s ¹
• 20 s
c4 Monitor off delay • 10 s
• 20 s ¹
• 1 m
• 5 m
• 10 m
Custom Settings Menu (d: Shooting / display)
Option Values / Actions Notes
d1 Beep
• High ¹
• Low
• Off
d2 Viewfinder grid display
• Off ¹
• On
Enables a 'thirds' grid overlay on the focusing screen.
d3 Viewfinder warning display
• On ¹
• Off
d4 CL mode shooting speed
• 7 fps
• 6 fps
• 5 fps
• 4 fps
• 3 fps ¹
• 2 fps
• 1 fps
d5 Max. continuous release • 1 - 100 Maximum shots in a burst.
d6 File Number Sequence • On ¹
• Off
• Reset
d7 Shooting info display • Auto
• Manual Defines if shooting info display should automatically change color in dark
d8 LCD illumination • Off ¹
• On When on any button will light the control panel.
d9 Exposure delay mode • Off ¹
• On Shutter release is delayed 1.0 sec to avoid vibration.
d10 MB-D10 battery type • LR6 (AA, Alkaline) ¹
• HR6 (AA, Ni-MH)
• FR6 (AA, Lithium)
• ZR6 (AA, Ni-Mn) Tell the camera what type of batteries are being used in the optional vertical grip.
d11 Battery order • Use MB-D10 batt first
• Use camera batt first
Custom Settings Menu (e: Bracketing / flash)
Option Values / Actions Notes
e1 Flash sync speed
• 1/320 (Auto FP)
• 1/250 (Auto FP)
• 1/250 ¹
• 1/200
• 1/160
• 1/125
• 1/100
• 1/80
• 1/60
e2 Flash shutter speed • 1/60 s ¹
• 1/30 s
• 1/15 s
• 1/8 s
• 1/4 s
• 1/2 s
• 1 s
• 2 s
• 4 s
• 8 s
• 15 s
• 30 s Slowest flash shutter speed.
e3 Flash cntrl for built-in flash • TTL ¹
• Manual
• Repeating Flash
• Commander Mode Set the mode for the built-in flash.
e4 Modeling flash • On ¹
• Off DOF preview button.
e5 Auto bracketing set • AE & Flash ¹
• AE only
• Flash only
• WB bracketing
e6 Auto bracketing (Mode M) • Flash / Speed ¹
• Flash / Speed / Apt.
• Flash / Aperture
• Flash Only
e7 Bracketing order • Meter > Under > Over ¹
• Under > Meter > Over
e8 Auto BKT Selection • Manual Value Select ¹
• Preset Value Select
Custom Settings Menu (f: Controls)
Option Values / Actions Notes
f1 Multi selector center button
• Shooting mode
• Playback mode
Multi selector center button function.
f2 Multi selector • Reset meter-off delay
• Do nothing ¹
f3 Photo info / playback • Info <>, PB ^v
• Info ^v, PB <> ¹
Multi selector role in single image playback.
f4 Assign FUNC button
• FUNC button press
• FUNC button + dials
Define the function of the FUNC button (front of the camera below the DOF preview button), both a single press and a hold with dial turn.
f5 Assign preview button
• Preview button press
• Preview button + dials
Define the function of the preview button (front of the camera above the FUNC button), both a single press and a hold with dial turn.
f6 Assign AE-L/AF-L button • Preview button press
• Preview button + dials
f7 Customize command dials • Reverse rotation
• Change main / sub
• Aperture setting
• Menus and Playback
f8 Release button to use dial • Yes
• No ¹
f9 No memory card? • Release locked ¹
• Enable release
f10 Reverse indicators • + ---- 0 ---- - ¹
• - ---- 0 ---- +
Menus (contd.)
Setup Menu
Option Values / Actions Notes
Format memory card • Yes
• No
LCD brightness • -3 to +3
Clean image sensor • Clean now
• Clean at startup / shut.
Lock mirror up for cleaning • Start
Video Mode • NTSC
• PAL
HDMI • Auto
• 480p
• 576p
• 720p
• 1080i
World Time • Time zone
• Date and time
• Date format
• Daylight saving time
Language • German
• English
• Spanish
• Finnish
• French
• Italian
• Dutch
• Polish
• Portuguese
• Russian
• Swedish
• Chinese Traditional
• Chinese Simplified
• Japanese
• Korean
Image comment • Done
• Input comment
• Attach comment
When enabled the comment is written into the header of each image.
Auto image rotation • On
• Off
USB • Mass Storage
• MTP / PTP
Dust off ref photo • Start
• Clean sensor then start Used to capture a 'dust reference image' for the 'Dust Off' feature of Nikon Capture. (RAW only).
Battery Info • Battery meter
• Picture meter
• Charging life Information display only.
Wireless transmitter
Image authentication • On
• Off
Save/load settings • Save settings
• Load settings
GPS • Auto meter off
• Position
Non-CPU lens data • Done
• Lens number (1 - 9)
• Focal length (6 - 4000)
• Max aperture (F1.2 - F22)
AF fine tune • AF fine tune (On/Off)
• Saved value (+/- 20)
• Default (+/- 20)
• List saved values
Firmware Version • Version No.
Timings & File Sizes
The D200 represented a serious step forward in performance over its predecessor, the D100. Performance metrics such as power on / sleep to on and user interface response were as fast as you could ever need (indeed virtually instant). Despite having fewer areas in which to demonstrate an improvement the D300 still manages to feel faster than the D200. Examples of additional improvements are shorter record review times, faster playback and extremely high throughput with a fast CF card such as the SanDisk Extreme IV. Continuous shooting was consistent with the published specs, six frames per second with the standard battery and eight frames per second with the battery girp and higher powered batteries. It's hard to pick out any one area where the D300's performance could be improved.
Timing Notes: All times calculated as an average of three operations. Unless otherwise stated all timings were made on a 4288 x 2848 JPEG Fine (approx. 4.2 MB per image).
The media used for these tests were:
2 GB SanDisk Extreme IV CF card 2 GB Lexar Pro 133x CF card 16 GB SanDisk Extreme III CF card
Media comparison
Action Time, secs
(2 GB SanDisk)
Time, secs
(2 GB Lexar)
Time, secs
(16 GB SanDisk)
Power Off to On
<0.1 <0.1 <0.1
Power Off to Shot <0.1 <0.1 <0.1
Sleep to On <0.1 <0.1 <0.1
Power On to Off <0.1 <0.1 <0.1
Record Review JPEG *1 0.5 0.5 0.5
Record Review RAW 12-bit *1 0.5 0.5 0.5
Record Review RAW 14-bit *1 0.8 0.8 0.8
Enter Live View 0.6 0.6 0.6
Exit Live View <0.2 <0.2 <0.2
Play RAW 12-bit *2 ~0.3 / <0.1 ~0.3 / <0.1 ~0.3 / <0.1
Play RAW 14-bit *2 ~0.3 / <0.1 ~0.3 / <0.1 ~0.3 / <0.1
Play JPEG *2 ~0.3 / <0.1 ~0.3 / <0.1 ~0.3 / <0.1
Play Image to Image RAW <0.2 <0.2 <0.2
Play Image to Image JPEG <0.2 <0.2 <0.2
*1 Time taken from the shutter release being pressed to the review image being displayed on the LCD monitor.
*2 The first number is the time from shooting to play mode for an image which hasn't yet been displayed, the second figure is the time to display if the image has been displayed (and 'cached').
Continuous Drive mode
Caveats / notes
Continuous rate with battery grip
Depending on the camera's power supply the D300 has two different maximum continuous shooting rates. With the standard EN-EL3e battery in the camera or the optional MB-D10 grip the maximum rate is six frames per second. Using either EN-EL4(a)* or AA batteries in the MB-D10 increases the maximum rate to eight frames per second.
Active D-Lighting
As you may expect the additional processing required by Active D-Lighting has a significant impact on image processing speed and hence number of frames in a burst. Instead of a burst of 100 frames using 'Normal' Active D-Lighting reduced the burst to 15 frames before slowing.
Max. continuous release (c.fn d5)
The D300 imposes a maximum 100 frame limit on continuous bursts. Put simply assuming the CF card is fast enough the camera will shoot continuously until it reaches the set limit (by default 100 frames) and then simply stop unless you lift your finger off the shutter release and re-press. This doesn't appear to be a hard buffer limt, just a soft limit.
* To use EN-EL4(a) batteries in the MB-D10 you also need the BL-3 'Battery Chamber Cover'.
Continuous drive tests
To test continuous drive mode the camera had the following settings: Manual Focus, ISO 100, Shutter Priority (1/500 sec). Measurements were taken from audio recordings of the tests. Media used were the same as above.
The tests carried out below measured the following results for JPEG and RAW:
Frame rate - Initial frame rate, without battery grip ~6.1 fps, with battery grip ~8.0 fps Number of frames - Number of frames in a burst (until buffer full) Buffer full rate - Frame rate if shutter release held down after burst (buffer full) Next burst - How soon after the burst the buffer has emptied / CF compartment light goes out
Burst of JPEG Large/Fine images (6 fps mode, internal EN-EL3a only)
Timing 2 GB SanDisk
Extreme IV CF
2 GB Lexar
Pro 133x CF
16 GB SanDisk
Extreme III CF
Frame rate 6.1 fps 6.1 fps 6.1 fps
Number of frames 100 49 34
Buffer full rate n/a 3.3 fps 1.6 fps
Next burst n/a 8.8 sec 17.5 sec
Burst of JPEG Large/Fine images (8 fps mode, MB-D10 + EN-EL4a)
Timing 2 GB SanDisk
Extreme IV CF
2 GB Lexar
Pro 133x CF
16 GB SanDisk
Extreme III CF
Frame rate 8.0 fps 8.0 fps 8.0 fps
Number of frames 62 37 32
Buffer full rate 6.0 fps (uneven) 3.3 fps 1.6 fps
Next burst 20.7 sec 8.8 sec 18.4 sec
Burst of RAW images (12-bit NEF, 6 fps mode)
Timing 2 GB SanDisk
Extreme IV CF
2 GB Lexar
Pro 133x CF
16 GB SanDisk
Extreme III CF
Frame rate 6.1 fps 6.1 fps 6.1 fps
Number of frames 28 18 17
Buffer full rate 3.5 fps (uneven) 1.3 fps (uneven) 1.1 fps (uneven)
Next burst 7.0 sec 17.5 sec 19.4 sec
Burst of RAW images (12-bit NEF, 8 fps mode)
Timing 2 GB SanDisk
Extreme IV CF
2 GB Lexar
Pro 133x CF
16 GB SanDisk
Extreme III CF
Frame rate 8.0 fps 8.0 fps 8.0 fps
Number of frames 17 17 16
Buffer full rate 2.5 fps (uneven) 1.3 fps (uneven) 0.9 fps (uneven)
Next burst 7.5 sec 14.6 sec 20.1 sec
The D300 did exactly what it said on the box, just over six frames per second without the battery grip (and more powerful battery) and eight frames per second with them (and this at 1/500 sec, bearing in mind the issues we had achieving maximum shooting rate with theCanon EOS 40D). The D300 only hit the 100 frame limit at full rate once in our tests, in JPEG mode with the 2 GB SanDisk Extreme IV otherwise the buffer filled and the shooting rate slowed (and was often fairly uneven). The biggest surprise here was the significant difference in write speed between the SanDisk and Lexar cards.
File Flush Timing
RAW options; 12-bit / 14-bit, compression
The D300 provides a fairly wide range of RAW options, you can choose between recording 12 or 14 bits of data (as the analogue to digital converter on the D300 is 14 bit) as well as lossless compression, 'normal compression' (same as previous Nikon NEF's, partially lossy) and uncompressed.
Timings shown below are the time taken for the camera to process and "flush" the image out to the storage card. Timing was taken from the instant the shutter release was pressed to the time the storage card activity lamp beside the compartment door went out. Media used were the same as above.
Image type
(4288x 2848 size) Time, secs
(2 GB SanDisk)
Time, secs
(2 GB Lexar)
Time, secs
(16 GB SanDisk)
Approx.
size
RAW 14-bit + JPEG *2 1.9 2.6 3.2 18.2 MB
RAW 12-bit + JPEG *2 1.5 2.1 2.7 15.3 MB
RAW 14-bit Lossless 1.6 2.3 2.6 14.0 MB
RAW 12-bit Lossless 1.2 1.6 2.0 11.1 MB
RAW 12-bit Compressed 1.2 1.6 1.9 9.9 MB
RAW 12-bit Uncompress. 1.5 2.3 2.5 18.7 MB
JPEG Fine ~1.0 ~1.1 1.4 4.2 MB
JPEG Normal ~1.0 ~1.0 1.2 3.1 MB
*1 The D300 begins writing about 0.9 seconds (1.2 seconds for 14-bit RAW) after the shutter release is pressed, hence you must subtract this from the timings shown above to get the actual write time.
*2 RAW Lossless compression and JPEG Fine. File size reported is the RAW and JPEG added together.
With a fast card the D300 delivers crushingly fast write times, in more thorough tests we measured write throughput as 24.5 MB/sec for the SanDisk Extreme IV, 14.1 MB/sec for the Lexar 133x and 20.4 MB/sec for a Lexar 300x UDMA (not shown above). This combined with excellent 'shoot and forget' background buffering means that you never really need to think about write times, no matter how large the file.
USB transfer speed
Method Transfer rate
CardBus PCMCIA adapter 10.5 MB/sec
Nikon D300 (Mass Storage device) 11.5 MB/sec
SanDisk Extreme IV USB 2.0 card reader 13.3 MB/sec
SanDisk Extreme IV Firewire 800 card reader 26.6 MB/sec
To test the D300's USB transfer speed we transferred approximately 256 MB of images (mixed RAW and JPEG) from a SanDisk Extreme IV 2 GB CF card. In this test the D300 performed fairly well, delivering about the same throughput as a typical USB 2.0 card reader.
Image parameters
With the introduction of the D300 and D3 digital SLRs Nikon has considerably improved its image parameter functionality. You now have four standard 'Picture Control' presets (Standard, Neutral, Vivid and Monochrome) plus the ability to load and save custom sets. Adjustment options have been expanded providing a much wider latitude for sharpening, contrast and saturation as well as the new brightness adjustment. Note also the 'Quick adjust' feature which allows for linked adjustment of sharpening, contrast and saturation. Lastly there's also a grid view which allows you to see all of the current picture control modes on a saturation vs. contrast (plus sharpness) grid.
Image parameter adjustments
Picture Control presets: Standard, Neutral, Vivid, Monochrome Picture Control adjustments Sharpening: 0 to 9 (10 levels) Contrast: Auto, -3,to +3 (7 levels) Brightness: -1, 0, +1 (3 levels) Saturation: Auto, -3 to +3 (7 levels) Hue: -3 to +3 (7 levels)
Picture Control presets
Below are samples of our test scene taken in each of the Image Optimization presets, we've also included a 100% crop from each image so you can see the sharpness level of each preset.
Thumbnail 100% crop
S
t
a
n
d
a
r
d
N
e
u
t
r
a
l
V
i
v
i
d
M
o
n
o
c
h
r
o
m
e
'Quick' adjustment
The 'quick adjust' option allows you to modify sharpening, contrast and saturation together to produce a more vivid / sharp image (positive adjustment) or neutral / softer image (negative adjustment). It's worth noting that making negative 'quick adjust' changes doesn't appear to affect these three parameters equally.
Thumbnail Luminosity histogram
-2
0
+2
Sharpening adjustment
The D300 provides a total of ten manual sharpening levels plus the traditional Nikon 'Auto' mode. The default sharpening level for Standard Picture Control mode is three, below you can see examples of Auto and levels 0, 2, 4, 6 and 8. Kudos to Nikon for providing a wide range of sharpening options which cover a wide latitude of adjustment, and for delivering higher sharpening by default than they have in the past.
Sharpening: Auto
Sharpening: 0
Sharpening: 2
Sharpening: 4
Sharpening: 6
Sharpening: 8
Contrast adjustment
Adjusting the tone alters the shape of the 'S curve' used to map the linear image data captured by the sensor into the correct gamma. A lower contrast setting maintains more of the original data's dynamic range but leads to a flatter looking image. A higher contrast setting stretches the grayscale (dark to light) of the image and could lead to clipping of both shadow detail and highlights. I'm very pleased to see Nikon providing a wider range of adjustment (seven levels in total) however the latitude of change is smaller than I would have expected, we would expect -3 to provide very flat images and +3 very contrasty.
Thumbnail Luminosity histogram
-3
0
+3
Brightness adjustment
New and unique is the Brightness adjustment which makes a subtle linear brightness adjustment to the image, essentially shifting the 'black point' slightly from the default, it may have been more useful if it had more latitude of adjustment than just -1 or +1.
Thumbnail Luminosity histogram
-1
0
+1
Saturation (color) adjustment
Saturation adjustment allows you to control the strength of color in the final image. Compared to previous Nikon digital SLRs the range of saturation adjustment on the D300 is considerably larger (Kudos for that) but I would perhaps have liked even less saturation at the -3 end of the scale.
Thumbnail 50% crop
-3
0
+3
Hue (color) adjustment
The hue adjustment setting allows you to make some subtle changes to the hue output of the image, it is useful for compensation of hue shifts caused by certain artificial light, a negative setting makes color appear more blue-ish, a positive setting makes color appear more yellow-ish.
Thumbnail 50% crop
-3
0
+3
Active D-Lighting
D-Lighting is a shadow & highlight enhancement feature first seen on Nikon's Coolpix range of compact cameras and later on the D200. On previous models it was an after-the-fact filter which you could apply to images in playback mode. With the D300 'Active' D-Lighting is a menu setting which is applied to all images if enabled. There are four levels available; Off, Low, Normal and High. Rather than only adjusting the shape of the tone curve (as most similar systems do) setting higher levels appears to apply a third of a stop negative exposure compensation (typically slightly higher shutter speed). Unlike the Sony DRO system Nikon's works best if you meter for shadows (apply some positive exposure compensation) and allow Active D-Lighting to maintain / recover highlight detail.
To demonstrate the difference Active D-Lighting can make we set up our simple 'shadow scene' and shot it at increasing exposure compensation levels with Active D-Lighting Off and also set to High. As you can see the High setting manages to maintain highlight detail with about +1.0 EV compensation, beyond that while it is better than Off even the High setting can't maintain full highlight detail.
Active D-Lighting: Off Active D-Lighting: High
1/25 sec, F8 1/30 sec, F8
1/13 sec, F8 (+1.0 EV) 1/15 sec, F8 (+1.0 EV)
1/6 sec, F8 (+2.0 EV) 1/8 sec, F8 (+2.0 EV)
0.3 sec, F8 (+3.0 EV) 1/4 sec, F8 (+3.0 EV)
Software
The D300 is provided with a software CD which contains:
Nikon View NX (Windows / Mac OS X) - A new simplified image browser / organization / basic manipulation application based on the Capture NX design (although it has to be said, easier to use). Provides basic RAW to JPEG conversion with adjustment of exposure compensation, white balance and picture control.
Nikon Transfer (Windows / Mac OS X) - Automated transfer of images from camera or card reader.
Nikon Capture NX (Windows / Mac OS X) - Nikon's advanced workflow and RAW development application, has traditionally been an 'optional extra' however a current promotion means that the D300 and D3 are being shipped with Capture NX keys in many regions enabling the 'trial download' to be upgraded to a full release.
RAW conversion
As is normal in our digital SLR reviews I like to compare the supplied RAW conversion software, any optional manufacturer RAW conversion software and some third party RAW converter. In the case of the A700 we had the supplied Image Data Converter SR as well as Adobe Camera RAW 4.3 beta.
JPEG - Large/Fine, Default settings View NX - Nikon View NX 1.0.3 Capture NX - Nikon Capture NX 1.3 ACR - Adobe Camera RAW 4.3.1 Bibble - Bibble Pro 4.9.9b
Color reproduction
Place your mouse over the label below the image to see the color from a GretagMacbeth ColorChecker chart produced using each RAW converter. As you can see both View NX and Capture NX match the color response of the cameras internal image processor identically. As usual the third party converters, in this case Adobe Camera RAW and Bibble Pro have their own 'different' color response.
JPEG Standard RAW View NX RAW Capture NX RAW Adobe ACR
RAW Bibble Pro
Sharpness and Detail
As expected the RAW converted images look sharper than JPEG (images look crisper and demostrate better per-pixel sharpness), it does appear as though View NX and Capture NX are using the same engine as their output is identical. Overall there's little difference in sharpness between the three RAW conversion engines compared here.
J
P
E
G
V
i
e
w
N
X
C
a
p
t
u
r
e
N
X
A
C
R
B
i
b
b
l
e
Resolution
Again, the sharpness advantage to RAW conversion is fairly clear to see, all converters delivering higher resolution than JPEG straight from the camera. The image with the most resolution and fewest artifacts appears to be that produced by Bibble Pro.
JPEG from camera Nikon View NX 1.0.3 (RAW)
Nikon Capture NX 1.3 (RAW) Adobe Camera RAW 4.3.1 (RAW)
Bibble Pro 4.9.9b (RAW)
ISO / Sensitivity accuracy
In a new addition to our reviews we are now measuring the actual sensitivity of each indicated ISO sensitivity. This is achieved using the same shots as are used to measure ISO noise levels, we simply compare the exposure for each shot to the metered light level (using Sekonic L-358), middle gray matched. We estimate the accuracy of these results to be +/- 1/6 EV.
Like many recent digital SLRs all four in this comparison proved to be right on the spot with their indicated sensitivity, that is to say an indicated sensitivity of say ISO 200 was exactly that (unlike some older digital SLRs which were slightly more or less sensitive than indicated).
Indicated
sensitivity Nikon D300
(actual sensitivity) Sony DSLR-A700
(actual sensitivity) Canon EOS 40D
(actual sensitivity) Olympus E-3
(actual sensitivity)
ISO 100 ISO 100 ISO 100 ISO 100 ISO 100
ISO 200 ISO 200 ISO 200 ISO 200 ISO 200
ISO 400 ISO 400 ISO 400 ISO 400 ISO 400
ISO 800 ISO 800 ISO 800 ISO 800 ISO 800
ISO 1600 ISO 1600 ISO 1600 ISO 1600 ISO 1600
ISO 3200 ISO 3200 ISO 3200 ISO 3200 ISO 3200
ISO 6400 ISO 6400 ISO 6400 n/a n/a
ISO Sensitivity / Noise levels
ISO equivalence on a digital camera is the ability to increase the sensitivity of the sensor. The works by turning up the "volume" (gain) on the sensor's signal amplifiers (remember the sensor is an analogue device). By amplifying the signal you also amplify the noise which becomes more visible at higher ISO's. Many modern cameras also employ noise reduction and / or sharpness reduction at higher sensitivities.
To measure noise levels we take a sequence of images of a GretagMacBeth ColorChecker chart (controlled artificial daylight lighting). The exposure is matched to the ISO (ie. ISO 200, 1/200 sec for consistency of exposure between cameras). The image sequence is run through our own proprietary noise measurement tool (version 1.4 in this review).Click here for more information. (Note that noise values indicated on the graphs here can not be compared to those in other reviews). Room temperature is approximately 22°C (~72°F), simulated daylight lighting.
Nikon D300 vs. Canon EOS 40D vs. Sony DSLR-A700 vs. Olympus E-3
Nikon D300: Nikkor 50 mm F1.4 lens, Manual exposure, Manual WB,
Default Parameters (Normal), High ISO NR (Normal), JPEG Large / Fine
Canon EOS 40D: Canon 50 mm F1.4 lens, Manual exposure, Manual WB,
Default Parameters (Standard), High ISO NR (Default; Off), JPEG Large / Fine
Sony DSLR-A700: Minolta 50 mm F1.4 lens, Manual exposure, Manual WB,
Default Parameters (Standard), High ISO NR (Normal - default), JPEG Large / Fine
Olympus E-3: Olympus 50 mm F2.0 Macro lens, Manual exposure, Manual WB,
Default Parameters (Natural), JPEG Large / Fine
Nikon D300
ISO 100 Canon EOS 40D
ISO 100 Sony DSLR-A700
ISO 100 Olympus E-3
ISO 100
Nikon D300
ISO 200 Canon EOS 40D
ISO 200 Sony DSLR-A700
ISO 200 Olympus E-3
ISO 200
Nikon D300
ISO 400 Canon EOS 40D
ISO 400 Sony DSLR-A700
ISO 400 Olympus E-3
ISO 400
Nikon D300
ISO 800 Canon EOS 40D
ISO 800 Sony DSLR-A700
ISO 800 Olympus E-3
ISO 800
Nikon D300
ISO 1600 Canon EOS 40D
ISO 1600 Sony DSLR-A700
ISO 1600 Olympus E-3
ISO 1600
Nikon D300
ISO 3200 Canon EOS 40D
ISO 3200 Sony DSLR-A700
ISO 3200 Olympus E-3
ISO 3200
Nikon D300
ISO 6400 Canon EOS 40D
n/a Sony DSLR-A700
ISO 6400 Olympus E-3
n/a
From ISO 100 to 400 there is virtually no difference from a noise point of view between any of these cameras, none exhibit noticeable any noise. Indeed visible noise only begins to creep into the D300 shots at around ISO 1600, at which point it has a very 'natural' monochromatic grain appearance (not want to be too cliched but 'film like'). At ISO 3200 the effects of the D300's noise reduction are more obvious if you look closely at the detail crop. ISO 6400 really is only for the brave or those emergency situations. It has to be said that out of these four cameras the D300 has the nicest appearance to its higher sensitivity images, Nikon's decision to preserve as much luminance detail as possible by using mostly chroma noise reduction really pays off.
* These results are with the cameras in their default modes, the EOS 40D for example does have anoptional stronger chroma noise reduction option which delivers images with almost no chroma noise.
Noise graphs
Note that we normally show both gray and black results on the same graph, comparing four cameras this became too difficult to read hence we have two separate graphs, one for the gray patch (middle gray) and one for the black patch (shadows).
Luminance noise graph (gray patch)
The D300's noise reduction kicks in at ISO 800 from their upwards noise around the middle gray level increases in a steady manner to ISO 3200 then there's a fairly obvious jump at ISO 6400 (which can also be seen in the crops above as fine grain).
Indicated ISO sensitivity is on the horizontal axis of this graph, standard deviation of luminosity on the vertical axis.
Luminance noise graph (black patch)
Much the same story for the black patch (which generally represents shadow noise), noise reduction drops the noise level at ISO 800, consistent growth from there to ISO 3200 then a jump at ISO 6400.
Indicated ISO sensitivity is on the horizontal axis of this graph, standard deviation of luminosity on the vertical axis.
Chroma (color) noise graph
Because the D300's noise reduction appears to be mostly chroma based we get the biggest change in noise levels when measuring chroma (color) noise, at ISO 800 chroma noise is actually lower than at ISO 200.
Indicated ISO sensitivity is on the horizontal axis of this graph, standard deviation of color on the vertical axis.
In-camera High ISO noise reduction
The D300 has four different levels of noise reduction; Off, Low, Normal and High (with Normal as the default). The good news is that the Normal setting is tuned quite nicely to give a good answer to the compromise between noise levels and detail and that the latitude of adjustment between 'Off' and 'High' is great enough for this option to be useful. If you have your own noise reduction workflow or prefer your images with no potential NR smearing you can choose the Off option, if you want to avoid noise almost completely and aren't too concerned that detail may be compromised High is for you.
Indicated ISO sensitivity is on the horizontal axis of this graph, standard deviation of luminosity on the vertical axis (note that the standard deviation scale here has been extended 3x compared to the graphs on the previous page).
Noise reduction crop comparisons (ISO 800 - 6400)
ISO 800
NR Off ISO 800
NR Low ISO 800
NR Normal ISO 800
NR High
ISO 1600
NR Off ISO 1600
NR Low ISO 1600
NR Normal ISO 1600
NR High
ISO 3200
NR Off ISO 3200
NR Low ISO 3200
NR Normal ISO 3200
NR High
ISO 6400
NR Off ISO 6400
NR Low ISO 6400
NR Normal ISO 6400
NR High
Dynamic Range
Our new Dynamic Range measurement system involves shooting a calibrated Stouffer Step Wedge (13 stops total range) which is backlit using a daylight balanced lamp (98 CRI). A single shot of this produces a gray scale wedge from (the cameras) black to clipped white (example below). Each step of the scale is equivalent to 1/3 EV (a third of a stop), we select one step as 'middle gray' and measure outwards to define the dynamic range. Hence there are 'two sides' to our results, the amount of shadow range (below middle gray) and the amount of highlight range (above middle gray).
To most people highlight range is the first thing they think about when talking about dynamic range, that is the amount of highlight detail the camera can capture before it clips to white. Shadow range is more complicated, in our test we stop measuring values below middle gray as soon as the luminance value drops below our defined 'black point' (about 2% luminance) or the signal-to-noise ratio drops below a predefined value (where shadow detail would be swamped by noise), whichever comes first.
Active D-Lighting feature
We've already covered the visible effect of Active D-Lighting on a simple test sceneearlier in this review, below you can see a graphical representation of the curve produced by each mode. As you can see none of these modes actually extend highlight range, they do improve shadow range somewhat and also the response from middle gray upwards.
Picture Control presets
The graph below shows the dynamic range response from each of the D300's three Picture Control presets (excluding monochrome). As you can see each has a slightly different tone curve but none achieves any better highlight range. Arguably the best overall range (because of its lighter and hence extended shadow range) comes from the Neutral setting.
ISO Sensitivity and Dynamic Range
The D300 has an indicated base sensitivity of ISO 200, sensitivities below this (ISO 160, 125 and 100) are indicated as L0.3, L0.7 and L1.0 respectively. The same is true above ISO 3200 with ISO 6400 indicated as H1.0. As you can see from graph below the compromise at ISO 100 is highlight range which falls just over two thirds of a stop (0.7 EV) short of the highlight range seen from ISO 200 upwards.
From ISO 200 upwards the D300 demonstrates excellent dynamic range, around nine stops in total with a useful four stops of that above middle gray (what we call highlight range). This is a significant improvement over the D200 which had a highlight range of around three and a third EV. Shadow range is slightly better at ISO 400 and 800 because of increased noise reduction (not specifically an improvement in actual range).
Sensitivity Shadow range Highlight range Usable range
ISO 100* -5.2 EV 3.3 EV 8.5 EV
ISO 200 -4.7 EV 4.1 EV 8.8 EV
ISO 400 -5.1 EV 4.1 EV 9.2 EV
ISO 800 -5.1 EV 4.1 EV 9.2 EV
ISO 1600 -4.3 EV 4.1 EV 8.4 EV
ISO 3200 -4.0 EV 4.0 EV 8.0 EV
ISO 6400* -3.7 EV 3.9 EV 7.6 EV
360docimg_501_
* Non-standard sensitivities
Dynamic Range compared
All of the current crop of 'advanced amateur / semi-professional' digital SLRs (D300, A700, 40D and E-3) deliver around nine stops of dynamic range. The biggest difference is in the balance of the range, the D300 and A700 both deliver around four stops of highlight range (above middle gray) where as the 40D around three and a half and the E-3 around three. Both the 40D and E-3 deliver more shadow range.
Camera Shadow range
Highlight range
Usable range
Nikon D300 (ISO 200) -4.7 EV 4.1 EV 8.8 EV
Sony DSLR-A700 (ISO 200) -4.9 EV 3.9 EV 8.8 EV
Canon EOS 40D (ISO 100) -5.7 EV 3.4 EV 9.1 EV
Olympus E-3 (ISO 100) -5.7 EV 3.0 EV 8.8 EV
Nikon D200 (ISO 100) -5.0 EV 3.2 EV 8.2 EV
360docimg_502_
The wedges below are created by our measurement system from the values read from the step wedge, the red lines indicate approximate shadow and highlight range (the dotted line indicating middle gray).
360docimg_503_
360docimg_504_
360docimg_505_
360docimg_506_
360docimg_507_
RAW headroom
Experience has told us that there is typically around 1 EV (one stop) of extra information available at the highlight end in RAW files and that a negative digital exposure compensation when converting such files can recover detail lost to over-exposure. As with previous reviews we settled on Adobe Camera RAW for conversion to retrieve the maximum dynamic range from our test shots.
As you can see the default Adobe Camera RAW conversion delivers less dynamic range than JPEG from the camera (a more contrasty tone curve and less noise reduction in shadows). The best we could achieve was just under ten stops (10 EV) of total dynamic range - at the optimum ISO 200, more importantly almost a stop of that is in highlights (although with no guarantee of color accuracy).
It's also worth noting that we are indeed plotting both 12-bit and 14-bit RAW modes on the graphs below but that because their results were absolutely identical you can't really distinguish one from the other. 14-bit RAW in theory provides you with more 'data points' between the maximum and minimum brightness (the dynamic range) which could be useful for level-type adjustments.
ACR Default: Exp. 0.0 EV, Blacks 5, Contrast +25, Curve Medium ACR Best: Exp. -1.5 EV, Blacks 1, Brightness + 50, Contrast -50, Curve Linear
360docimg_508_
360docimg_509_
360docimg_510_
360docimg_511_
360docimg_512_
360docimg_513_
360docimg_514_
WARNING: Although ACR was able to retrieve the 'luminance' (brightness) of wedge steps which were previously clipped there's no guarantee of color accuracy as individual channels may clip before others. This can be seen fairly clearly in the examples below, on the right the negative digital exposure compensation has revealed some more detail but this soon turns into gray as one or more of the color channels clips.
Adobe Camera RAW default conversion Adobe Camera RAW with -2.5 EV digital comp.
360docimg_515_
360docimg_516_
360docimg_517_360docimg_518_
Color reproduction
Here you can see a generated GretagMacbeth ColorChecker chart, place your mouse over any of the labels below it to see the color reproduction in that mode. Select a camera/setting combination from the 'Compared to' drop-down to comparative boxes inside each patch.
Apart from a few subtle contrast differences the D300 delivers virtually identical color response (hue and saturation) as the D200, and to a large degree this is a good thing as it means consistent results for upgraders and heps to maintain a 'family look' for all Nikon DSLR models.
Nikon D300 Compared to: - Nothing - Canon EOS 1000D (Standard) Canon EOS 1000D (Neutral) Canon EOS-1Ds Mk III (Standard) Canon EOS-1Ds Mk III (Faithful) Canon EOS 30D (Standard) Canon EOS 30D (Neutral) Canon EOS 400D (Standard) Canon EOS 400D (Neutral) Canon EOS 40D (Standard) Canon EOS 40D (Neutral) Canon EOS 450D (Standard) Canon EOS 450D (Neutral) Canon EOS 500D (Standard) Canon EOS 500D (Portrait) Canon EOS 50D (Standard) Canon EOS 50D (Natural) Canon EOS 5D MK2 (Standard) Canon EOS 5D MK2 (Natural) Fujifilm S5 Pro (Std) Fujifilm S5 Pro (Film F1) Leica M8 (sRGB) Leica M8 (Adobe RGB) Nikon D200 (Normal) Nikon D200 (Softer) Nikon D3 (Standard) Nikon D3 (Neutral) Nikon D300 (Standard) Nikon D300 (Neutral) Nikon D3x (Standard) Nikon D3x (Neutral) Nikon D40 (Normal) Nikon D40 (Softer) Nikon D40 (Vivid) Nikon D40X (Normal) Nikon D40X (Softer) Nikon D40X (Vivid) Nikon D5000 (Standard) Nikon D5000 (Neutral) Nikon D60 (Normal) Nikon D60 (Softer) Nikon D60 (Vivid) Nikon D700 (Standard) Nikon D700 (Neutral) Nikon D80 (Normal) Nikon D80 (Softer) Nikon D80 (Vivid) Nikon D90 (Standard) Nikon D90 (Neutral) Olympus E-3 (Natural) Olympus E-3 (Vivid) Olympus E-30 (Natural) Olympus E-30 (vivid) Olympus E-330 (Vivid) Olympus E-330 (Natural) Olympus E-410 (Natural) Olympus E-410 (Vivid) Olympus E-420 (Natural) Olympus E-420 (Vivid) Olympus E-510 (Natural) Olympus E-510 (Vivid) Olympus E-520 (Natural) Olympus E-520 (Vivid) Olympus E-620 (Natural) Olympus E-620 (Vivid) Panasonic DMC-G1 (Standard) Panasonic DMC-G1 (Dynamic) Panasonic DMC-GH1 (Standard) Panasonic DMC-GH1 (Dynamic) Panasonic DMC-L1 (Standard) Panasonic DMC-L1 (Dynamic) Panasonic DMC-L10 (Standard) Panasonic DMC-L10 (Dynamic) Pentax K100D (Bright) Pentax K100D (Natural) Pentax K10D (Natural) Pentax K10D (Bright) Pentax K200D (Bright) Pentax K200D (Natural) Pentax K20D (Bright) Pentax K20D (Natural) Pentax K2000 (Bright) Pentax K2000 (Natural) Sigma DP1 (Standard) Sigma DP1 (Adobe RGB) Sony DSLR-A200 (Standard) Sony DSLR-A200 (Vivid) Sony DSC-R1 (Standard) Sony DSC-R1 (Vivid) Sony DSLR-A100 (Standard) Sony DSLR-A100 (Vivid) Sony DSLR-A200 (Standard) Sony DSLR-A200 (Vivid) Sony DSLR-A350 (Standard) Sony DSLR-A350 (Vivid) Sony DSLR-A700 (Standard) Sony DSLR-A700 (Vivid) Sony DSLR-A900 (Standard) Sony DSLR-A900 (Natural)
360docimg_519_
Standard Neutral Vivid Monochrome
Adobe RGB
Artificial light White Balance
The D300's automatic white balance in artificial light could be described as slightly better than the average but still poor enough for you to consider using the bulit-in presets, to shoot manual white balance or better still shoot RAW and sort out the white balance later. It's still a curiosity to me that the DSLR manufacturers haven't yet sorted out automatic white balance in artificial light, there isn't one current DSLR which stands out as allowing you to shoot confidently in auto white balance mode in such light.
360docimg_520_360docimg_521_
Incandescent - Auto WB
Red: 9.9%, Blue: -19.8%, Poor Incandescent - Incandescent preset WB
Red: 7.6%, Blue: -12.7%, Poor
360docimg_522_360docimg_523_
Fluorescent - Auto WB
Red: 6.0%, Blue: -15.6%, Average
Fluorescent - Fluorescent preset WB
Red: 5.4%, Blue: -4.2%, Average
Long Exposure noise reduction / Night shots
As is becoming the norm our 30 second 'night shot' exposure produced no hot pixels with noise reduction turned off. The D300 does provide optional 'dark frame subtraction' noise reduction which requires a noise sample frame to be taken directly after the main exposure.
Noise reduction Off Noise reduction On
360docimg_524_360docimg_525_
ISO 100, 30 sec, F8 ISO 100, 30 sec, F8
360docimg_526_360docimg_527_
(100% crops)
Flash
The D300's built-in flash produced a decent enough performance, well metered, no color cast and even coped well with our test chart with its white background (something which often throws out most metering systems). The D300 uses the newer i-TTL metering for internal (and external if compatible) flash which produces three lower powered pre-flashes before the main flash.
360docimg_528_360docimg_529_
Overall Image Quality / Specifics
Overall the D300's image quality is very impressive, Nikon have taken big strides in the last few years to catch up with and I would go so far as saying overtake much of the competition. On almost every metric image quality is improved; lower noise, higher dynamic range, better default JPEG sharpness and a now brand-consistent color response.
As we have come to expect Nikon have taken a more conservative approach to image sharpening than we see from their competitors, that said the situation is certainly better than it was with the D200 where our general recommendation was to turn sharpening up to its maximum setting when shooting JPEG.
Mentioned before, but it's worth mentioning again; we do prefer Nikon's approach to noise reduction. The visibility of noise comes in two distinguishable flavors; luminance (monochromatic grain) and chroma (color grain / blotches), Nikon tend to use mostly chroma noise reduction leaving luminance either untouched or reduced using very low levels of NR. This tends to leave higher sensitivity images looking grainy but without the smeary loss of detail we see from other noise reduction systems. The appearance of monochromatic grain in an image is far less of a concern than the loss of real detail because of overpowering luminance noise reduction, indeed many prefer this look as a more 'film like' response.
Built-in Chromatic Aberration correction
The D300 and D3 feature built-in Chromatic Aberration (CA) correction. This feature works by analysing the image, the image processor looks for CA in the image and actively corrects for it. If you're shooting RAW the analysis still occurs but instead of being applied the results of the analysis are simply written into metadata and are used by Capture NX to (optionally) correct. Obviously if you're using a third party RAW converter you won't get automatic CA correction. Our experience was that this worked very well and delivered surprising levels of CA reduction while also improving sharpness (probably due to the fact that the correction itself is effectively drawing the color channels back into alignment).
The amount of correction achieved can be demonstrated pretty clearly with the following graphs (from our lens analysis software). The top graph from Adobe Camera RAW with no CA correction, the bottom from a camera JPEG with the D300's automatic CA correction. Lens: 18-200 mm @ 18 mm, F3.5 (wide open).
360docimg_530_
360docimg_531_
Below you can see a visual comparison of the difference between images, shot as RAW+JPEG, the RAW image converted using Adobe Camera RAW.
Adobe Camera RAW JPEG
360docimg_532_360docimg_533_
A crop from our lens test chart, magnified 200% The same crop but shot as JPEG
360docimg_534_360docimg_535_
360docimg_536_360docimg_537_
360docimg_538_360docimg_539_
360docimg_540_360docimg_541_
Compared to...
As you can see from the balance between the positives / negatives versus the competition (below) the D300 is, on paper at least, one of the strongest DSLRs on the market. Its Live View feature provides both contrast-detect (like a compact digital camera) and passive (mirror-down) auto-focus options as well as a highly magnified option, these deliver excellent usability on the D300's next strong feature; its large, high resolution (640 x 480) LCD monitor and also in a studio setting through its HDMI output. Auto focus is mature and flexible with the highest number of AF points and largest range of selection / grouping options of any camera here and there's almost no need to mention the superb 1005 pixel RGB metering sensor which is widely accepted as probably the best in the business. Dive into the menus and the D300's extensive custom functions make it (along with the D3) one of the most configurable cameras on the market, providing the photographer with a massive range of customization and adjustment.
Positives versus the competition
Both passive (mirror-down) and contrast-detect auto-focus in Live View Full 1:1 magnified view in Live View 51 point AF with wide range of selection / grouping options White light AF assist lamp (over the EOS 40D and E-3 which require flash to be raised) AF 'fine tuning' adjustment can be set for body and per lens Arguably the best metering of the bunch (1005 pixel RGB sensor) High shutter life Fully flexible Auto ISO function (max ISO and min shutter speed configurable) Up to eight frames per second continuous shooting with optional grip and battery Very flexible control system, various configurable buttons, dial operation 3.0" 922,000 dot LCD monitor (also on DSLR-A700) Detailed battery information (including lifetime / aging) High definition HDMI video output (also on DSLR-A700)
Negatives versus the competition
Fixed LCD reduces the usefulness of Live View No built-in body stabilization (arguable as a negative but seen in two other SLRs here) No mirror lock-up (although 'exposure delay' can be used)
360docimg_542_
Nikon D300
360docimg_543_
Canon EOS 40D
360docimg_544_
Olympus E-3
360docimg_545_
Sony DSLR-A700
Price (body only) $1800[check] $1300[check] $1700[check] $1400[check]
Quality zoom price • Nikon 18-200mm VR
• F3.5-F5.6
• 27-300 mm equiv.
• $750
• Canon 17-85mm IS
• F4.0-F5.6
• 27.2-136 mm equiv.
• $600
• Olympus 14-54 mm
• F2.8-F3.5
• 28-108 mm equiv.
• $500 • Sony 16-105mm DT
• F3.5-F5.6
• 24-157.5 mm equiv.
• $550
Dust removal • Self-cleaning filter
• Dust-off image • Self-cleaning filter
• Anti-static coating
• Dust delete data • SSW filter • CCD-shift shake
• Anti-static coating
Environmental sealing • Splash proof
• Dust proof
• Sealed lenses available • Environmental seals on battery and CF compartment doors
• Sealed lenses available • Weatherproof seals throughout
• Sealed lenses available • Weatherproof seals throughout
Sensor type CMOS CMOS Live MOS CMOS
Sensor size 23.6 x 15.8 mm 22.2 x 14.8 mm 17.3 x 13.0 mm 23.5 x 15.6 mm
Sensor area 373 mm² 329 mm² 225 mm² 367 mm²
Image Stabilization Lenses only Lenses only Built-in sensor shift Built-in sensor shift
Effective pixels 12.3 million 10.1 million 10.1 million 12.3 million
Aspect ratio 3:2 3:2 4:3 3:2
FOV crop 1.5x 1.6x 2.0x 1.5x
Image size 4288 x 2848 3888 x 2592 3648 x 2736 4272 x 2848
Live View • Yes
• Up to 1:1 pixel view
• Contrast detect AF
• Mirror flip AF • Yes
• Up to 10x magnify
• Mirror flip AF
• Different modes • Yes
• Up to 10x magnify
• Mirror flip AF No
Lens support • Nikon F mount • Canon EF / EF-S • Four Thirds • Sony Alpha
• Minolta A-type
File formats JPEG, TIFF, RAW (NEF 12-bit / NEF 14-bit) JPEG, RAW (CR2) JPEG, RAW (ORF) JPEG, RAW (ARW), cRAW (ARW)
Auto focus • 51 point
• 15 cross-type
• -1 to 19 EV • 9 point
• 9 cross-type
• -0.5 to 18 EV • 11 point
• 11 cross-type
• -2 to 19 EV • 11 point
• 1 double cross-type
• 0 to 18 EV
• Eye-start AF option
AF illuminator White lamp Flash strobe Flash strobe Red lamp pattern
AF adjustment Yes, body and per lens No No No
Metering sensor 1005 pixel RGB 35 zone 49 zone 40 segment
Metering range 0 to 20 EV 0 to 20 EV 1 to 20 EV 0 to 20 EV
Metering modes 3D Color Matrix, CWA, Spot Evaluative, Partial, Spot, CWA ESP, CWA, Spot, Highlight spot, Shadow spot Multi-segment, CWA, Spot
Exp. comp. +/- 5.0 EV +/- 2.0 EV +/- 5.0 EV +/- 3.0 EV
Exp. comp. EV steps 0.3, 0.5 or 1.0 EV 0.3 or 0.5 EV 0.3, 0.5 or 1.0 EV 0.3 or 0.5 EV
Manual EV steps 0.3, 0.5 or 1.0 EV 0.3 or 0.5 EV 0.3, 0.5 or 1.0 EV 0.3 or 0.5 EV
Sensitivity range (boost setting) (100), 200 - 3200, (6400) 100 - 1600, (3200) 100 - 3200 100 - 1600, (3200, 6400)
Auto ISO adjust Max ISO & Min shutter speed selectable No Max & Min ISO selectable Max & Min ISO selectable
Shutter speed 30 - 1/8000 sec 30 - 1/8000 sec 60 - 1/8000 sec 30 - 1/8000 sec
Shutter life 150,000 exposures 100,000 exposures 150,000 exposures 100,000 exposures
Continuous rate (high) 6.0 fps (8.0 fps with battery grip) 6.5 fps 5.0 fps 5.0 fps
Continuous buffer • 100 JPEG Norm
• 17 RAW • 75 JPEG
• 17 RAW • ?? JPEG
• 19 RAW • Unlimited JPEG
• 18 RAW / 25 cRAW
White balance • 7 presets
• Color temp (K)
• Manual (4 mem.) • 6 presets
• Color temp (K)
• Manual • 7 presets
• Color temp (K)
• Manual (4 mem.) • 6 presets
• Color temp (K)
• Manual (3 mem.)
Image parameters • 4 presets
• Saturation +/- 3, A
• Contrast +/- 3, A
• Brightness +/- 1
• Hue +/- 3
• Sharpness 0-9, A
• Quick adjust +/- 2
• 6 presets / 3 user
• Saturation +/- 4
• Contrast +/- 4
• Color tone +/- 4
• Sharpness 0-7
• 5 presets / 1 user
• Saturation +/- 2
• Contrast +/- 2
• Sharpness +/- 2
• Gradation (3) • 13 presets / 3 user
• Saturation +/- 3
• Contrast +/- 3
• Brightness +/-3
• Sharpness +/- 3
• Zone -1 to +2
Noise reduction control 4 levels 1 additional level 4 levels 3 levels
DR / Shadow adjust. Active D-Lighting (4 levels) None Shadow adjustment DRO (3 modes plus 5 manual settings)
Built-in flash • Manual pop-up
• Guide no. 12 (ISO 100) • Electronic pop-up
• Guide no. 13 (ISO 100) • Electronic pop-up
• Guide no. 13 (ISO 100) • Manual pop-up
• Guide no. 12 (ISO 100)
External flash • Hot-shoe
• PC sync terminal
• Wireless flash • Hot-shoe
• PC sync terminal
• Wireless flash • Hot-shoe
• PC sync terminal
• Wireless flash • Hot-shoe
• PC sync terminal
• Wireless flash
Flash sync speed 1/250 sec (1/320 sec reduced Guide no.) 1/250 sec 1/250 sec 1/250 sec
Customizable controls • FUNC button
• FUNC+dials
• Multi-selector cent.
• Preview button
• AE-L/AF-L button
• Dials • SET button
• AF-ON button
• AE lock button
• Dials
• Fn button
• AEL/AFL button
• Dials
• Custom button
• Preview button
• AF/MF button
• AEL button
• Dials
User memories 4 via menu 3 via dial positions 2 via menu 3 via 1 dial position
Delete in record review Yes Yes No Yes
Storage CF (inc. UDMA) CF (inc. UDMA) • CF (inc. UDMA)
• xD-Picture Card • CF (inc. UDMA)
• MS Duo / Pro Duo
Viewfinder • 100% coverage
• 0.94x magnification • 95% coverage
• 0.95x magnification • 100% coverage
• 1.15x magnification • 95% coverage
• 0.9x magnification
LCD monitor • 3.0" TFT LCD
• 922,000 dots • 3.0" TFT LCD
• 230,000 dots • 2.5" TFT LCD
• 230,000 dots • 3.0" TFT LCD
• 922,000 dots
LCD articulation No No Yes (flip-out & twist) No
Top panel LCD Yes Yes Yes No
Battery 11.1 Wh 10.3 Wh 10.8 Wh 11.8 Wh
Battery status • Percentage (%)
• Shots since charge
• Battery aging 5 stages 4 stages Percentage (%)
Vertical grip Yes, MB-D10 Yes, BP-E2N, BP-E2 & WFT-E3/E3A (WiFi) Yes, HLD-4 Yes, VG-C70AM
Mirror lock-up No, exposure delay Yes, custom function Yes, 1-30 sec Yes, with self-timer
Other features • On demand viewfinder grid
• GPS record with optional cable
• Retouching • Custom 'My Menu' • RAW development
• JPEG edit • Included IR remote
Video output HDMI (up to 1080i) Composite Composite HDMI (up to 1080i)
Dimensions 147 x 114 x 74 mm
(5.8 x 4.5 x 2.9 in) 146 x 108 x 74 mm
(5.7 x 4.2 x 2.9 in) 142 x 116 x 75 mm
(5.6 x 4.6 x 2.9 in) 142 x 105 x 80 mm
(5.6 x 4.3 x 3.3 in)
Weight (no batt) 825 g (1.8 lb) 740 g (1.6 lb) 800 g (1.8 lb) 690 g (1.5 lb)
Compared to...
The choice of cameras for comparison is the same as the specification comparison on the previous page, so that's the D300 versus the Canon EOS 40D, Olympus E-3 and Sony DSLR-A700. In addition we'll add the D200 in for a relative improvement comparison over the camera it replaces.
Lenses used
For direct comparisons we always use sharp prime lenses stopped down (F8-F9 or F6.3 for the Four Thirds lens). Here we have used the Minolta 50 mm F1.4, Canon EF 50 mm F1.4, Nikon 50 mm F1.8 and Olympus 50 mm F2.0 Macro.
Studio scene comparison (JPEG)
This is our standard studio scene comparison shot taken from exactly the same tripod position. Lighting: daylight simulation, >98% CRI. Crops are 100%. Ambient temperature was approximately 22°C (~72°F).
Nikon D300 vs Nikon D200
There are a few caveats you should consider when looking at the comparison below; firstly that the D200's default sharpening is less than the D300 and secondly that the D200's base sensitivity is ISO 100 where as it is ISO 200 with the D300.
Camera settings:
Nikon D300: Nikkor 50 mm F1.8 lens, Aperture Priority, ISO 200 (default base)
JPEG Large/Fine, Manual WB, Default Parameters (Normal), Self-Timer (with exposure delay)
Nikon D200: Nikkor 50 mm F1.8 lens, Aperture Priority, ISO 100 (default base)
JPEG Large/Fine, Manual WB, Default Parameters (Normal), Self-Timer
Nikon D300
Nikon D200
360docimg_546_360docimg_547_
4.4 MB JPEG (4288 x 2848)
4.2 MB JPEG (3872 x 2592)
360docimg_548_360docimg_549_
Firstly you can see the improvement in edge sharpness and texture definition gained from the slightly stronger sharpening employed by the D300. You can also see an improvement in the level and definition of detail thanks to two more megapixels (which equates to just 256 additional vertical lines). Tone and color balance are very similar, the D300 perhaps just a little more saturated, especially reds.
Studio scene comparison (JPEG)
This is our standard studio scene comparison shot taken from exactly the same tripod position. Lighting: daylight simulation, >98% CRI. Crops are 100%. Ambient temperature was approximately 22°C (~72°F).
Nikon D300 vs. Canon EOS 40D
Camera settings:
Nikon D300: Nikkor 50 mm F1.8 lens, Aperture Priority, ISO 200
JPEG Large/Fine, Manual WB, Default Parameters (Normal), Self-Timer (with exposure delay)
Canon EOS 40D: Canon EF 50 mm F1.4 lens, Aperture Priority, ISO 100
JPEG Large/Fine, Manual WB, Default Parameters (Standard), Self-Timer (with MLU)
Nikon D300
Canon EOS 40D
360docimg_550_360docimg_551_
4.4 MB JPEG (4288 x 2848)
3.2 MB JPEG (3888 x 2592)
360docimg_552_360docimg_553_
As with the D200 on the previous page the Canon EOS 40D comes to this comparison with a two megapixel (256 vertical lines) deficit, however it does appear to stand its ground a little better (helped somewhat by slightly stronger sharpening)*. The D300 does eke out a little more detail in some areas of the image and there's definitely a feeling of more natural texture response on the Baily's label crop (second from bottom). Overall however apart from the base sharpening differences there's not a huge amount between these two cameras and certainly in print it would be very difficult to pick a clear winner.
* The difference in sharpening with the D300 is not as significant as it was with the D200. If you prefer your images sharper (although obviously with the risk of sharpening halos) you can turn sharpening up to 4 or 5 from the default of 3, for comparison download links are below.
Also available
Nikon D300 JPEG, sharpening 4 (4.4 MB)Nikon D300 JPEG, sharpening 5 (4.6 MB)
Studio scene comparison (JPEG)
This is our standard studio scene comparison shot taken from exactly the same tripod position. Lighting: daylight simulation, >98% CRI. Crops are 100%. Ambient temperature was approximately 22°C (~72°F).
Nikon D300 vs. Sony DSLR-A700
Camera settings:
Nikon D300: Nikkor 50 mm F1.8 lens, Aperture Priority, ISO 200
JPEG Large/Fine, Manual WB, Default Parameters (Normal), Self-Timer (with exposure delay)
Sony DSLR-A700: Minolta 50 mm F1.4 lens, Aperture Priority, ISO 200
JPEG Large/Fine, Manual WB, Default Parameters (Standard), Self-Timer (auto MLU)
Nikon D300
Sony DSLR-A700
360docimg_554_360docimg_555_
4.4 MB JPEG (4288 x 2848)
3.5 MB JPEG (4272 x 2848)
360docimg_556_360docimg_557_
If you've read ourSony DSLR-A700 review you may already have seen this comparison. Both cameras have twelve megapixels, both have the same vertical pixel count, the D300 has 16 extra horizontal columns but that makes no difference. A quick scan down these crops indicates that there's very little difference in absolute image quality apart from perhaps slightly more low contrast ('texture') detail from the D300 and a very slightly more conservative approach to sharpening.
Studio scene comparison (JPEG)
This is our standard studio scene comparison shot taken from exactly the same tripod position. Lighting: daylight simulation, >98% CRI. Crops are 100%. Ambient temperature was approximately 22°C (~72°F).
Nikon D300 vs. Olympus E-3
Camera settings:
Nikon D300: Nikkor 50 mm F1.8 lens, Aperture Priority, ISO 200
JPEG Large/Fine, Manual WB, Default Parameters (Normal), Self-Timer (with exposure delay)
Olympus E-3: Olympus 50 mm F2.0 Macro lens, Aperture Priority, ISO 100
JPEG Large/Fine, Manual WB, Default Parameters (Natural), Self-Timer (with MLU)
Nikon D300
Olympus E-3
360docimg_558_360docimg_559_
4.4 MB JPEG (4288 x 2848)
4.5 MB JPEG (3648 x 2736)
360docimg_560_360docimg_561_
Because of the difference in aspect ratio between the Olympus E-3 and the D300 there isn't a huge vertical pixel count difference (just 112 lines) despite the two megapixel deficit, what's lost are to the left and right of the scene (and we frame these studio comparisons vertically). The E-3 produces very nice sharp images with plenty of low contrast detail (texture) and pretty good per pixel sharpness (we should note that the Olympus 50 mm F2.0 macro is a very sharp lens and may help a little here). As we have noted in both our E-3 and DSLR-A700 reviews you should perhaps compare the E-3's handling of highlights on the paperclips versus the D300.
Studio scene comparison (RAW)
For a (more) level playing field for comparison we also shot our studio scene in RAW mode with each camera and converted it using Adobe Camera RAW. Because Adobe Camera RAW applies different levels of sharpening to different cameras (this confirmed) we had to use the following workflow for these conversions:
Load RAW file into Adobe Camera RAW (Auto mode disabled) Set Sharpness to 0 (all other settings default) Open file to Photoshop Apply a Unsharp mask: 80%, Radius 1.0, Threshold 0 Save as a TIFF (for cropping) and as a JPEG quality 11 for download
This is our standard studio scene comparison shot taken from exactly the same tripod position. Lighting: daylight simulation, >98% CRI. Crops are 100%. Ambient temperature was approximately 22°C (~72°F). Camera settings as per previous pages.
Nikon D300 (RAW) vs. Canon EOS 40D (RAW)
Nikon D300 (RAW)
Canon EOS 40D (RAW)
360docimg_562_360docimg_563_
3.7 MB JPEG (4288 x 2848)
3.1 MB JPEG (3888 x 2592)
360docimg_564_360docimg_565_
Switching to a standard RAW converter (in this case our benchmark; Adobe Camera RAW) means that the image processing pipeline is equalized between the cameras. Both cameras gain from the use of ACR with images looking considerably sharper and better detailed than their JPEG equivalents. There is now a more obvious advantage to the D300, better defined areas of fine detail and more texture, although as previously mentioned you would need to be outputing at a very large size for these differences to be noticeable.
Studio scene comparison (RAW)
See previous page for RAW conversion notes.
This is our standard studio scene comparison shot taken from exactly the same tripod position. Lighting: daylight simulation, >98% CRI. Crops are 100%. Ambient temperature was approximately 22°C (~72°F). Camera settings as per previous pages.
Nikon D300 (RAW) vs. Sony DSLR-A700 (RAW)
Nikon D300 (RAW)
Sony DSLR-A700 (RAW)
360docimg_566_360docimg_567_
3.7 MB JPEG (4288 x 2848)
3.4 MB JPEG (4272 x 2848)
360docimg_568_360docimg_569_
Using a RAW conversion workflow there really is almost no difference between the DSLR-A700 and the Nikon D300, not hugely surprising as we suspect they share the same sensor (or at least very similar).
Studio scene comparison (RAW)
See previous page for RAW conversion notes.
This is our standard studio scene comparison shot taken from exactly the same tripod position. Lighting: daylight simulation, >98% CRI. Crops are 100%. Ambient temperature was approximately 22°C (~72°F). Camera settings as per previous pages.
Nikon D300 (RAW) vs. Olympus E-3 (RAW)
Nikon D300 (RAW)
Olympus E-3 (RAW)
360docimg_570_360docimg_571_
3.7 MB JPEG (4288 x 2848)
2.8 MB JPEG (3648 x 2736)
360docimg_572_360docimg_573_
As we have noted previously the E-3's RAW converted images actually look less sharp than JPEG, this is probably down to a stronger anti-alias filter which is compensated for by the camera processor with more sharpening. Using this comparison we can surmise that the D300 has a much lighter anti-alias filter which makes it easier to extract detail (less sharpening is required) with the compromise of potentially visible moire (although none is visible here).
Studio scene comparison (higher sensitivities)
Nikon's approach to noise reduction has always been chroma (color) noise reduction first, then relatively mild amounts of luminance noise reduction. This tends to leave its high sensitivity images looking more detailed but with potentially more visible luminance 'grain' noise (which isn't generally as objectionable as the more digital-like blotchy color noise).
ISO 1600
360docimg_574_360docimg_575_
Nikon D300 Canon EOS 40D
360docimg_576_360docimg_577_
Sony DSLR-A700 Olympus E-3
ISO 3200
360docimg_578_360docimg_579_
Nikon D300 Canon EOS 40D
360docimg_580_360docimg_581_
Sony DSLR-A700 Olympus E-3
ISO 6400
360docimg_582_360docimg_583_
Nikon D300 Sony DSLR-A700
Resolution Chart Comparison
Shots here are of our 'version two' resolution chart which provides for measurement of resolution up to 4000 LPH (Lines Per Picture Height). A value of 20 equates to 2000 lines per picture height. For each camera the relevant prime lens was used. The chart is shot at a full range of apertures and the sharpest image selected. Studio light, cameras set to aperture priority (optimum aperture selected), image parameters default. Exposure compensation set to deliver approximately 80% luminance of white area.
360docimg_584_360docimg_585_
Nikon D300 (3.3 KB; 12 MP)Canon EOS 40D (2.6 MB, 10 MP)
360docimg_586_360docimg_587_
Sony DSLR-A700 (2.6 MB, 12 MP)Olympus E-3 (3.3 MB; 10 MP)
360docimg_588_360docimg_589_
Nikon D300 Canon EOS 40D
360docimg_590_360docimg_591_
Sony DSLR-A700 Olympus E-3
360docimg_592_360docimg_593_
Nikon D300 Canon EOS 40D
360docimg_594_360docimg_595_
Sony DSLR-A700 Olympus E-3
360docimg_596_360docimg_597_
Nikon D300 Canon EOS 40D
360docimg_598_360docimg_599_
Sony DSLR-A700 Olympus E-3
Measurable results
Camera Measurement Absolute
resolution
Extinction
resolution
Nikon D300 Horizontal LPH 2200 2600
Vertical LPH 2100 2600
Canon EOS 40D Horizontal LPH 2100 2300
Vertical LPH 1800 2300
Sony DSLR-A700 Horizontal LPH * 2200 2900
Vertical LPH 2100 2800
Olympus E-3 Horizontal LPH * 2100 2400
Vertical LPH * 1800 2200
* Moire is visible
+ Chart maximum
LPH Lines per Picture Height (to allow for different aspect ratios the measurement is the same for horizontal and vertical)
Absolute resolution
Point at which all lines of a resolution bar are still visible and defined, beyond this resolution loss of detail occurs (below Nyquist frequency).
Extinction resolution Detail beyond camera's definition (becomes aliased)
As you can see from the figures (and crops) above there really is very little difference between ten and twelve megapixels, however the sensor design (anti-alias filter strength), imaging pipeline (demosaicing, sharpening) have a much more significant effect that megapixels alone. The D300's image is the cleanest here with no noticeable moire and almost invisible sharpening artifacts. The DSLR-A700 delivers as much absolute resolution and manages to delve a bit deeper beyond nyquist (to extinction resolution) but seemingly at the expense of some visible moire.
Conclusion - Pros
Very good resolution and detail without looking over-processed, even up to ISO 1600 Better balanced noise reduction than most; more chroma NR, less luminance NR High ISO 3200 perfectly usable (if slightly softer due to NR), ISO 6400 usable for small output Highly configurable Auto ISO function (can set maximum ISO and minimum shutter speed) Conservative approach to image processing (slightly lower sharpening) helps to avoid 'digital' artifacts Excellent dynamic range from ISO 200 - 800 (good highlight 'reach'), typical at ISO 1600 Seldom mentioned built-in chromatic aberration reduction is very effective (JPEG, RAWs through NX) Compact, solid body design with environmental sealing Quality glass pentaprism viewfinder (bright, large view) with electronic grid lines Professional in-use performance (instant power-up, short shutter lag and short viewfinder black-out) Improved auto-focus module (Multi-CAM3500DX) delivers fast and accurate AF lock even in low light Auto-focus fine-tuning by body or per lens Nikon's excellent 1005 pixel RGB metering sensor Numerous 'hidden' designed-in features; AF tracking by color, scene recognition system High speed continuous shooting (6 fps) can be boosted to 8 fps with grip & battery 150,000 exposure shutter life Now Nikon standard range of image parameter presets, addition of brightness adjustment Superb large, high resolution LCD (delivers full-color VGA; 640xRGB x 480) Live view with up to 1:1 pixel view, contrast detect AF as well as passive (mirror flip) AF HDMI video output (up to 1080i) Compact Flash UDMA support, very fast throughput overall Menu system is a pleasure to use, attractive, logical and built-in help Easy to use playback with very logical delete system (press delete button twice) Highly configurable via custom functions (6 configurable hard buttons / dials) Sophisticated interval timer feature Unique in-camera features: Overlay, Multiple exposures GPS data recording feature (requires optional cable, NMEA compatible) Built-in AF assist lamp (white light) Probably the best battery information display in the business (% charge, shots, aging) Optional wireless WiFi transmitter (802.11 b/g)
Conclusion - Cons
No timed mirror lock-up function (could be automatic with self-timer) Non-articulating LCD (increases the usefulness of Live View considerably) Average automatic white balance performance, still very poor under incandescent light
Overall conclusion
The D200 was a big step forward for Nikon, the 'baby D2X' certainly gave the competition a thing or two to think about. Its big problem was the fact that Canon was still a generation ahead in the noise stakes, managing to consistently deliver clean images despite megapixel jumps. With the advent of the D300 however Nikon has conclusively removed this disparity and if anything stepped ahead of Canon (mostly thanks to its chroma based noise reduction delivering more film-like grain rather than color blotches).
But that's just one aspect of the D300 story, almost everything else about this camera has been improved. Starting on the outside there's that stunning high resolution three inch LCD monitor, the usefulness of which shouldn't be underestimated (you'll find you get enough detail without magnifying as far), there's perhaps the best implementation of Live View to date with both contrast detect (like a compact camera, although not particularly fast) and passive auto-focus options, and there's HDMI output; a boon no doubt to studio photographers who can now provide live high resolution previews of a shot. And of course we can't talk about the D300 without giving Nikon credit for the superb build quality and robust 'go anywhere' feel the body has.
On the inside Nikon has worked hard to deliver both better image quality and better performance; you get usable images up to ISO 3200, extended image parameter control, improved dynamic range, automatic CA removal (which immediately improves the performance of all your lenses), six frames per second continuous shooting (eight with the grip / battery combo), a new AF sensor, AF tracking by color and scene recognition. There are also an almost infinite range of customization options available, everything from how many AF areas are used to the size of the center-weighted metering circle to what happens when you hold the FUNC button and turn the command dial.
My biggest problem writing this conclusion has been picking out the D300's weak points. The usefulness of Live View would certainly be improved with an articulating LCD monitor (although I'm sure Nikon would argue that this could compromise the integrity of the body), auto white-balance is poor in artificial light (although this isn't anything unique to the D300) and there's still no true mirror lock-up feature. But really, these few niggles are really the only things we could pick out as criticism.
There is price, but sometimes the best products demand a premium and the D300 is no exception. Nikon's biggest problem now will be bettering the D300; it raises the bar to a new high, and represents the state of the art despite strong competition from the likes of Canon, Sony and Olympus. There's simply no better semi-professional digital SLR on the market.
Detail (D-SLR) Rating (out of 10)
Build quality 9.5
Ergonomics & handling 8.5
Features 9.5
Image quality 9.0
Performance (speed) 9.5
Value 9.0
Highly Recommended
360docimg_600_
Want to make sure you don't miss out on any future articles?Sign up for our free weekly newsletter!
Enter the 'Nikon D300/D200/D100 Talk' Discussion Forum
Samples Galleries
There are 36 images in the samples gallery. Please do not reproduce any of these images on a website or any newsletter / magazine without prior permission (see ourcopyright page). We make the originals available for private users to download to their own machines for personal examination or printing (in conjunction with this review), we do so in good faith, please don't abuse it.
Unless otherwise noted images taken with no particular settings at full resolution. A reduced size image (within 1024 x 1024 bounds) is provided to be more easily viewed in your browser. As always the original untouched image is available by clicking on this reduced image.
360docimg_601_
Nikon D300 Samples Gallery - Posted 12 March 2008
Nikon D300 Review
Nikon Coolpix S700 Review - PhotographyBLOG
Nikon D300 美图欣赏[快乐图片]
Nikon AF-S 35mm F1.8G DX Lens Review: 1. Intr...
REVIEW守则
nikon镜头
Nikon 美女
nikon 相机图谱——怀念nikon,
chemical drawing programs review
Review: Google Mini 2.2
El Norte Review
Film Review: Tony Manero
Review: Power of 2
【原汁原味50片】尼康 D300
【尼康摄影讲堂】尼康 D300
nikon镜头标记含义
nikon镜头全部
nikon 相机图谱
chemical drawing programs review 2.
Review:The Da Vinci Code
REVIEW OF CALL RESEARCH PERSPECTIVES
Enabling Mobile Learning (EDUCAUSE Review) | ...
Film Review: El Norte essays
Canon EOS 50D Review